The stakes are higher than usual at this year’s WWDC. Major Apple Intelligence features the company teased at last year’s conference are stalled out, the company got a stern talking-to from a federal judge a couple of months ago over its App Store policies, and then there’s everything going on with tariffs. It’s not an entirely enviable position, but the show goes on.
Will it be enough to distract from the Apple Intelligence train wreck? Will Tim Cook apologize onstage for getting out over his AI skis? Probably not, but it sure will be an interesting show this year.
Welcome to the next episode in our GitHub for Beginners series, where we’re diving into the world of GitHub Copilot. This is our eighth and final episode, and it’s been quite a journey. We’ve covered a lot of different topics showcasing the power of GitHub Copilot, and you can check out all our previous episodes on our blog or as videos.
Today we’re covering that important step of code review—getting a second pair of eyes on your code. This can help catch bugs, improve code quality, and ensure consistency. We’ll also talk about refactoring code—restructuring existing code without changing its functionality. This can make things more efficient or more readable for those who need to understand it later (even if that’s yourself).
In any development project, maintaining a clean and efficient codebase is crucial to make future work easier. But in reality, things can quickly become messy as you’re focused on making it work. That’s where Copilot can come in handy. It doesn’t just assist you in writing code, it also makes the review and refactoring process smoother and more efficient.
Refactoring code
Suppose that you have a function that is long and difficult to understand. Refactoring code can make it easier to understand and ensure pieces of it aren’t too unwieldy to follow.
To use GitHub Copilot to help you with this refactoring task, open up Copilot Chat and do the following:
Highlight the function you want to refactor in your code editor.
In Copilot Chat, send the prompt please provide refactoring suggestions.
Review the changes that Copilot suggests. It might break the code up into smaller pieces or optimize the logic for better performance. It might even update variable names to be aligned with your naming conventions.
Once you’re comfortable with the suggested changes, click the Apply in editor button to apply the changes and have Copilot automatically update the file.
This works well for small changes, but there’s no reason to stop there. This is just if you want to focus Copilot’s attention on a specific area of your code. You can also have it look across entire files or your project. For example, take a look at this dashboard component. Let’s say you want to improve it.
To do so, open up the component in your editor and send Copilot Chat the following prompt:
How can I improve this code?
Copilot will then give several suggestions on ways the code can be improved. You can review these suggestions and even ask Copilot to explain each step in greater detail. When you’re finished, click the Apply in editor button to have Copilot make the necessary changes.
To see this in action, check out the video version of this episode. Just remember that since Copilot is a generative AI tool, the suggestions you see might not match those in the video exactly.
You can take this a step further by asking specific and direct questions. For example, you might want to make the data fetching logic reusable across components by creating a custom hook and centralizing the logic. To do this, create a new chat conversation and ask it the following:
How can I extract the data fetching logic into a custom hook?
Copilot generates refactored code that allows you to extract the logic out of the Dashboard component into a new hook directory that you can use in multiple components in the app. This makes it much more reusable! To follow through on this:
Save the changes in a new file by selecting … > Insert into New File.
Import the hook into the dashboard file.
Remove the old code.
Now what if you wanted Copilot to take a look and make sure you didn’t have a bunch of redundant code in your file? Just ask it.
Is there any redundant code in this file?
Copilot scans your code and identifies any redundancies that can be corrected. After reviewing the suggestions, go ahead and apply them to tighten up your code and make it a bit cleaner.
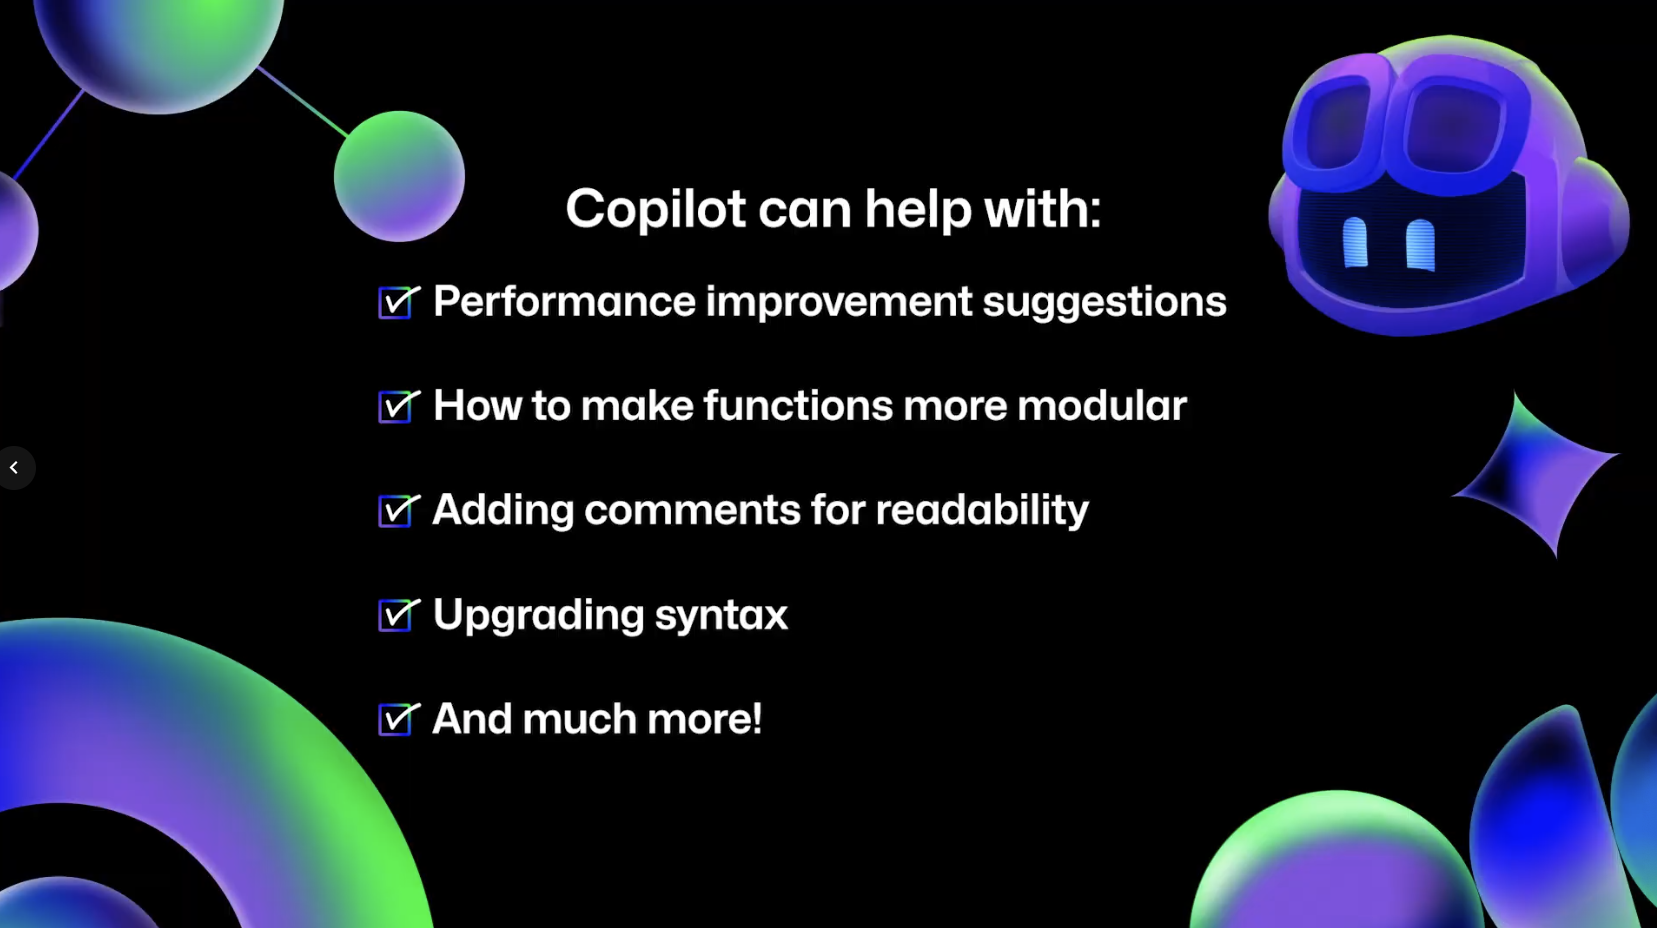
Reviewing and refactoring your code with GitHub Copilot is a great way to do an initial overview of the work you’ve done. You can also ask Copilot for performance improvement suggestions, how to make functions more modular, have it add comments, or upgrade syntax to be more modern. If you can think of a question, ask Copilot and see what it can do.
Code reviews in github.com
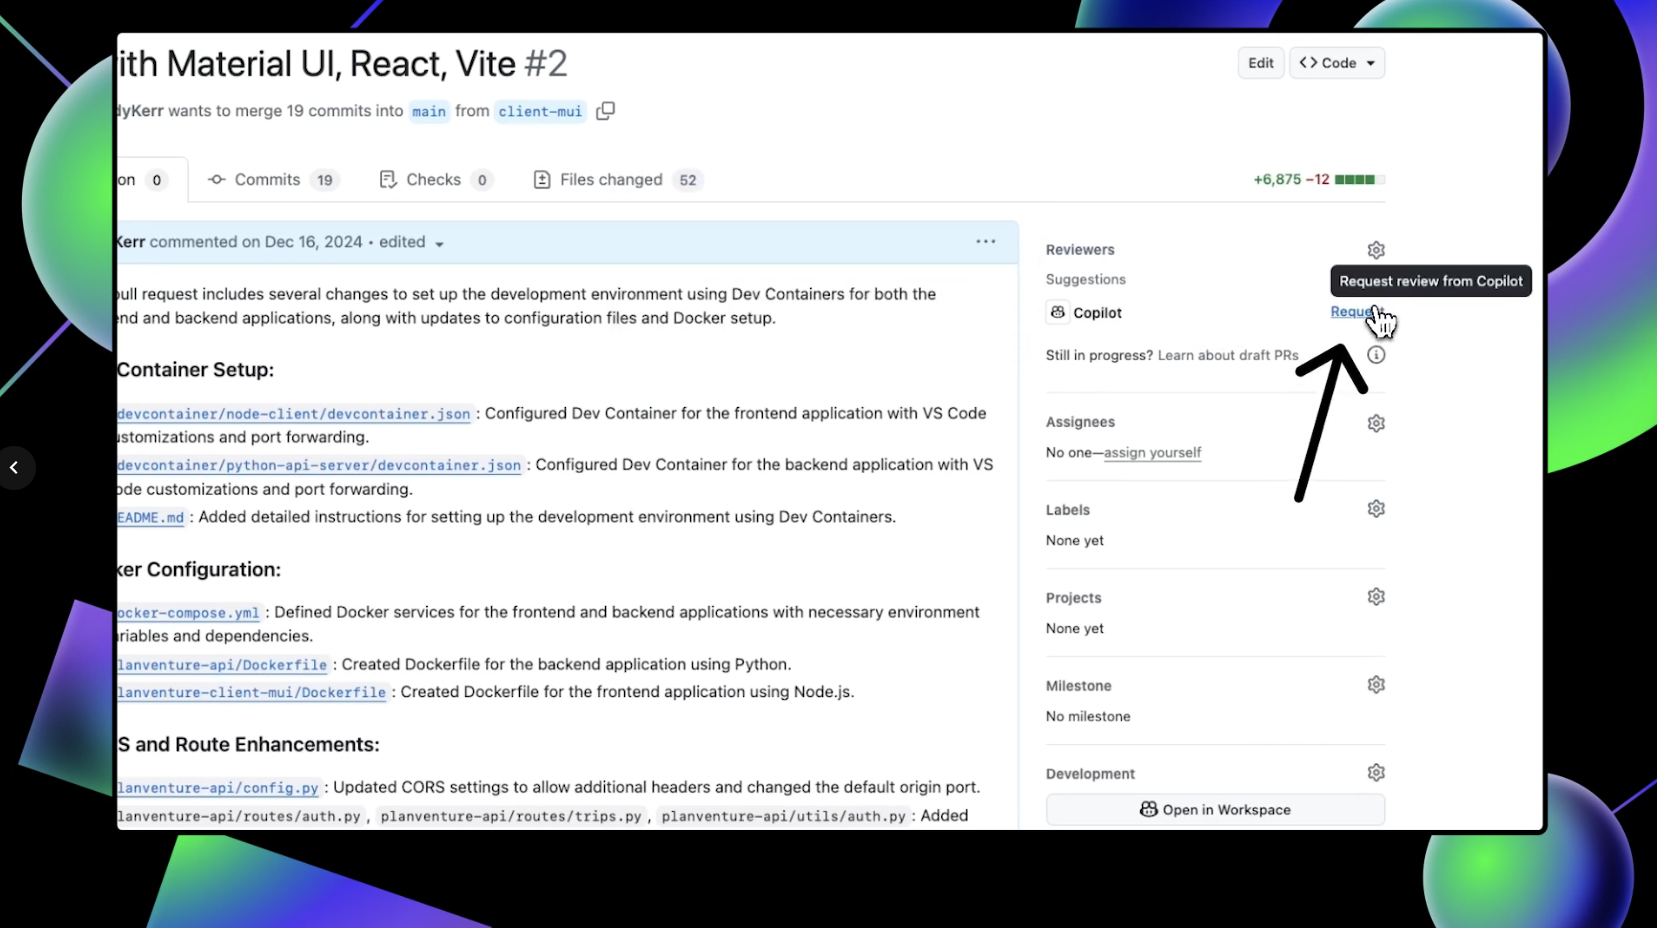
If you have the proper access, you can also get GitHub Copilot code reviews directly on github.com to make the process even more seamless. First, open up a pull request. Under the “Reviewers” section in the top-right corner, you’ll notice Copilot listed as a possible reviewer. Click Request to have Copilot review your code.
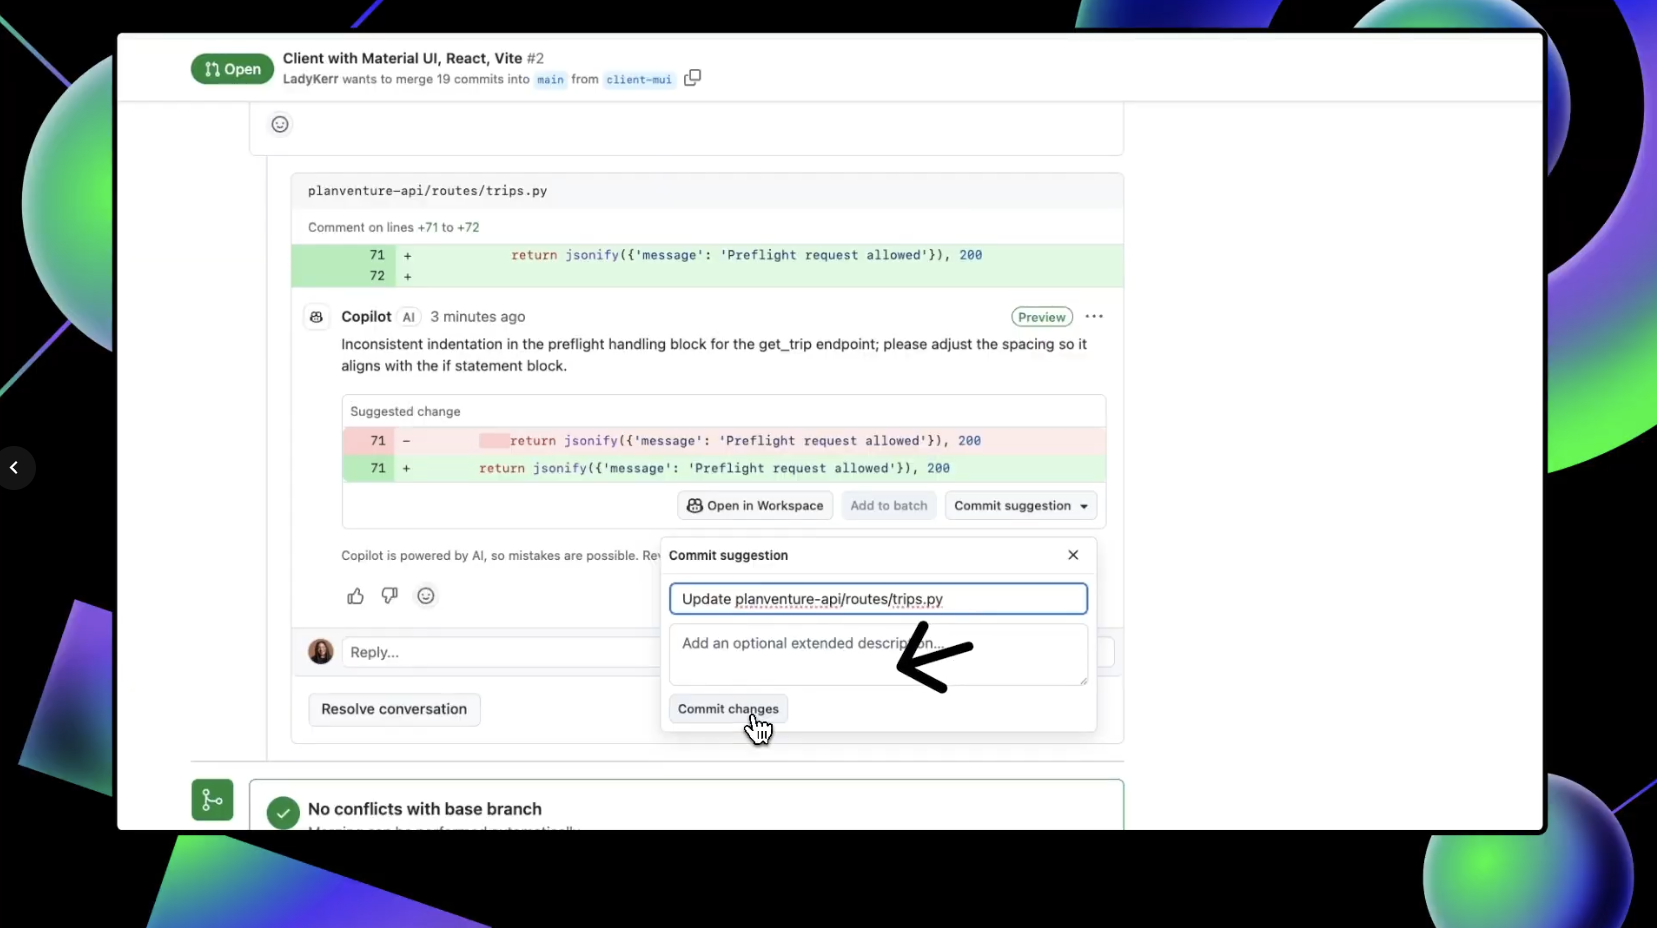
Once Copilot finishes the review, scroll down on the pull request to see any suggestions that it makes. It’s important to note that Copilot always leaves a Comment review, and never an Approve or Request changes review. This means that Copilot’s reviews will never be required nor block merges.
To accept any of Copilot’s suggestions, click Commit suggestion at the bottom of the specific suggestion you’d like to integrate. This pulls up a context menu. Click Commit changes and GitHub will update your pull request with that change.
You can also batch several suggested changes by clicking the Add to batch button under individual suggestions so they are pulled into one change.
After you’ve integrated any suggestions and made any changes, you can request another review from Copilot by clicking the circular arrows in the “Reviewers” box next to Copilot’s name.
With Copilot code review, you can have Copilot perform a preliminary review of your code before asking your team for that final code review.
Key components and limitations
The key components of using Copilot for code review and refactoring can be broken down into five areas:
Automated suggestions: Copilot suggests improvements and optimizations as you review your code.
Consistency checks: Copilot helps maintain coding standards by suggesting consistent naming conventions and structures for your functions.
Refactoring assistance: Copilot provides actionable refactoring suggestions, whether it’s simplifying complex functions or reorganizing your codebase.
Error detection: Copilot can spot potential bugs or inefficiencies that you might have missed while building.
Comment support: Copilot helps generate clear comments in your code, making it easier to understand for others.
While GitHub Copilot can do a lot, it’s important to keep in mind that you are the pilot, and we call it Copilot for a reason. It’s a powerful tool, but it does have some limitations. First and foremost, it relies on the context you provide, so unclear or poorly documented code might lead to less effective suggestions.
In addition, while Copilot can catch many issues, it’s not a substitute for a thorough human review. Always double check the suggestions it provides to ensure they align with your project’s goals and standards, as well as your organizational policies.
Your next steps
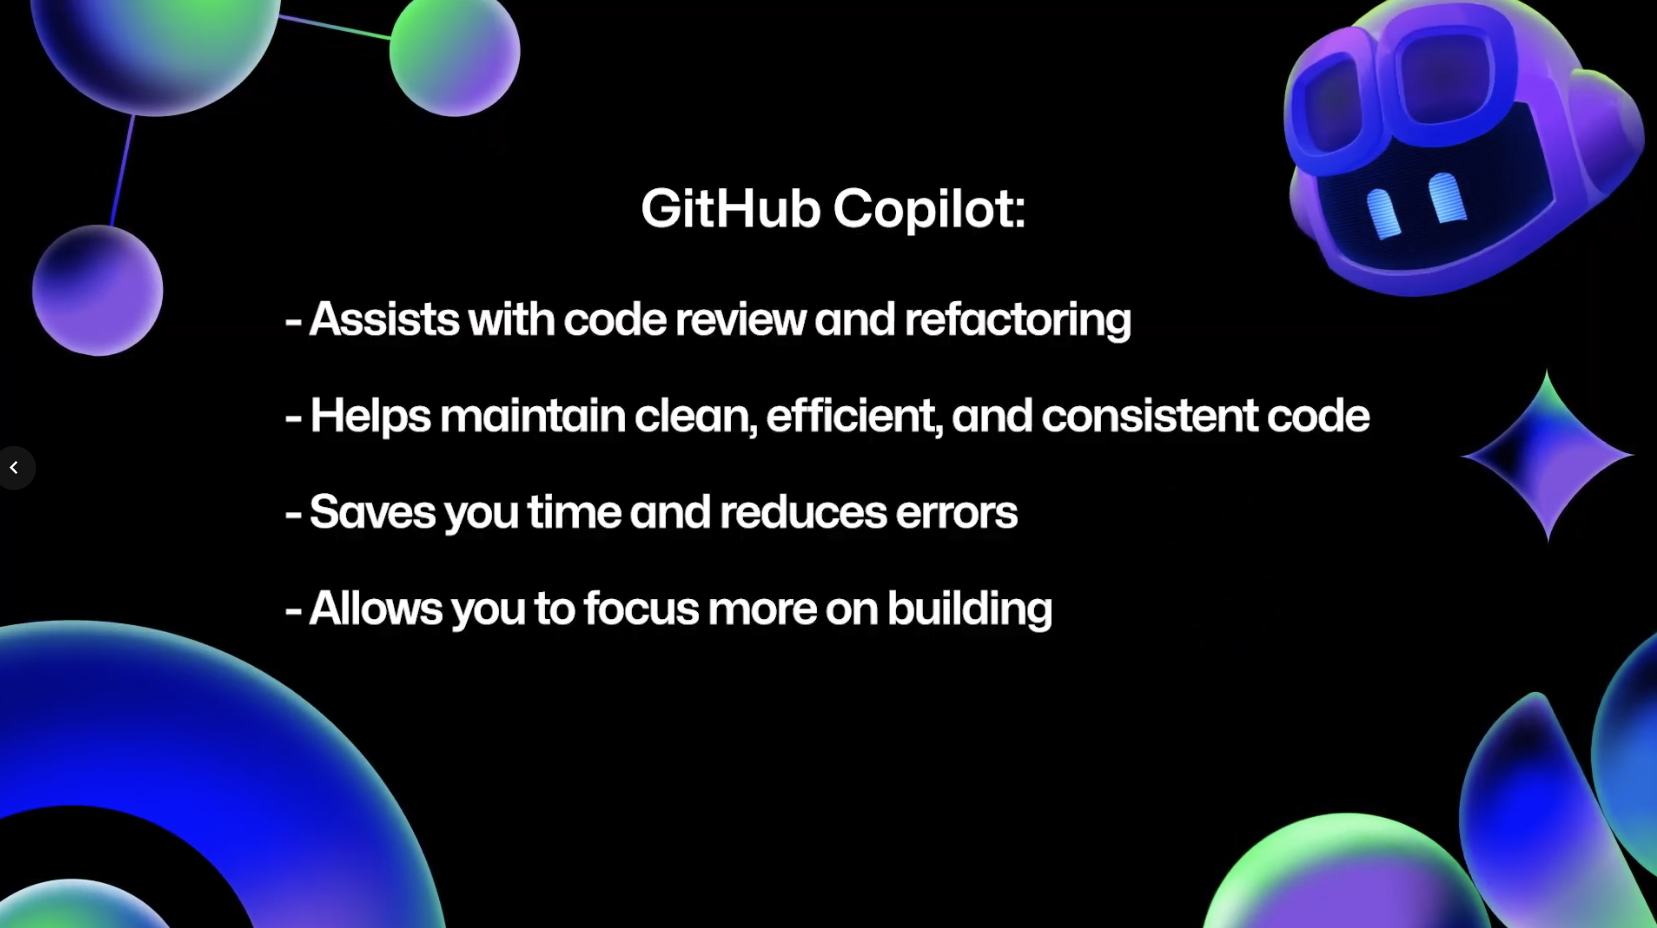
GitHub Copilot is an invaluable assistant for code review and refactoring. It helps you maintain clean, efficient, and consistent code, saving you time and reducing errors. By integrating Copilot into your workflow, you can focus more on building great features and less on the nitty-gritty aspects of code maintenance.
If you’d like to dive a little deeper into using Copilot to help with code reviews and refactoring, here are some links to get you started:
Don’t forget that you can use GitHub Copilot for free! If you have any questions, pop them in the GitHub Community thread, and we’ll be sure to respond. Thanks so much for joining us for this season of GitHub for Beginners! Don’t forget to check out our previous episodes if you haven’t already.
Happy coding!
Need some help getting through a preliminary code review? Give GitHub Copilot a try!
At the heart of this post is Kairos IMS, an innovative Impact Management System designed to empower human-serving nonprofits and social impact organizations. Co-developed by the Urban League of Broward County and our trusted technology partner, Impactful, Kairos IMS reduces administrative burdens, enhances holistic care, and enables organizations to leverage data for increased agility and seamless service delivery. In this blog series, we’ll take a closer look at the powerful technologies that fuel Kairos IMS, from Azure services to security frameworks, offering insight into how modern infrastructure supports mission-driven impact. Click here to learn more.
Azure App Service is a powerful platform for building, deploying, and scaling web apps. It supports multiple languages and frameworks, making it a versatile choice for developers. In this guide, we'll walk you through the process of deploying a web app on Azure App Service.
Step 1: Prerequisites
Before you start, ensure you have the following:
An Azure account with an active subscription. If you don't have one, you can create a free account.
Your web app code ready for deployment.
Visual Studio or any other development environment you prefer.
Step 2: Create an App Service
Log in to the Azure Portal: Go to portal.azure.com and sign in with your Azure account
Create a Resource: Click on "Create a resource" and select "Web App."
Creating Your Web App:
Subscription: Choose your subscription.
Resource Group: Select an existing resource group or create a new one.
App Name: Enter a unique name for your app.
Publish: Choose "Code" if you're deploying code directly, or "Docker Container" if you're using a container.
Runtime Stack: Select the runtime stack that matches your web app (e.g., .NET, Node.js, Python).
Region: Choose the region closest to your users.
Pricing Plans: When creating your Web App, Azure will also ask you to create or select an App Service Plan, which defines the pricing tier and performance level for your app.
Finish the steps and click "Review + create."
4. Completing Deployment: You will see a message letting you know your deployment is complete.
Step 3: Deploy Your Web App
Deployment Center: Once your deployment is complete, click on "Go to Resources" and navigate to the "Deployment Center" in your App Service.
Source Control: Choose your source control method (e.g., GitHub, Bitbucket, Azure Repos).
4. Configure Settings: Follow the prompts to configure your deployment settings. This includes connecting your repository and setting up continuous integration/continuous deployment (CI/CD) pipelines.
Deploying a web app on Azure App Service is a streamlined process that integrates well with various development tools and workflows. By following these steps, you can easily deploy, monitor, and scale your web app, ensuring a robust and reliable online presence.
Microsoft continues to refine the Outlook experience, delivering thoughtful enhancements that boost organization, productivity, and collaboration. Whether you're using the new Outlook for Windows or the Outlook Web App, these features are designed to help you work smarter—not harder.
Here’s a roundup of the new features from April and May 2025 that you’ll want to explore:
📅 Calendar & Event Management Upgrades
🗑️ Auto-Delete Meeting Invites After Responding
Tired of calendar clutter? You can now automatically delete meeting invites from your inbox once you’ve responded.
How to Enable:
Go to Settings (⚙️ icon)
Navigate to Calendar > Events and invitations > Invitations from other people
Toggle the “Delete invitations from Inbox after responding” option
🔔 Background Calendar Event Notifications
Stay on schedule even when Outlook isn’t open. With background event notifications, you’ll receive alerts on your desktop or lock screen, ensuring you never miss a meeting.
📨 Email Management Enhancements
💾 Save Emails as .MSG Files
You can now save individual emails as .msg files by right-clicking them in your inbox and selecting Save as > Save as MSG. This is great for archiving or sharing emails while preserving their original formatting.
🤝 Share Emails to Microsoft Teams
Email-to-Teams integration just got easier. Share any email—including attachments—directly to a Teams chat or channel without leaving Outlook. Perfect for fast collaboration!
🗂️ Smarter Folder & Category Controls
📁 Reorder Folders with Drag and Drop
You’re no longer stuck with alphabetical order. This update lets you drag and drop folders into whatever order makes sense for your workflow.
Tip: Organize by priority or frequency of use to boost productivity.
🎨 Add Some Color: Custom Folder Icons
Give your folders a fresh look with custom folder icon colors! This update makes it easier to visually organize and differentiate your folders at a glance.
Whether you color-code by project, urgency, or department, this update is perfect for visual thinkers.
How to Change Folder Color:
Right-click a folder
Choose “Change folder icon color”
Select your preferred color
📌 Pin Your Favorites to the Top
Keep your most-used folders within reach by pinning them to the top of the Left Navigation Bar. It’s a small tweak with big impact—your go-to folders are now always just a click away.
How to Pin a Folder:
Right-click any folder > Select “Pin to top”
"None" as a Category – More Control, Cleaner View
Sometimes, less is more. You can now assign a "None" color category to emails and calendar events, giving you better control over what stands out—and what doesn’t.
This is perfect if:
You want to declutter without deleting
You use color sparingly for higher impact
🔄 Delegation & Archive Improvements
🧑💼 Category Management for Delegates
Delegates can now create and apply new calendar categories on behalf of the person who granted them access. This streamlines meeting organization and avoids back-and-forth on color codes and labels.
🗃️ Group Messages as a Conversation in PST Files
You can now view emails saved in .pst files in a conversation-style format. This makes archived content easier to follow and manage.
Conclusion
From visual customization to smarter calendar tools and seamless collaboration, Outlook’s April and May 2025 updates are full of features designed to help you do more with less effort. Whether you're streamlining your workflow, organizing folders your way, or collaborating more efficiently, these updates are worth exploring.
Something about vuln exploitation vs credential abuse in today’s breaches–what’s driving the shifts we’re seeing? DBIR
Are we at peak ransomware? Will ransomware be here in 20 years? Will we be here in 20 years talking about it?
How is AI changing the breach report, other than putting in hilarious footnotes about how the report is for humans to read and and is written by actual humans?


 Meet the 20 organizations using generative AI to address tough societal issues.