Ryan welcomes Simone Kalmakis, VP of Engineering at Viam, to dive into how her team is bridging the gap between software and robotics, the importance of abstraction layers in making robotics more accessible, and the real-world applications of robotics from lobster traps to industrial sanding robots.

|
Sr. Content Developer at Microsoft, working remotely in PA, TechBash conference organizer, former Microsoft MVP, Husband, Dad and Geek.
|

Pennsylvania, USA

In this episode of Armchair Architects, part of the Azure Essentials Show, Uli, Eric, and David explore the unique challenges and considerations of governing AI agents, emphasizing how agent governance differs from traditional microservices. The discussion covers the importance of observability, evaluation, and identity in agent operations, and highlights the need for new monitoring strategies to ensure responsible, efficient, and secure deployment of AI agents within enterprise environments.
Three things you will learn
- How agent governance requires different approaches than microservice governance, focusing on cognitive monitoring and reasoning transparency.
- The role of observability and evaluation in both design-time and execution-time phases, including the use of guardrails and evaluators to ensure responsible AI behavior.
- The significance of agent identity and model routing, and how these impact security, entitlements, and operational flexibility.
Recommended next steps
- Assess your current governance models and adapt them to address the unique requirements of AI agents, especially around observability and evaluation.
- Implement robust monitoring for agent cognition, tool interactions, and memory management to ensure responsible and efficient operations.
- Prepare to integrate agent identity and model routing into your security and entitlement frameworks as you scale agent deployments.
Resources
- Key concepts - Copilot Studio security and governance https://learn.microsoft.com/microsoft-copilot-studio/security-and-governance
- Implement agentic AI safeguards https://learn.microsoft.com/azure/well-architected/ai/responsible-ai#implement-agentic-ai-safeguards
- Microsoft Purview https://learn.microsoft.com/purview
Related Episodes
- Watch more episodes of Armchair Architects https://aka.ms/ArmchairArchitects
- Watch more episodes of the Azure Essentials Show https://aka.ms/AzureEssentialsShow
Connect
- David Blank-Edelman https://www.linkedin.com/in/dnblankedelman/
- Uli Homann https://www.linkedin.com/in/ulrichhomann/
- Eric Charran https://www.linkedin.com/in/ericcharran/
Chapters
00:00 Introduction
01:05 Governing agents is not like governing microservices
02:32 Observability is needed
04:03 Think guardrails not absolutes
05:59 Identity driven
06:46 Who's asking & who's answering
07:35 Dimensions of monitoring
10:24 Performance and cost of ownership
11:03 More layers of monitoring
12:55 Performance evaluations
14:35 What's in the next episode?

Pennsylvania, USA
Show Notes – Episode #235 Drawing from years of experience, this episode has 25 things NOT to do in PowerPoint. Design things, template setup things, presenting things. This is literally decades of experience - and frustration - as Troy, Nolan and Sandy break down 25 common PowerPoint pitfalls with their top tips, [...]
Download audio: https://traffic.libsyn.com/thepresentationpodcast/TPP_e235.mp3
Download audio: https://traffic.libsyn.com/thepresentationpodcast/TPP_e235.mp3
Pennsylvania, USA
Newly minted Microsoft MVP, pentester, and returning guest Spencer Alessi joins The PowerShell Podcast to talk about growth, giving back, and building security through PowerShell. Spencer shares lessons from his journey from sysadmin to pen tester, including the importance of learning from mistakes, documenting wins, and advocating for yourself in your career. He also introduces his latest open-source project, AppLocker Inspector, and discusses tools like Locksmith, Pink Castle, and Purple Knight that help IT pros secure their environments and build confidence in automation and defense.
Key Takeaways:
- Grow through mistakes – Learn from both your own missteps and those of others; every lesson strengthens your technical and professional skills.
- Security tools for sysadmins – Free PowerShell-based tools like AppLocker Inspector, Locksmith, and Purple Knight offer practical wins for securing Active Directory.
- Advocate for yourself and give back – Track your wins, share your work, and pay forward the mentorship and generosity that helped you grow.
Guest Bio:
Spencer Alessi is a Microsoft MVP, penetration tester, and community educator passionate about helping sysadmins strengthen their environments. Known online as @TechSpence, he creates approachable content and tools focused on helping sysadmins o improve security. Spencer is also a podcast host, public speaker, and strong advocate for mentorship, authenticity, and continuous learning in tech.
Resource Links:
- Spencer on PDQ Live - https://www.youtube.com/watch?v=j33dN2bELPU
- AppLocker Inspector – https://github.com/techspence/AppLockerInspector
- Purple Knight – https://www.semperis.com/purple-knight/
- Ping Castle – https://www.pingcastle.com/download/
- Locksmith (ADCS Auditing Tool) – https://github.com/jakehildreth/locksmith
- ADeleginator – https://github.com/techspence/ADeleginator
- Spencer’s Links – https://links.spenceralessi.com
- Cyber Threat Perspective Podcast – https://offsec.blog
- Connect with Andrew - https://andrewpla.tech/links
- PDQ Discord – https://discord.gg/PDQ
- PowerShell Wednesdays – https://www.youtube.com/watch?v=lPoc8X7t0hY&list=PL1mL90yFExsix-L0havb8SbZXoYRPol0B&pp=0gcJCbAEOCosWNin
- The PowerShell Podcast on YouTube: https://youtu.be/E4ji0-rmsuA
Pennsylvania, USA
This blog post is originally published on https://blog.elmah.io/mastering-owned-entities-in-ef-core-cleaner-complex-types/
Not all data in your application should live as a standalone table with its own ID and lifecycle. Sometimes you need a tightly coupled dependent object that exists alongside its parent, like a movie's budget, a survey's questions, or a customer's address. If you had the magic to handle this data differently, you could save tons of lines and reduce Entity Framework Core (EF Core) overhead. The good news is that EF Core offers owned entities that do this. It reduces the complexities of your domain model. In this post, I will show you how to use owned entity types to maintain dependent data.

What is an owned entity?
In EF Core, an owned entity is a special type of entity that exists only within another entity and cannot stand alone in the database. Unlike other EF models, owned entities do not have their own identity, such as a primary key. Owned entities inherit the identity of their parent table. The lifecycle of owned entities also depends on the parent entity. When the owning entity is created, owned properties are made, when it is deleted, all of its owned properties are also deleted.
Key characteristics of EF Core's owned properties
EF Core owned entities possess the following characteristics:
- Owned entity types do not have a separate identity. Instead, they depend on their parents' identity.
- An owned entity's lifecycle is tied to its owner entity and cannot exist independently of it. It is created, updated, and deleted with its parent entity.
- They are stored in the same table as their owner by default. Although we create a separate class for them, they do not go to a separate table and are saved with their class prefix, like
Address_Street. - An owned entity does not have a separate
DbSetsand cannot be queried independently. - An owned entity always has a one-to-one relation with its owner entity
- You cannot reference an owned entity with another entity via a foreign key relation.
- EF change tracker tracks owned entities along with their owners, not as separate entities.
- Can encapsulate complex data types such as coordinates, addresses, and contact details.
How to use an owned entity in EF Core
I am creating a console application to see how we can implement an owned entity in an EF Core-based project.
Step 1: Create a console application
Run the following in the CLI
dotnet new console -o MovieProjectionDemo
Step 2: Install all required packages
For the project, we need to run the command to install the required NuGet packages.
dotnet add package Npgsql.EntityFrameworkCore.PostgreSQL
dotnet add package Microsoft.EntityFrameworkCore.Design
dotnet add package Microsoft.Extensions.Configuration
dotnet add package Microsoft.Extensions.Configuration.Json
I will be using a Postgres database, so installing Npgsql.EntityFrameworkCore.PostgreSQL You can install the NuGet package accordingly, as per your preferred database.
Step 3: Add models
namespace OwnedEntityDemo.Models;

public class Movie
{
    public int Id { get; set; }
    public string Title { get; set; } = string.Empty;
    public int ReleaseYear { get; set; }
    public string Genre { get; set; } = string.Empty;

    public Budget Budget { get; set; } = null!;
}

public class Budget
{
    public decimal ProductionCost { get; set; }
    public decimal MarketingCost { get; set; }
    public decimal DistributionCost { get; set; }
    public string Currency { get; set; } = string.Empty;
}
Here, the Budget object will be part of the Movie entity. Note, I did not create any ID in the budget as it relies on its owner, the Movie entity.
Step 4: Set up the DbContext
using Microsoft.Extensions.Configuration;
using OwnedEntityDemo.Models;
using Microsoft.EntityFrameworkCore;

namespace OwnedEntityDemo;

public class AppDbContext: DbContext
{
    public DbSet<Movie> Movies => Set<Movie>();

    private readonly string _connectionString;

    public AppDbContext()
    {
        // Simple reading from appsettings.json
        var config = new ConfigurationBuilder()
            .SetBasePath(Directory.GetCurrentDirectory())
            .AddJsonFile("appsettings.json")
            .Build();

        _connectionString = config.GetConnectionString("PostgresConnection");
    }

    protected override void OnConfiguring(DbContextOptionsBuilder optionsBuilder)
    {
        optionsBuilder.UseNpgsql(_connectionString);

    }

    protected override void OnModelCreating(ModelBuilder modelBuilder)
    {
        modelBuilder.Entity<Movie>()
            .OwnsOne(c => c.Budget, bugdet =>
            {
                bugdet.Property(a => a.ProductionCost);
                bugdet.Property(a => a.DistributionCost);
                bugdet.Property(a => a.MarketingCost);
                bugdet.Property(a => a.Currency);
            });
    }
}
One DbSet is registered. Also, you need to configure the Budget entity as an owned entity with OwnsOne in the OnModelCreating method.
Step 5: Create appsettings.json
The console app does not contain an appsettings file by default. So I have created one with the connection string:
{
  "ConnectionStrings": {
    "PostgresConnection": "Host=localhost;Port=5432;Database=tvDb;Username=postgres;Password=4567"
  }
}
Step 6: Configure appsettings in csproj
By default, a console app will expect the file in the bin directory. To read newly added appsettings from the root directory, add the following inside the <Project> tag of the application's project file:
<ItemGroup>
  <None Update="appsettings.json">
    <CopyToOutputDirectory>PreserveNewest</CopyToOutputDirectory>
  </None>
</ItemGroup>
Step 7: Prepare the database
To create the table in the database, create and run the migration:
dotnet ef migrations add InitialCreate
dotnet ef database updateOur database is now ready
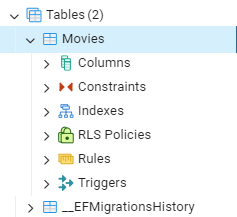
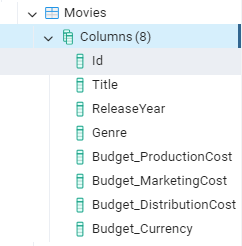
Notice how columns of owned entities are named as a prefix of the owned class name.
Step 8: Prepare Program.cs to write the data
We will seed the data by initializing it in the Program.cs file:
using Microsoft.EntityFrameworkCore;
using OwnedEntityDemo;
using OwnedEntityDemo.Models;

using var context = new AppDbContext();

// Make sure database exists
await context.Database.EnsureCreatedAsync();

// Add a movie with budget
var movie1 = new Movie
{
    Title = "Inception",
    Genre = "Sci-Fi",
    ReleaseYear = 2010,
    Budget = new Budget
    {
        ProductionCost = 160_000_000,
        MarketingCost = 100_000_000,
        DistributionCost = 50_000_000,
        Currency = "USD"
    }
};
var movie2 = new Movie
{
    Title = "Memento",
    Genre = "Thriller",
    ReleaseYear = 2000,
    Budget = new Budget
    {
        ProductionCost = 90_000_000,
        MarketingCost = 120_000_000,
        DistributionCost = 2_000_000,
        Currency = "USD"
    }
};

context.Movies.Add(movie1);
context.Movies.Add(movie2);
await context.SaveChangesAsync();
Console.WriteLine("Movie saved!");

// Query movie
var storedMovies = await context.Movies.ToListAsync();
foreach (var movie in storedMovies)
{
    Console.WriteLine($"Movie: {movie.Title}, Total Budget: {movie.Budget.ProductionCost + movie.Budget.MarketingCost}");
}
In the first part, we are populating the Movie table with some data. While the latter part gets and prints them. I focused on implementing the owned entity. You can query the records better with a projection.
Step 9: Run the project
Let's run it:
dotnet run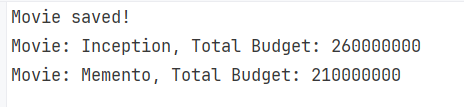
The above approach can be more customized. You can rename the column in the configuration as you want.
modelBuilder.Entity<Movie>(entity =>
{
    entity.OwnsOne(m => m.Budget, budget =>
    {
        // Optional: Configure column names
        budget.Property(b => b.ProductionCost).HasColumnName("ProductionCost");
        budget.Property(b => b.MarketingCost).HasColumnName("MarketingCost");
        budget.Property(b => b.DistributionCost).HasColumnName("DistributionCost");
        budget.Property(b => b.Currency).HasColumnName("Currency");
    });
});
That way, the columns will be like PodcutionCost and MarketingCost instead of Budget_PodcutionCost and Budget_MarketingCost.
How to add nested owned entities in EF Core
An entity can have more than one owned entity. Also, you can define a nested owned entity, an owned entity inside another owned entity. Let's have a look at how we can do that with the same example.
Step 1: Add another owned entity
Create the class CostBreakdown:
public class Budget
{
    public decimal ProductionCost { get; set; }
    public decimal MarketingCost { get; set; }
    public decimal DistributionCost { get; set; }
    public string Currency { get; set; } = string.Empty;
    public CostBreakdown Breakdown { get; set; } = null!;
}

public class CostBreakdown
{
    public decimal CastSalaries { get; set; }
    public decimal CrewSalaries { get; set; }
    public decimal Equipment { get; set; }
    public decimal CGI { get; set; }
}
Step 2: Configure a new owned type
modelBuilder.Entity<Movie>(movie =>
{
    movie.OwnsOne(m => m.Budget, budget =>
    {
        budget.Property(b => b.ProductionCost);
        budget.Property(b => b.MarketingCost);
        budget.Property(b => b.DistributionCost);
        budget.Property(b => b.Currency);

        // Nested Owned Entity
        budget.OwnsOne(b => b.Breakdown, breakdown =>
        {
            breakdown.Property(p => p.CastSalaries);
            breakdown.Property(p => p.CrewSalaries);
            breakdown.Property(p => p.Equipment);
            breakdown.Property(p => p.CGI);
        });
    });
});
As in the example, you can use the fluent API to add nested owned types to relations in your Movies table.
Step 3: Add migration
Add a new migration by running the command:
dotnet ef migrations add CostBreakdownAddedand apply it:
dotnet ef database update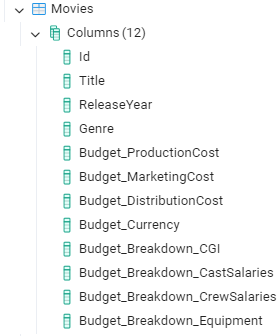
How to add a Collection Owned Entity in EF Core
Owned types can be a collection as well, where multiple objects of the same type depend on a single owner entity. In that case, EF Core maintains a separate table to save the dependent data. Let's see how we can do in our example.
Step 1: Create models
Let's create a new Questionnaire model. All the questions will be collected from the entity in question. Question.
public class Questionnaire
{
    public int Id { get; set; }
    public string Title { get; set; } = string.Empty;

    public List<Question> Questions { get; set; } = new();
}

public class Question
{
    public string Text { get; set; } = string.Empty;
    public string Type { get; set; } = string.Empty;  // e.g. Text, MCQ, Rating
    public bool IsRequired { get; set; }
}
Step 2: Perform configurations in the DbContext
Add a new DbSet:
public DbSet<Questionnaire> Questionnaires => Set<Questionnaire>();
and use the fluent API to set up the entity:
modelBuilder.Entity<Questionnaire>(q =>
{
    q.OwnsMany(x => x.Questions, questions =>
    {
        questions.WithOwner().HasForeignKey("QuestionnaireId");

        questions.Property<int>("Id");           // shadow key
        questions.HasKey("Id");

        questions.Property(x => x.Text).HasColumnName("Text");
        questions.Property(x => x.Type).HasColumnName("Type");
        questions.Property(x => x.IsRequired).HasColumnName("IsRequired");

        questions.ToTable("QuestionnaireQuestions"); // optional
    });
});
OwnsMany configures that each entity of Questionnaire will hold a collection of Questions as an owned type. questions.WithOwner().HasForeignKey("QuestionnaireId"); defines that each Question belongs to one Questionnaire with a foreign key QuestionnaireId. EF Core will translate it to:
QuestionnaireId INTEGER NOT NULL
Although Questions have a primary and foreign key, they are not queryable and cannot exist independently.
Step 3: Run migration
Make the updates with a new migration:
dotnet ef migrations add QuestionaireAddedAnd run the migration:
dotnet ef database update
Step 4: Set up Program.cs to insert data
var survey = new Questionnaire
{
Title = "Customer Satisfaction Survey",
Questions = new List<Question>
{
new Question { Text = "How satisfied are you?", Type = "Rating", IsRequired = true },
new Question { Text = "What can we improve?", Type = "Text", IsRequired = false },
new Question { Text = "Would you recommend us?", Type = "YesNo", IsRequired = true }
}
};
context.Questionnaires.Add(survey);
await context.SaveChangesAsync();
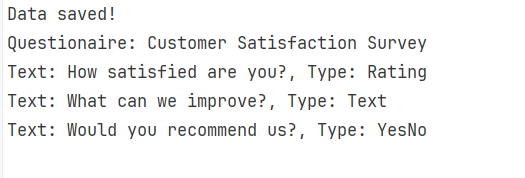
Console.WriteLine("Data saved!");
var data = await context.Questionnaires.FirstAsync();
Console.WriteLine($"Questionaire: {data.Title}");
foreach (var item in data.Questions)
{
Console.WriteLine($"Text: {item.Text}, Type: {item.Type}");
}Step 5: Test the project
Advantages of an owned entity
- An owned entity is a value object defined solely by its values, without an identity. The nature of owned types allows your domain to model real-world concepts while remaining clean and expressive.
- As owned entities are dependent, they cascade automatically with the owner. Hence, you do not require involvement in additional management for dependent fields, such as the questions in a questionnaire.
- In the model, you can encapsulate related fields in separate classes, while the database does not need to map them to the tables. That way, you can keep code flexible without cluttering up extra tables or DbSets.
- As EF Core stores the properties of owned entities in the same table, no additional joins are performed when querying the data. Hence, owning property helps improve the overall performance of the application.e
- Owned handles parent-child relations cleanly with shadow keys. You don't need standalone entities even for one-to-many parent-child relationships.
- Owned entities eliminate unnecessary IDs and primary keys by directly attaching them to their parent entities.
- It keeps data consistent because the lifecycle of owned entities is tied to the owner, deleting or updating the owner changes the child entities.
- The dependent entities reduce EF Core's overhead by allowing it to track only the parent entity.
Conclusion
Owned entity types provide a clean way to save complex values in the database. They are dependent entities that do not hold any identity or table of their own but exist alongside their parent. We delved into this remarkable feature and saw how you can encapsulate complex data such as addresses, costs, and order items. Owned entities keep the domain models clean by clustering related fields into dependent types.
Pennsylvania, USA
## 1 The Era of Hybrid Code Review: Beyond Static Analysis
Software teams rely on pull requests to maintain code quality and consistency, but expectations around PR review have grown significantly. Reviewers are no longer asked to check naming or formatting—they’re expected to spot subtle logic issues, identify design drift, and understand the intent behind a change. Traditional linters and static analyzers help with the basics, but they can’t interpret why a piece of code changed or whether it aligns with the project’s broader architecture. And the burden often falls on senior developers, who spend hours reviewing code that mostly needs structured feedback, not deep architectural analysis.
A hybrid approach solves this: combining deterministic static analysis with the reasoning abilities of modern LLMs. By using Roslyn for structure, GitHub for automation, and Azure OpenAI for interpretation, you can build a Code Review Copilot that scales with your repositories and reduces cognitive load on human reviewers.
Pennsylvania, USA
Next Page of Stories