Sr. Content Developer at Microsoft, working remotely in PA, TechBash conference organizer, former Microsoft MVP, Husband, Dad and Geek.
158063 stories
·
33 followers

Grounding Copilot Studio Agents with Azure AI Search and Foundry IQ

1 Share

An employee opens the HR agent and asks, "How much PTO do I accrue each month?" A few minutes later, someone else asks, "Where is the official code of ethics policy?" Those sound like the same problem. They are not. The first person needs a grounded answer they can understand. The second person needs a link to the right document quickly, without interpretation. If you design for one experience, the other one feels broken.

That is usually where knowledge-agent projects start to get messy. “Grounding” can sound like one switch you turn on, but in practice it is a spectrum: from zero-code classic search, to agentic retrieval over a knowledge base, to a forced-grounding agent that synthesizes answers when synthesis is required. The easier way to think about it is this: who is doing the retrieval work, and what does the user need back?

This post walks through five working retrieval patterns for an “Ask HR” agent built on Copilot Studio, Azure AI Search, and Foundry IQ. Each one is running code in the companion sample repo: foundry-copilot-hr-policy-knowledge. Each has a clear “use this when,” and the five patterns share the same reusable knowledge base so you can layer them on without re-indexing. By the end, you should have a decision tree you can reuse for your own knowledge source, whether that is HR policy, product docs, or support runbooks.

Scope: companion sample for learning and experimentation, not production-ready deployment. Review the Azure Well-Architected Framework for reliability, security, cost, and operational hardening before you ship.

The scenario: one index, many front doors

Here is the setup. The sample answers employee questions from a small corpus of internal HR policy documents: PTO accrual, hiring rules, code of ethics, blood-borne pathogen procedures, and dozens more. Underneath every pattern is one foundation: an Azure AI Search index named hr-policy-index, populated by an indexer and skillset that chunk and vectorize the documents.

Patterns A, C, and the Hosted Agent query that index directly. Patterns A2 and B add a Foundry IQ knowledge base named hr-knowledge-base on top of the same index for agentic retrieval. That layering is the part to pay attention to. The retrieval assets stay separate from the orchestration layer, so you can start with the simplest pattern, prove value quickly, and move to a more capable one later without re-indexing.

Two questions that decide everything

Before we get into the patterns, it helps to define the two retrieval terms I use throughout the rest of the post:

  • Classic search, index-first retrieval: one hybrid (keyword + vector) query against an Azure AI Search index, ranked and returned. Fast and predictable.
  • Agentic retrieval, the knowledge base plans multiple sub-queries from the user's question, runs them in parallel, re-ranks, and merges the results before the agent composes an answer. Higher quality on complex, multi-part questions.

If you want the fuller picture of how these two approaches map to retrieval-augmented generation, the Azure AI Search team's RAG and generative AI overview walks through the trade-offs and uses a similar HR/PTO example.

Once those terms are clear, the decision tree comes down to three practical questions:

Q1: Do users need an answer or are they really trying to find the right document?
If they just need the document, stay on the locator path. If they need the policy explained or summarized, move into the answer-synthesis path.

QL: Is the content in a citation-friendly knowledge base?
For example, SharePoint content or Azure AI Search content with a reliable
blob_url. If yes, Copilot Studio can usually handle this with native citation cards in Pattern A. If not, use Pattern C with the dual tool /api/lookup path so the agent can return the exact document link.

Q2: Do you actually need an LLM agent in the middle?
If the answer is no, keep it simple: use classic search or agentic retrieval over the knowledge base. If the answer is yes, move into the agent path.

QK: For that non-agent path, is classic index search enough, or do you need agentic KB retrieval?
Classic search points to Pattern A. Agentic retrieval over the knowledge base points to Pattern A2.

Q3: If you need an agent, do you want Foundry to run the request loop, or do you need to self-host it?
If Foundry can manage the runtime, use Pattern B. If you need the request loop in your own container, use the Hosted Agent.

That is the decision tree in plain terms: Q1 decides whether this is a document-locator experience or an answer-synthesis experience. Q2 decides whether you need an LLM agent at all. Q3 is only about where the agent runs, either Foundry or your container. It does not change the front door; Copilot Studio can still be the user-facing experience.

How the sample repo is organized

The repo follows the same flow as the post. Start with docs/DataPipelineAndTesting.md to understand how the HR policy corpus is indexed, tested, and validated. Use docs/RetrievalPatterns.md as the decision model for choosing between classic search, agentic retrieval, forced grounding, and hosted runtime options. Then use the pattern-specific docs when you are ready to wire each path.

For Copilot Studio patterns, docs/CopilotStudioIntegration.md maps to Pattern A, while docs/CopilotStudioHybridExample.md maps to Pattern C and the dual-tool locator flow. For the more advanced agent paths, docs/FoundryAgentArchitecture.md covers Pattern B and the hosted agent architecture. docs/Distribution-M365-Teams.md shows how the agent can be distributed through Microsoft 365 and Teams once the retrieval pattern is working.

The rest of the post is that tree, one branch at a time.

Pattern A: Direct index (classic search, zero agent code)

Start here. Copilot Studio queries hr-policy-index directly through its built-in Knowledge action. No custom agent code runs in the answer path. The sample only owns the index, skillset, and indexing pipeline.

Populate the index (server-side indexer + skillset handles chunking and vectorization):

uv run python scripts/index_knowledge_base_integrated_vectorization.py # Builds hr-policy-index; a client-side alternative exists for dev/test

What you get: very low latency in the sample, roughly 1-2 seconds, no LLM cost in the retrieval path, and native citation cards. When the source documents carry a blob_url or metadata_storage_path, Copilot Studio can render a click-through card straight to the document. For many "where is the policy?" questions, that may be enough.

The honest limitation: Pattern A is still classic search. It does not force synthesis. If Copilot Studio generates an answer from retrieved snippets, it may paraphrase a policy in a way that is close, but not precise enough. For HR policy, that matters. If exact wording matters, that is your sign to step up to Pattern B.

Pattern A2: Copilot Studio meets Foundry IQ (agentic retrieval, no prompt agent)

This is the pattern I would look at when you want better retrieval quality without taking on the overhead of a full prompt agent. In the Copilot Studio new agent experience preview, an agent connects directly to a Foundry IQ knowledge base through Microsoft IQ, with no Foundry prompt agent in between. You reuse the same hr-knowledge-base on top of the same hr-policy-index (one command: python -m src.agents.create_foundry_agent), but retrieval is now agentic: the knowledge base plans sub-queries, retrieves in parallel, reranks, and hands merged results to the agent.

Wiring it takes a few clicks in Copilot Studio (step-by-step on Microsoft Learn):

  1. Build → Microsoft IQ → Foundry IQ → Create new connection
  2. Choose Microsoft Entra ID Integrated authentication
  3. Select hr-knowledge-base
  4. Add to agent

A2 is worth the upgrade from A for two reasons. First, you get agentic-retrieval quality without having to build, deploy, or maintain a prompt agent. The knowledge base becomes the reusable asset you improve in Microsoft Foundry, not something you keep reworking inside each Copilot Studio agent. Second, when configured with Microsoft Entra ID Integrated authentication, retrieval can return ACL-trimmed results per user. Each person sees content based on their access.

Foundry IQ knowledge bases can also inherit enterprise-readiness controls such as customer-managed keys, network isolation, and Entra ID. A single knowledge base can also federate across multiple knowledge sources in parallel.

Use A2 when you want stronger hybrid retrieval quality without taking on the overhead of operating a full agent.

Pattern B: Foundry Agent Service with forced grounding

When answers need to be synthesized and grounded, publish a prompt agent to Microsoft Foundry with Foundry Agent Service. In the sample, the agent uses an MCPTool pointing at the knowledge-base endpoint, with tool_choice="required" so the model retrieves policy chunks before answering.

# src/agents/hr_policy_agent.py (excerpt) agent = PromptAgentDefinition( model=model_deployment_name, # e.g. gpt-5-mini instructions=HR_POLICY_INSTRUCTIONS, tools=[mcp_tool], # KB MCP endpoint tool_choice="required", # require retrieval before answering )

Invoke it through the OpenAI client the project hands you:

client = project.get_openai_client() response = client.responses.create( input="How does PTO accrue for a new hire?", extra_body={"agent_reference": {"name": agent_name}}, )

What you get: synthesized answers with grounding and inline [Policy XXXX - Title] citations, all from a single SDK call on a managed runtime. The trade-off: synthesis takes longer. In the sample, answers take roughly 10-14 seconds versus 1-2 seconds for classic search. For policy explanations, that extra time can be worth it because the user gets a composed, grounded answer instead of a list of snippets.

Pattern C: Dual-tool routing for deterministic document locators

Some questions do not need an essay; they just need the right URL, fast. Pattern C lets Copilot Studio route per turn:

  • "Where is the PTO policy?" → POST /api/lookup, a deterministic endpoint with no LLM, roughly 1-2 seconds, returning the document URL verbatim in the answer body.
  • "How many PTO hours do I accrue?" → hand off to Pattern A or B for a synthesized answer.
POST /api/lookup { "query": "PTO policy" } → 200 OK { "policy_id": "12345", "title": "Types of Leave: Paid Time Off (PTO)", "blob_url": "https://.../12345-pto.pdf" }

Reach for Pattern C when native citations are not enough. For example, use it when you need fast locator responses, the URL printed directly in the answer body, deterministic and auditable output, or support for a source that is not citation-friendly. The endpoint lives at src/backend/main.py:/api/lookup, with its contract in copilot/openapi-lookup-v2.json.

Hosted Agent: the same agent on your own runtime

If you need to own the request loop, custom authentication, side-car services, or infrastructure that stays inside your boundary, run the agent yourself. The Hosted Agent is the self-hosted version of the same idea: a container built on Microsoft Agent Framework with FoundryChatClient. It supports both classic and agentic retrieval through one environment variable:

RETRIEVAL_MODE

Strategy

Retrieval type

tool (default)

Custom @tool search_hr_policies (hybrid + semantic)

Classic search

context-semantic

Built-in AzureAISearchContextProvider before each turn

Classic search

context-agentic

AzureAISearchContextProvider over hr-knowledge-base

Agentic retrieval

The context-* modes use Agent Framework’s out-of-the-box RAG context provider. Retrieval runs automatically before each model call with standardized context and citation prompts, so the agent does not have to call a search tool explicitly. That gives the self-hosted path parity with the managed Foundry path across both retrieval types. Copilot Studio can still be the front door. Q3 in the decision tree is really about where the request loop runs, not who greets the user.

Choosing a pattern

Pattern

Orchestrator

Retrieval

Latency (sample)

Best for

A

Copilot Studio

Classic

~1-2 s

Start here, native citations, no agent code

A2

Copilot Studio → Foundry IQ

Agentic

~2-4 s

Agentic quality, no agent to maintain

B

Foundry Agent Service

Classic/agentic via MCP

~10-14 s

Forced-grounding synthesis in Foundry

C

Copilot Studio (router)

None for lookup

~1-2 s

Deterministic, verbatim document locators

Hosted

Agent Framework container

Classic + agentic

~10-14 s

Self-hosted runtime, custom auth

A simple way to read the table: start at A, move to A2 when you want agentic retrieval without operating an agent, choose B when each answer needs to be synthesized and grounded in Foundry, add C for high-volume locator traffic, and pick the Hosted Agent when you need the runtime on your own infrastructure. These are not mutually exclusive. A mature agent often routes locator queries to C and content questions to A2 or B.

What's next?

  • Try it: clone the sample and follow Steps 1-3 of the walkthrough to stand up Pattern A, provision hr-knowledge-base, connect Copilot Studio, and ask a question in minutes.
  • Go agentic: wire the same knowledge base into the Copilot Studio new agent experience via Foundry IQ (Pattern A2) and compare answer quality side by side.
  • Learn more: explore agentic retrieval in Azure AI Search, Foundry IQ, and Microsoft Agent Framework.
  • Adapt it: swap the HR policy corpus for your own product docs, support runbooks, or internal knowledge source, then compare Pattern A, A2, and B against the same user questions.
  • Use the repo-doc map: start with docs/RetrievalPatterns.md for the decision model, docs/CopilotStudioIntegration.md for Pattern A, docs/CopilotStudioHybridExample.md for Pattern C, docs/FoundryAgentArchitecture.md for Pattern B and Hosted Agent, and docs/DataPipelineAndTesting.md for ingestion and validation.

My recommendation: start simple, prove the index works, and move up the stack only when the use case needs it. Some questions need a trusted link. Others need a grounded explanation. A strong architecture supports both without forcing every request through the same path.


References

Copilot Studio + Foundry IQ

Foundry IQ / knowledge layer

Azure AI Search, retrieval

Microsoft Foundry Agent Service (Pattern B)

Microsoft Agent Framework (Hosted Agent)

Governance

Related Microsoft Foundry blog posts

Read the whole story
alvinashcraft
50 minutes ago
reply
Pennsylvania, USA
Share this story
Delete

Middleware in Microsoft Agent Framework

1 Share

A critical need, when creating multi-agent applications is to manage token usage in API calls. This is where middleware plays a crucial role. In this post, we will explore what middleware is within the Microsoft Agent Framework, why it is essential for capping token usage, and how to implement it effectively.

What is Middleware in the Microsoft Agent Framework?

Middleware serves as an intermediary layer that processes requests and responses between users and AI agents. It acts as a bridge, allowing developers to intercept, inspect, and modify the data flowing through the system. This capability is vital for implementing additional logic, such as validation, logging, and, importantly, token management.

In the context of the Microsoft Agent Framework, middleware can be utilized to enhance the functionality of AI agents by providing a structured way to handle requests and responses. This not only improves the overall efficiency of the system but also allows for greater control over how the AI interacts with users.

Why Use Middleware to Cap Token Usage?

1. Control Costs

One of the primary reasons to implement middleware for capping token usage is cost management. Many AI services, including those provided by Microsoft, charge based on the number of tokens processed during interactions. By using middleware to monitor and limit token usage, organizations can prevent unexpected spikes in expenses. This is particularly important for businesses that rely heavily on AI for customer service, content generation, or data analysis.

2. Enhance Security

Security is a paramount concern when dealing with AI agents, especially in environments that handle sensitive data. Middleware can validate requests before they reach the agent, ensuring that only legitimate requests are processed. This validation step is crucial for preventing malicious attacks or unintended data exposure, thereby enhancing the overall security posture of the application.

3. Improve Performance

Middleware can also play a significant role in optimizing the performance of AI agents. By intercepting and modifying requests and responses, middleware can streamline the data flow, reducing latency and improving response times. This ensures that the AI agent operates efficiently, providing users with a seamless experience.

4. Custom Logic Implementation

Another advantage of middleware is the ability to implement custom logic tailored to specific business needs. For instance, organizations can modify the input or output of the AI agent based on predefined business rules or user requirements. This flexibility allows for a more personalized interaction, enhancing user satisfaction and engagement.

Types of Middleware in the Microsoft Agent Framework

The Microsoft Agent Framework offers several types of middleware, each serving a unique purpose:

1. Agent Run Middleware

This type of middleware intercepts all agent runs, allowing developers to inspect and modify both input and output. It is particularly useful for implementing global logic that applies to all interactions with the agent.

2. Function Calling Middleware

Function calling middleware intercepts function calls made by the agent, enabling similar inspection and modification capabilities. This is beneficial for managing specific functions that may require additional validation or processing.

3. Streaming Middleware

Designed specifically for handling streaming data, streaming middleware allows for real-time modifications. This is essential for applications that require continuous data flow, such as live chatbots or real-time analytics.

Example of Middleware Implementation

To illustrate how middleware can be implemented to cap token usage, consider the following example in C#:

public class TokenUsageMiddleware
{
    private readonly RequestDelegate _next;
    private const int MAX_TOKENS = 1000; // Define your maximum token limit

    public TokenUsageMiddleware(RequestDelegate next)
    {
        _next = next;
    }

    public async Task InvokeAsync(HttpContext context)
    {
        // Inspect the incoming request
        var tokenCount = CountTokens(context.Request.Body);

        // Cap the token usage
        if (tokenCount > MAX_TOKENS)
        {
            context.Response.StatusCode = StatusCodes.Status400BadRequest;
            await context.Response.WriteAsync("Token limit exceeded.");
            return;
        }

        // Call the next middleware in the pipeline
        await _next(context);
    }

    private int CountTokens(Stream requestBody)
    {
        // Logic to count tokens in the request body
        // This is a placeholder for actual token counting logic
        return 0; // Replace with actual token counting implementation
    }
}

In this example, the TokenUsageMiddleware class intercepts incoming requests, counts the tokens, and checks if the count exceeds a predefined limit. If the limit is exceeded, it returns a 400 Bad Request response, effectively capping token usage.

Additional Real-World Use Cases

Cost Management

Organizations utilizing AI services, such as OpenAI’s GPT models, can implement middleware to monitor and cap token usage. This ensures that they remain within budget and avoid unexpected costs associated with excessive API calls.

Data Validation

Middleware can also be employed to validate user inputs before they reach the AI agent. This prevents invalid or harmful requests from being processed, safeguarding the integrity of the system and enhancing user experience.

Conclusion

Middleware in the Microsoft Agent Framework is a powerful tool for managing interactions with AI agents. By implementing middleware to cap token usage, organizations can effectively control costs, enhance security, and improve performance. This makes middleware an essential component of modern AI applications, enabling businesses to leverage the full potential of AI while maintaining control over their resources.

My blog post application has been updated to cap token usage here.

Read the whole story
alvinashcraft
51 minutes ago
reply
Pennsylvania, USA
Share this story
Delete

Why is pytorch compile so fast?

1 Share

PyTorch's Inductor compiler automatically groups dependent operations together into single, efficient Triton kernels. This keeps data in faster memory close to the register and cuts down on kernel overhead. In this article, we'll look at an example of fusion, and you'll see exactly how torch.compile transforms your PyTorch operations into optimized GPU code.

When you use PyTorch's compiler, your model runs up to 10x faster, but what's actually happening? Without compilation, the GPU runs a kernel (a function on the GPU) for each torch operation in your code. This causes things to slow down for two reasons: Time is spent moving data in memory, and there's overhead of starting each new kernel. Every time the GPU launches a kernel, it pays an overhead cost, and every intermediate result means writing to and reading from memory. This is where vertical fusion comes in, and why you need to understand how to use it.

To get the most out of this article, you need basic familiarity with PyTorch, and a general understanding of GPU programming concepts.

What is Vertical Fusion?

Think of vertical fusion as a way to link steps, so the output of one goes straight into the next. It's called "vertical" because if you picture the computation graph, these operations stack vertically, with each one dependent on the result of the previous step.

This is the most common fusion pattern in deep learning because neural networks are chains of operations: Normalization, then linear layers, then activation functions, and so on. The big win is eliminating intermediate results. Those temporary tensors never need to be written to or read from global memory. They stay in fast registers where the GPU can reach them more quickly.

Let's dive into an example of vertical fusion, specifically pointwise fusion.

Pointwise fusion example

Pointwise operations are simple math kernels that work on each element: Addition, multiplication, activation functions, and more. Let's look at a pattern you might see in a neural network layer:

import torch

def pointwise_example(x, w, b):
    # Multiple element-wise operations
    tmp = x * w        # multiply
    tmp = tmp + b      # add
    tmp = tmp.sigmoid() # sigmoid activation
    return tmp

Unfused: Three separate kernels

Without fusion, Inductor creates three separate Triton kernels. Don't worry if the Triton syntax looks intimidating. The important part isn't memorizing the syntax, but understanding the pattern. Each kernel loads data, does one operation, and writes the result.

Kernel 1: Multiply

@triton.jit
def mul_kernel(in_ptr0, in_ptr1, out_ptr0, xnumel, XBLOCK: tl.constexpr):
    xoffset = tl.program_id(0) * XBLOCK
    xindex = xoffset + tl.arange(0, XBLOCK)[:]
    xmask = xindex < xnumel
    x0 = xindex
    tmp0 = tl.load(in_ptr0 + x0, xmask)
    tmp1 = tl.load(in_ptr1 + x0, xmask)
    tmp2 = tmp0 * tmp1
    tl.store(out_ptr0 + x0, tmp2, xmask)

For succinctness, I've included just the signatures of the next kernels, because they're nearly identical. See my Git repositoryfor the full source code.

Kernel 2: Add

@triton.jit
def add_kernel(in_ptr0, in_ptr1, out_ptr0, xnumel, XBLOCK: tl.constexpr)

Kernel 3: Sigmoid

@triton.jit
def sigmoid_kernel(in_ptr0, out_ptr0, xnumel, XBLOCK: tl.constexpr)

Across the three kernels, you're performing eight memory operations: Reading inputs twice for multiply, reading multiply's result and the bias for add, reading add's result for sigmoid, and writing all three results. That's a lot of memory traffic.

Fused: One kernel

With fusion, torch.compile creates a single kernel:

Kernel 4: Fused

@triton.jit
def triton_poi_fused_add_mul_sigmoid_0(in_ptr0, in_ptr1, in_ptr2,
                                        out_ptr0, xnumel, XBLOCK: tl.constexpr):
    xoffset = tl.program_id(0) * XBLOCK
    xindex = xoffset + tl.arange(0, XBLOCK)[:]
    xmask = xindex < xnumel
    x0 = xindex

    # Load all inputs once
    tmp0 = tl.load(in_ptr0 + (x0), xmask)
    tmp1 = tl.load(in_ptr1 + (x0), xmask)
    tmp3 = tl.load(in_ptr2 + (x0), xmask)

    # Fused pointwise operations: mul -> add -> sigmoid
    tmp2 = tmp0 * tmp1
    tmp4 = tmp2 + tmp3
    tmp5 = tl.sigmoid(tmp4)

    # Store final result only
    tl.store(out_ptr0 + (x0), tmp5, xmask)

Notice the difference: We load all inputs once, do all three operations in a row, and store only the final result. The intermediate values (tmp2 and tmp4) stay in registers (the fastest memory on the GPU). They never touch the slower global memory.

Benefits of funsion

  • Kernel launches: Three reduced to one.
  • Intermediate buffers: Two eliminated (multiply result and add result).
  • Memory bandwidth: Reading five full tensors and writing three full tensors (eight memory operations) reduced to reading three tensors and writing one (four memory operations). That's a 50% reduction in memory traffic.

Other fusion types

Pointwise fusion is just one type of vertical fusion. Inductor uses other forms of vertical fusion to keep your GPU efficient:

  • Reduction fusion: Combines reducing operations like max, mean, or sum, with the operations that happen before and after them. This is critical for operations like batch normalization.
  • GEMM + Epilogue fusion: Attaches simple math to the end of heavy matrix calculations. Instead of doing a matrix multiply, writing the result to memory, then reading it back to add bias and apply ReLU, the bias and activation happen right after the multiply in the same kernel.
  • Prologue fusion: The opposite of epilogue. Preprocessing happens as data loads. For instance, normalizing input before matrix multiplication can happen even as the data comes in.

In addition to vertical fusion (the most prominent type of fusion), Inductor also uses horizontal fusion.

  • Horizontal fusion: Runs multiple independent operations on the same input at once. For example, computing both sin(x) and cos(x) in a single kernel, loading x only once instead of twice.

Get started: See fusion in your own code

Here's a complete example using a reduction pattern.

Step 1: Create a simple reduction example

Create a file called fusion_example.py:

import torch

def reduction_example(x):
    # Pointwise operation followed by reduction
    tmp = x * 2.0
    result = tmp.sum(dim=-1)
    result = result + 1.0
    return result

# Create test input
x = torch.randn(1024, 1024, device='cuda')

compiled_fn = torch.compile(reduction_example)
result_fused = compiled_fn(x)

Step 2: View the generated code

Run your script with the TORCH_LOGS environment variable to see what Inductor generated:

TORCH_LOGS="output_code" python fusion_example.py

This outputs the generated Triton kernels to your terminal. Look for a kernel named something like triton_per_fused_add_mul_sum_0. In this context, per in the kernel name indicates that it's a "per-reduction" kernel. The rest of the name tells you that add, mul, and sum were all fused together.

Conclusion

Fusion is one of the most important optimizations that torch.compile does. By linking dependent operations into single kernels, it cuts down memory traffic and kernel overhead, often the main cause of slow GPU work.

Try accelerating your own code with torch compile. As you've seen, there's no need to change your implementation. Just add a torch compiler decorator, and let the compiler do the work.

Learn more

The post Why is pytorch compile so fast? appeared first on Red Hat Developer.

Read the whole story
alvinashcraft
51 minutes ago
reply
Pennsylvania, USA
Share this story
Delete

NAudio 3 Effects Framework

1 Share

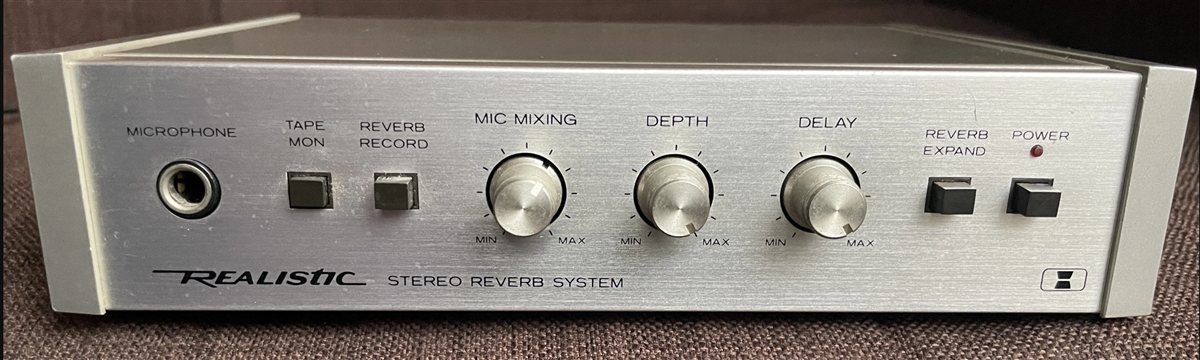
I've always been fascinated with audio effects, ever since I got my first "effects unit" - a "Realistic Reverb" from Radio Shack/Tandy.

Realistic Stereo Reverb System

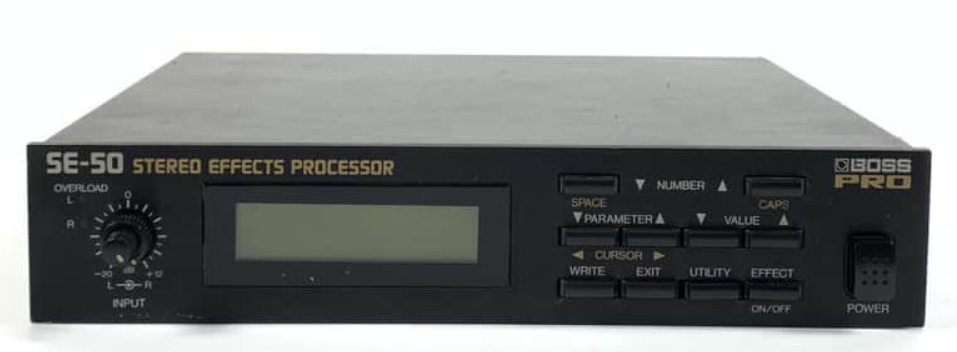
That was shortly followed by my first digital multi-effects unit - the BOSS SE-50.

BOSS SE-50 Stereo Effects Processor

And so it was only natural that when I created NAudio I wanted to make it possible to code your own effects.

In earlier versions of NAudio, there were only a few simple effects included in the library, mostly because my DSP skills are too limited to write many of my own, but also because several open source effects I did port to C# were license-incompatible and so never made it into the NAudio library itself.

However, as I've been modernizing and updating NAudio with assistance from Claude Code, I decided that it was long overdue to put in a proper effects framework, that includes both interface definitions for extending and a small library of built-in effects.

IAudioEffect

NAudio already has an interface called ISampleProvider which is designed to make it as simple as possible to implement your own effects, by presenting each sample as a float. This makes it trivially easy to create a custom ISampleProvider implementation, and in the Read method, write your own DSP code that manipulates those samples.

However, in NAudio 3, I wanted to take it a step further and have introduced a new base interface IAudioEffect. This has a Process method where you can modify the contents of a Span<float>, but it also includes a Reset method, allowing effects like delays to reset their internal state, as well as giving effects the ability to report how many samples of latency they introduce.

NAudio 3 also supplies a simple EffectSampleProvider that applies an IAudioEffect to an ISampleProvider, but more usefully, it includes an EffectChain allowing you to chain together multiple effects and even manipulate the order or add and remove effects during playback.

The Effects Library

I wanted to ship NAudio 3 with a useful set of "bread and butter" effects, and this was something that AI greatly accelerated, giving me a broad range of the most common effects including Delay, Reverb, Compression, EQ (based on the equalizer that was part of NAudio 2), Saturation, Gate, and several more.

Each effect inherits from AudioEffect which adds some more useful capabilities such as a click-free bypass and a dry-wet mix.

These effects should be considered "preview" - I've spent some time trying them with guitar, drums and vocals, and everything seems OK, but they may need some refinement in the future.

Effect Parameters

Another common challenge when implementing audio effects is how to deal with parameters. For example, how does an effect report its parameters so that suitable controls can be rendered in the UI? And how should parameter changes be given back to the effect? Often an effect needs to recalculate some internal values when its parameter changes, and you may also want to smooth changes.

NAudio 3 introduces an IParameterized interface allowing effects to optionally report a list of EffectParameter instances. Each parameter can report its name, unit of measure, default value, min and max values and so on. And there is support for continuous, choice and toggle parameters, as well as read-only meters that can be displayed in the UI, such as a gain reduction meter for a compressor effect.

There is also a ParameterSmoother that allows parameters to move smoothly to avoid clicks or other unwanted artifacts when you make a sudden change in a parameter value.

Another potential difficulty is that the UI and the audio playback typically operate on different threads, and so it is possible that a parameter change happens on another thread. The NAudio 3 effect parameters protect you from this, allowing the UI thread to set a new value, without disrupting the variables being used by the playback thread. The updated values are picked up on the next block of audio passed through the effect.

The Test Harness

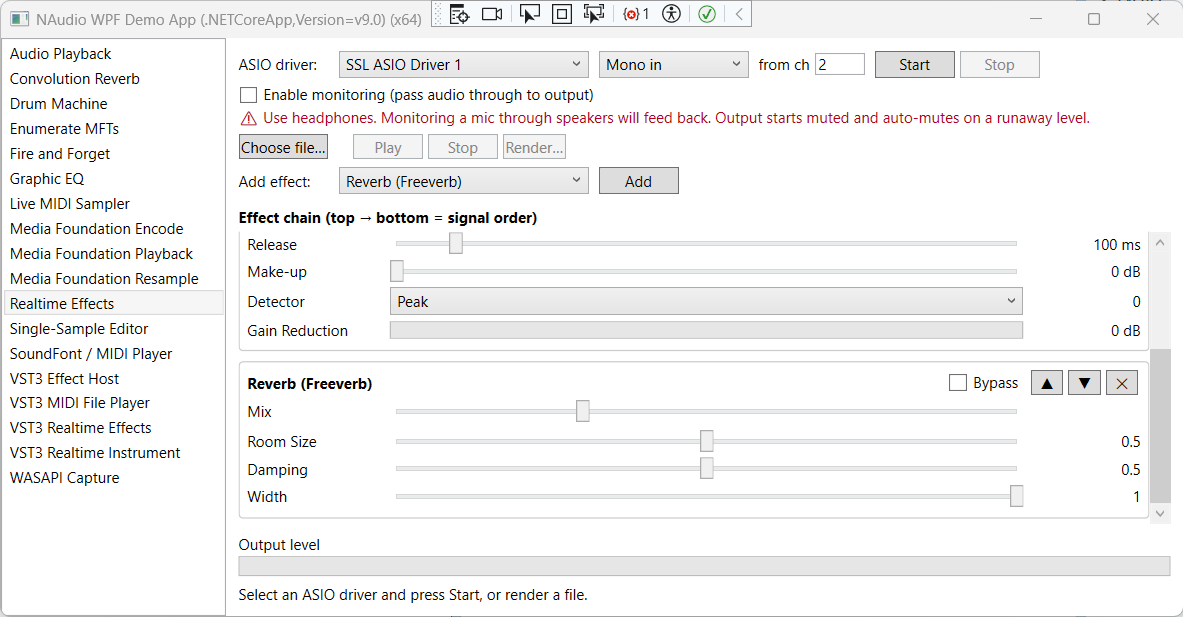
I've also attempted to make it as easy as possible to try out the effects, by adding some capabilities to the NAudioWpfDemo sample application. This includes a Realtime Effects demo, that allows you to set up an effect chain, and either play a pre-existing audio file through it, or capture audio via ASIO and apply effects in real-time, showcasing how NAudio is able to perform effects at very low latencies. The demo also allows you to render an audio file through the effect chain to a WAV file, and adjust effects parameters or even change the effect chain during playback. It's a lot of fun to play around with.

The Realtime Effects demo in the NAudioWpfDemo sample application

Summary

NAudio 3 has greatly improved support for audio effects, allowing you to easily write your own, or if you prefer, simply take advantage of what's included in NAudio.Core.Effects. You can read the documentation for using the effects framework in NAudio 3 here.

I should mention NAudio 3 is still in preview, but is getting very close to release - I'm doing final testing as well as gathering any last-minute feedback from users about the design of NAudio 3.

Read the whole story
alvinashcraft
51 minutes ago
reply
Pennsylvania, USA
Share this story
Delete

Using SpecKit and Specification-Driven Development to Tame AI Coding

1 Share

Using SpecKit and Specification-Driven Development to Tame AI Coding at NE Code 2026


✅ Presented at Nebraska.Code() 2026
📅 July 23, 2026
🎤 Session: Using SpecKit and Specification-Driven Development to Tame AI Coding

AI generated image of an Indiana Jones like figure taming a lion with a Copilot mask holding a whip


Introduction

AI is changing how we write software. According to DORA’s 2025 report, 95% of developers are now using AI in some capacity. Over the last year, we’ve been having a lot of conversations at work and I’ve been thinking a lot about how to use AI effectively in software development.

Read the whole story
alvinashcraft
51 minutes ago
reply
Pennsylvania, USA
Share this story
Delete

ReSharper C++ 2026.2: C++26 Reflection, ISPC Language Support, And More

1 Share

ReSharper C++ 2026.2 is out, bringing initial support for C++26 reflection, the most anticipated addition to the C++ language in recent years.

This release also introduces ACP agent support in ReSharper with Junie as the first available agent, adds support for the ISPC language, and significantly speeds up indexing in Unreal Engine projects. Other highlights include updates to the constexpr evaluator, new code inspections, and refactoring enhancements.

If you’d like to explore the full set of updates, take a look at the What’s New in ReSharper C++ 2026.2 page. In this post, we’ll walk through the most important changes and improvements.

C++ support

C++26 reflection

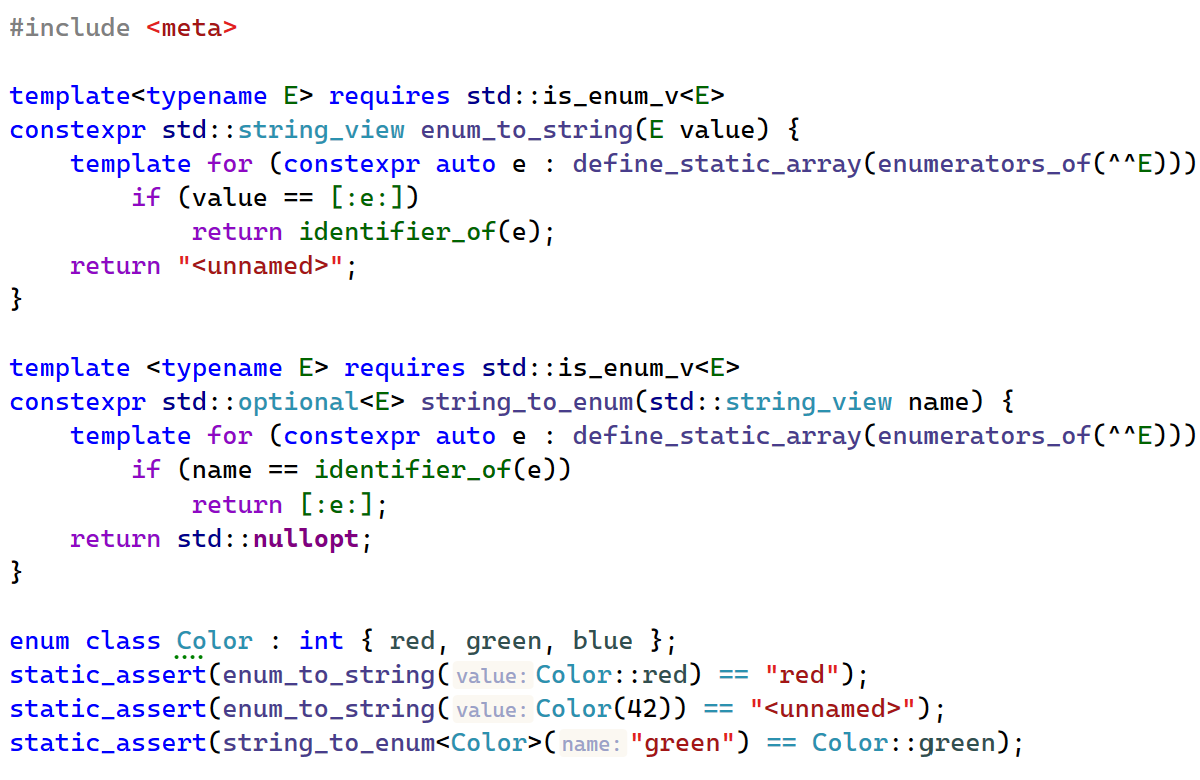
The headline feature of this release is C++26 reflection, a long-awaited addition to the language that enables compile-time introspection and code generation.

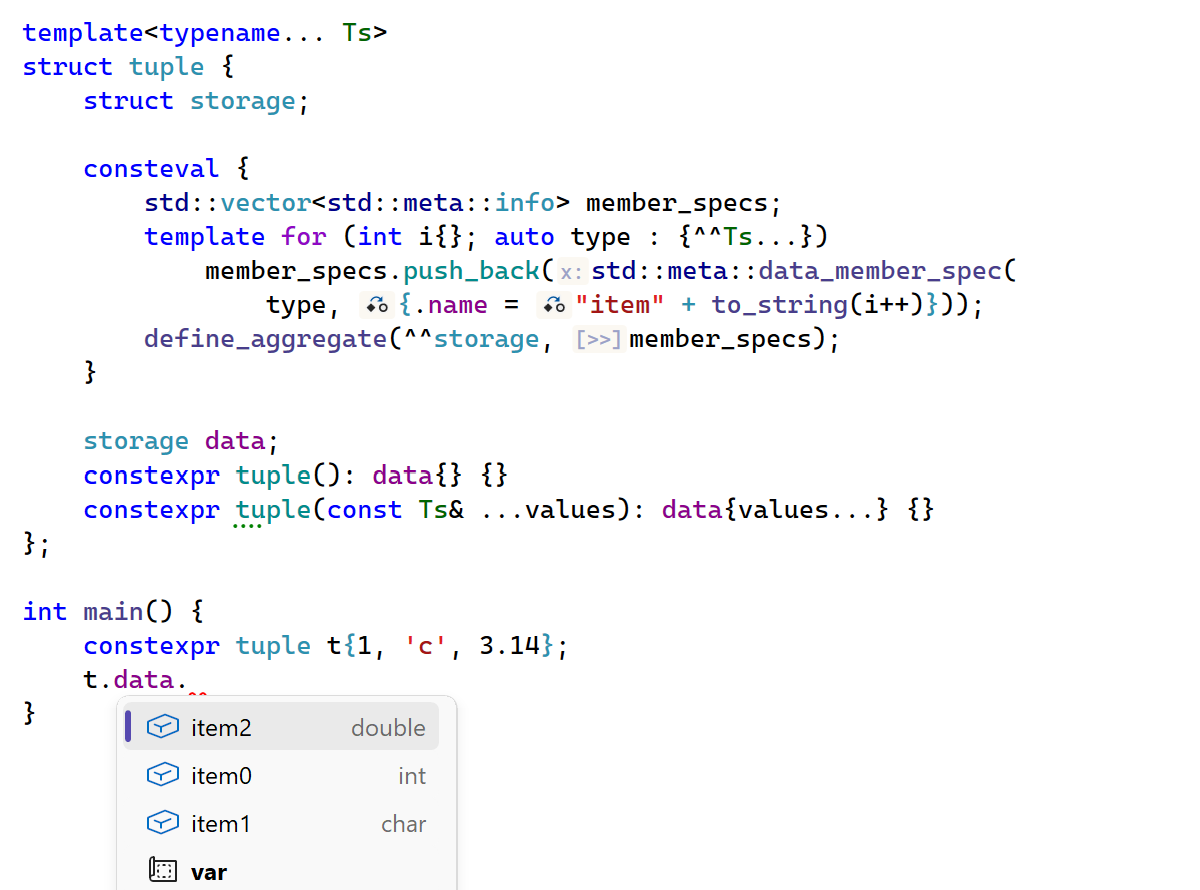
With this update, ReSharper C++ recognizes the core reflection primitives:

  • The ^^ (reflect) operator, which produces a std::meta::info value representing the reflected entity.
  • The [: ... :] (splice) syntax, which converts a reflection value back into a language construct.
  • Compile-time queries on reflected types, members, enumerators, and other entities.

Of the major C++ compilers, currently only GCC 16 supports C++26 reflection. One way you can experiment with C++26 reflection in Visual Studio right now is by creating a Linux C++ project and compiling it using WSL on a Linux distribution that includes GCC 16, like Fedora 44.

Related C++26 features

Support for reflection is complemented by two related C++26 language features:

  • ReSharper C++ now supports consteval { ... } blocks, which are evaluated at compile time and can inject declarations into the enclosing scope. consteval blocks provide a clean way to trigger compile-time side effects, making them particularly useful for practical metaprogramming with reflection.
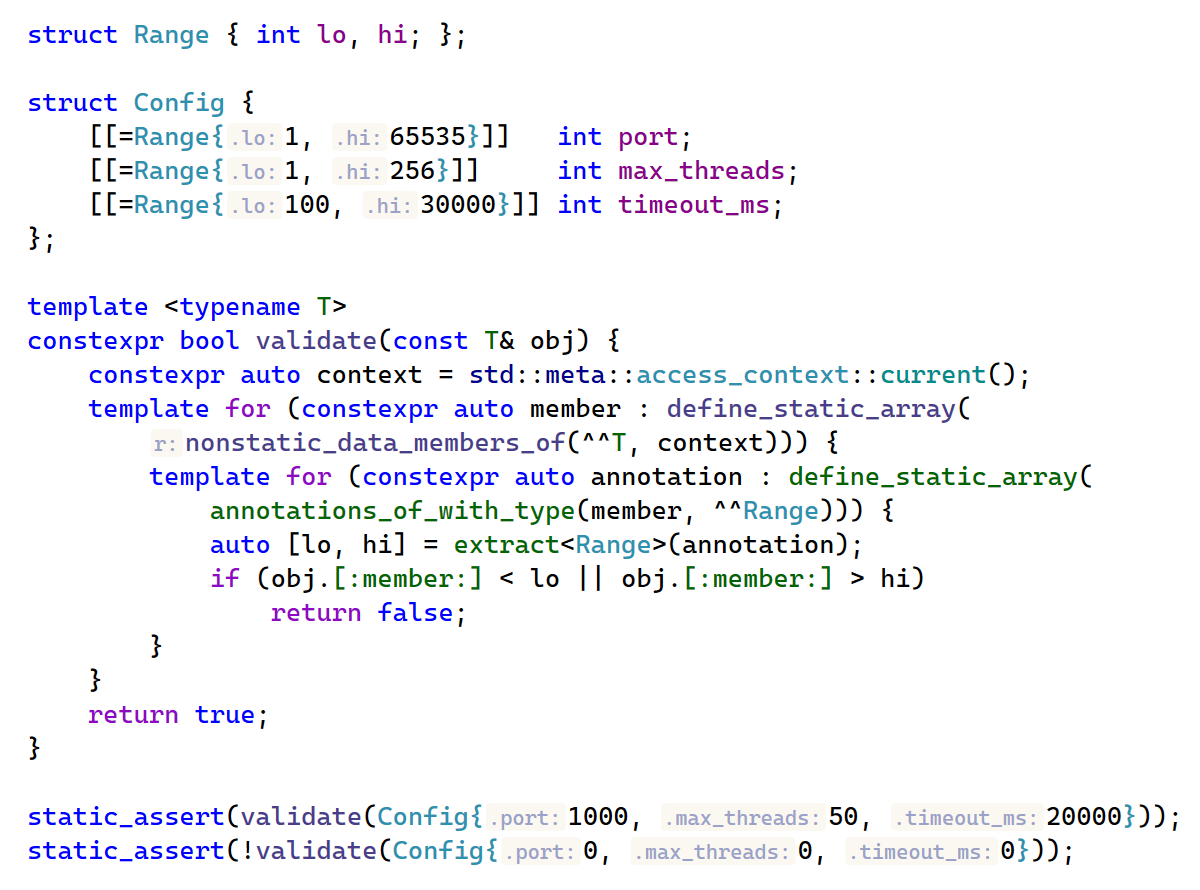
  • User-defined annotations can now be attached to declarations and queried through the reflection API, enabling custom metadata-driven code generation.

constexpr evaluation

We’ve also updated the constexpr evaluator with two important capabilities:

  • The evaluator now supports dynamic memory allocation during constant evaluation – a feature introduced in C++20. This enables correct evaluation of constexpr code that uses new/delete or standard containers like std::vector and std::string.
  • The evaluator now supports C++26 constexpr exceptions and handles try/catch and throw expressions during constant evaluation.

ISPC language support

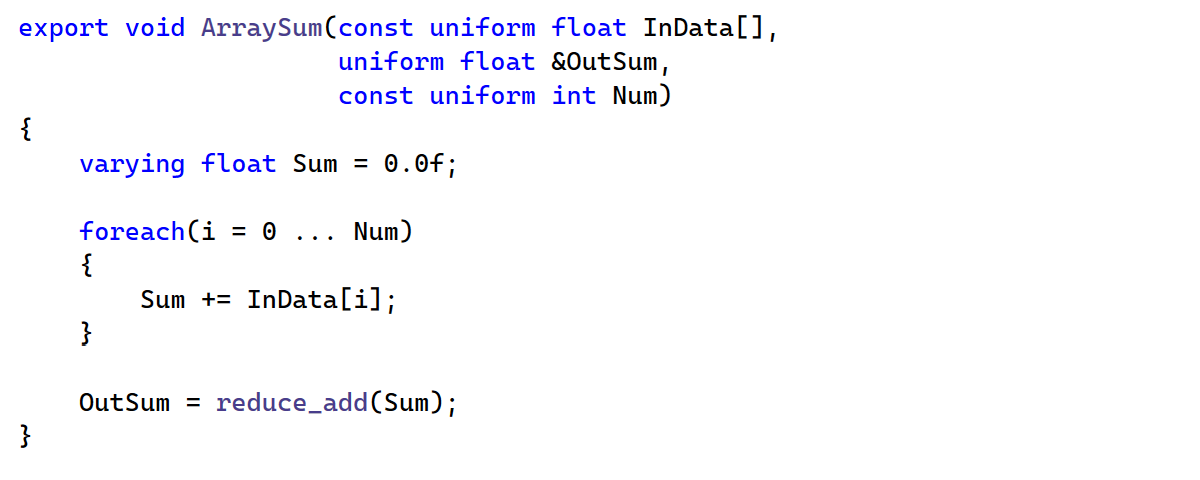
We’ve added support for ISPC (Intel SPMD Program Compiler), a language designed for high-performance parallel programming on CPUs. ISPC is based on the SPMD programming model, where you write code that appears to be a standard serial program, but at runtime, multiple program instances execute in parallel on the target hardware. ISPC is widely used in game engines, rendering systems, and scientific computing, including Unreal Engine projects.

ReSharper C++ now provides syntax highlighting, code analysis, navigation, and coding assistance for ISPC files, bringing the same quality of editor support you expect for C++ to your ISPC code.

Unreal Engine

Performance

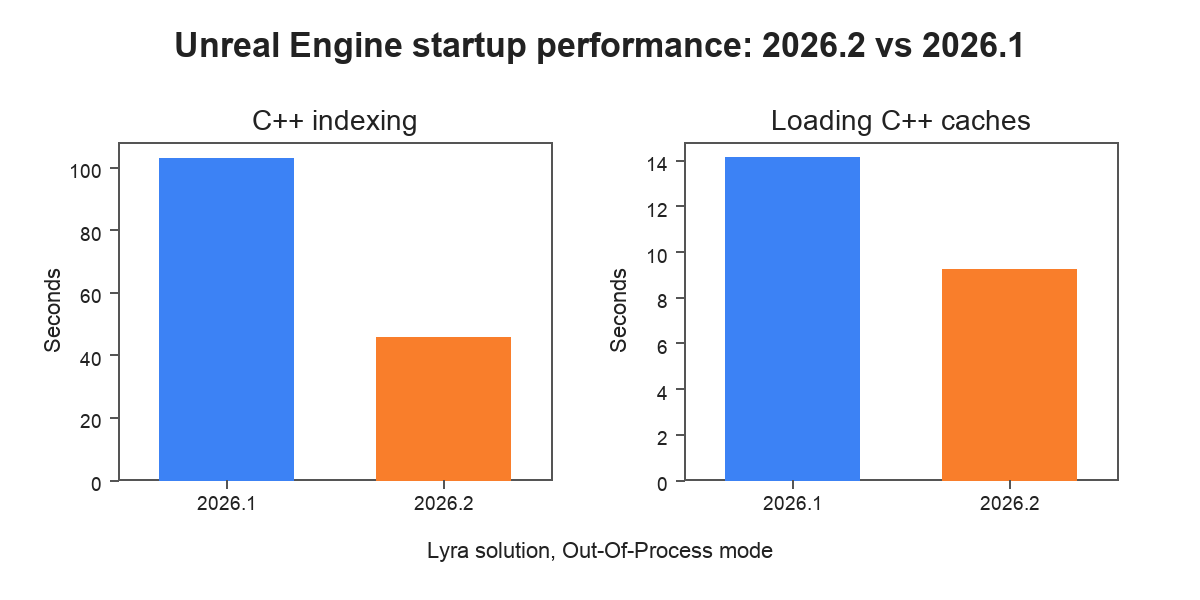
This release brings major performance improvements during startup in Unreal Engine projects. ReSharper C++ now uses the project information from UnrealBuildTool to speed up initial indexing by analyzing only files included in the Unreal Engine project model. Combined with other optimizations, including improvements in multithreaded indexing, this results in a significant speedup.

According to our measurements on the Lyra sample solution:

  • Initial indexing of C++ code is up to 55% faster.
  • Loading C++ caches during warm startup is up to 35% faster.

You can disable the new indexing behavior by unchecking the Index only files in Unreal Engine project model option on the Code Editing | C/C++ | Unreal Engine settings page.

Blueprint support

Blueprint support has also undergone a major overhaul, resulting in significantly improved indexing time. On the Lyra sample solution, indexing Blueprints is up to 40% faster, but the exact speedup in your project depends on the structure of your assets.

ReSharper C++ now also discovers usages of gameplay tags inside Blueprint assets and shows them in Code Vision and Find usages results, giving you a complete picture of where your gameplay tags are used across the project.

Code analysis

Internal linkage

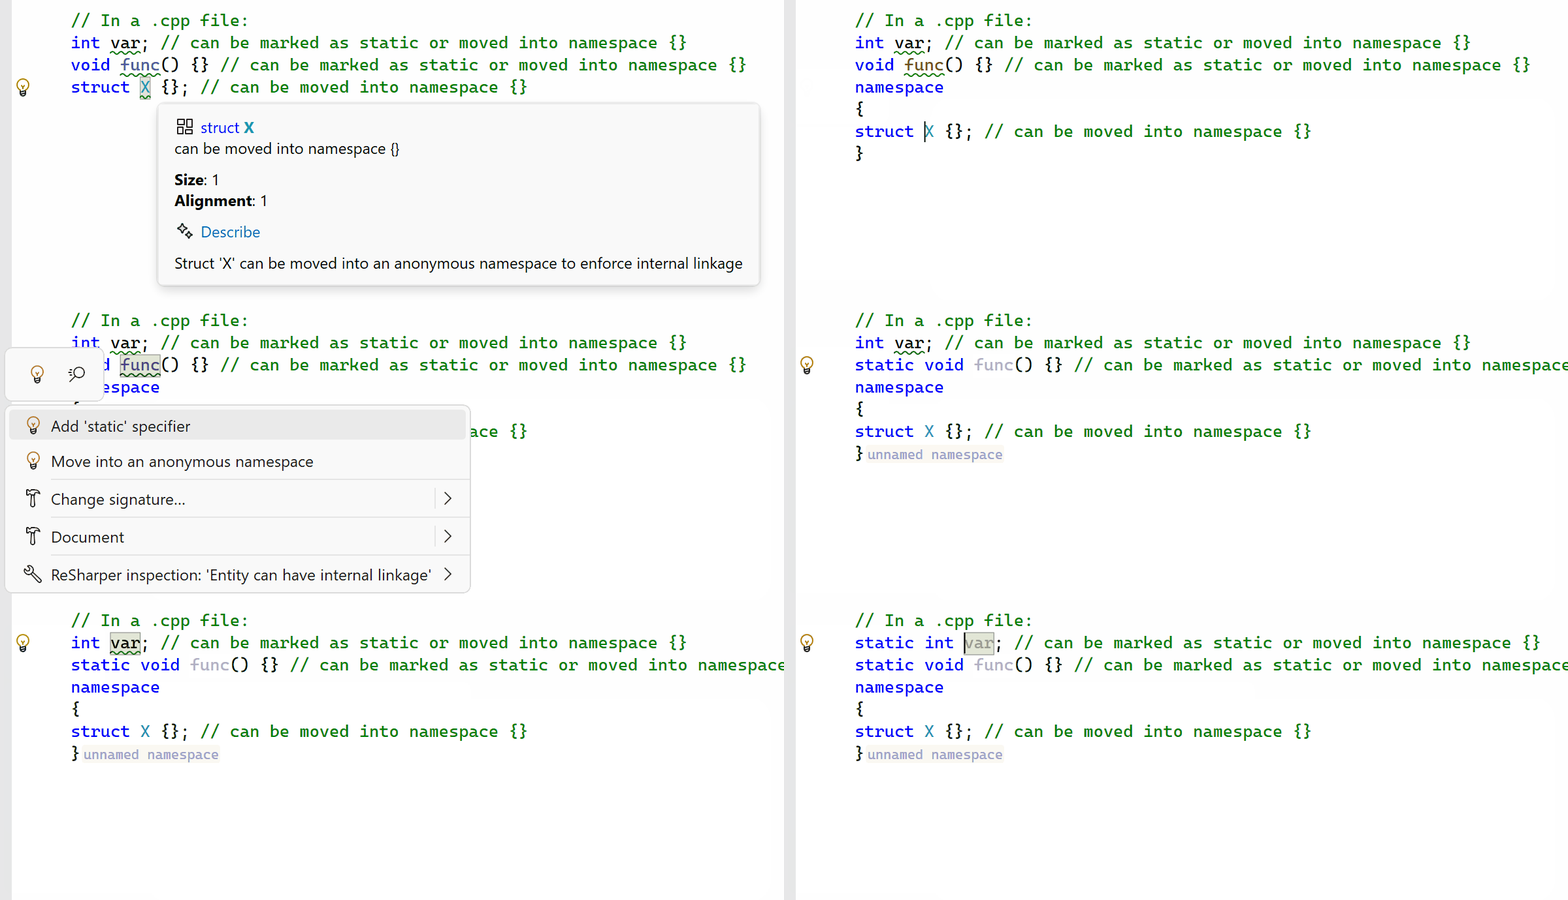
The new Entity can have internal linkage inspection detects functions, variables, and classes that are not used outside their translation unit. You can use the provided fixes to mark such entities static or move them into an anonymous namespace, which helps the compiler optimize and prevents unintended linkage conflicts.

Designated initializers in aggregate initialization

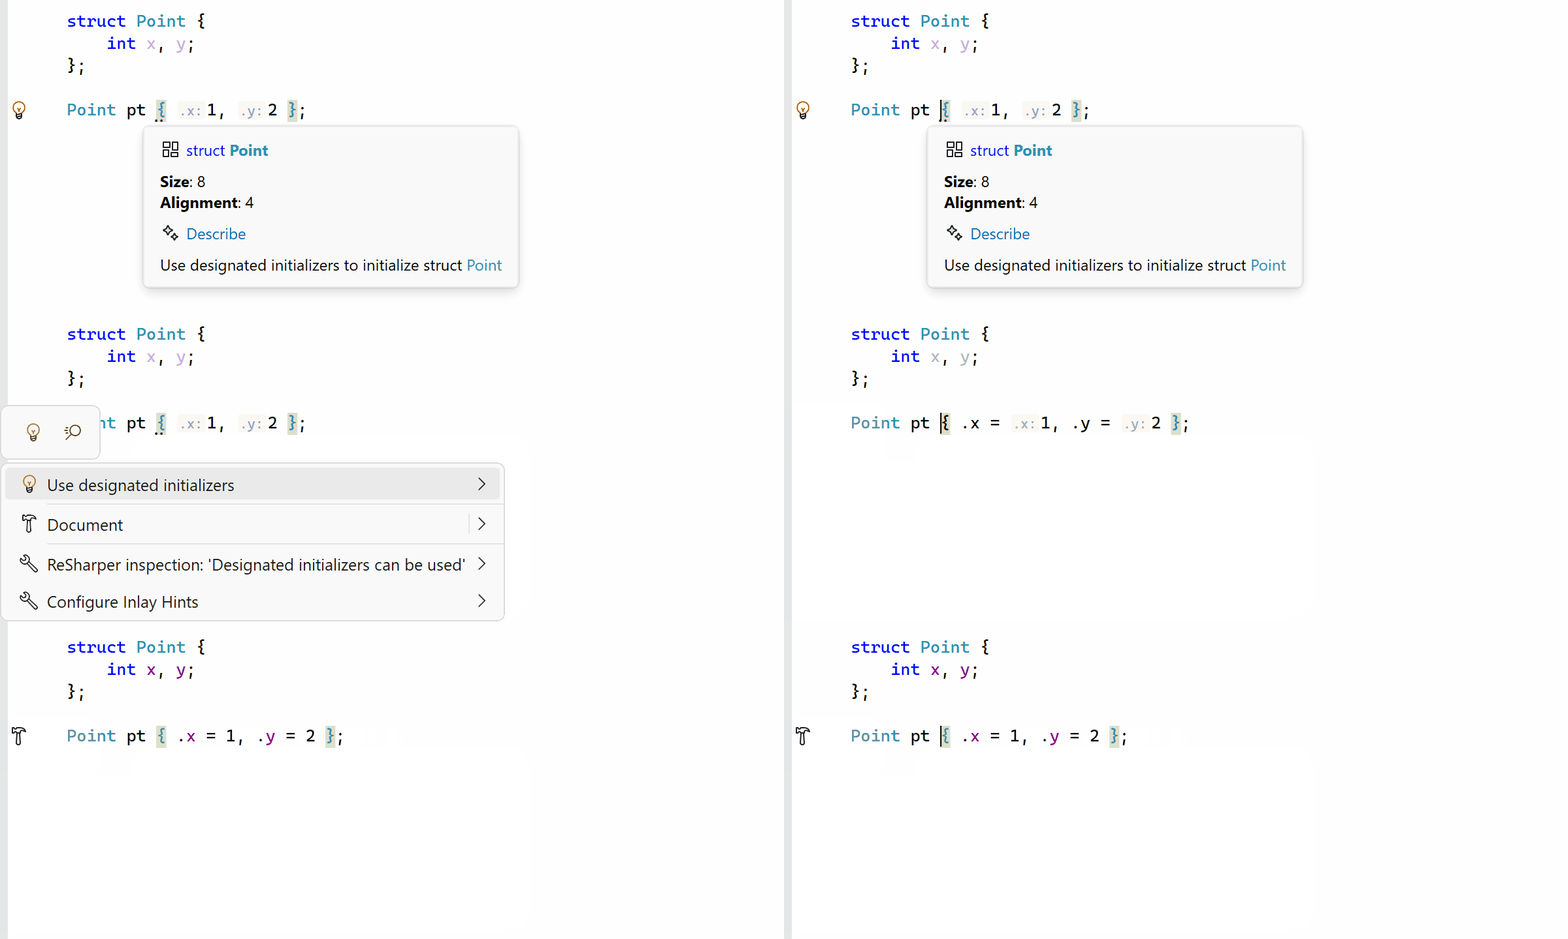
ReSharper C++ now suggests adding designators to braced initializer lists in aggregate initialization. Designated initializers, available since C++20 and C99, make it explicit which member each initializer corresponds to, improving code readability and reducing the chance of errors when members are reordered. A corresponding context action is also available and can be used even when the inspection is disabled.

Calls to overridden base functions

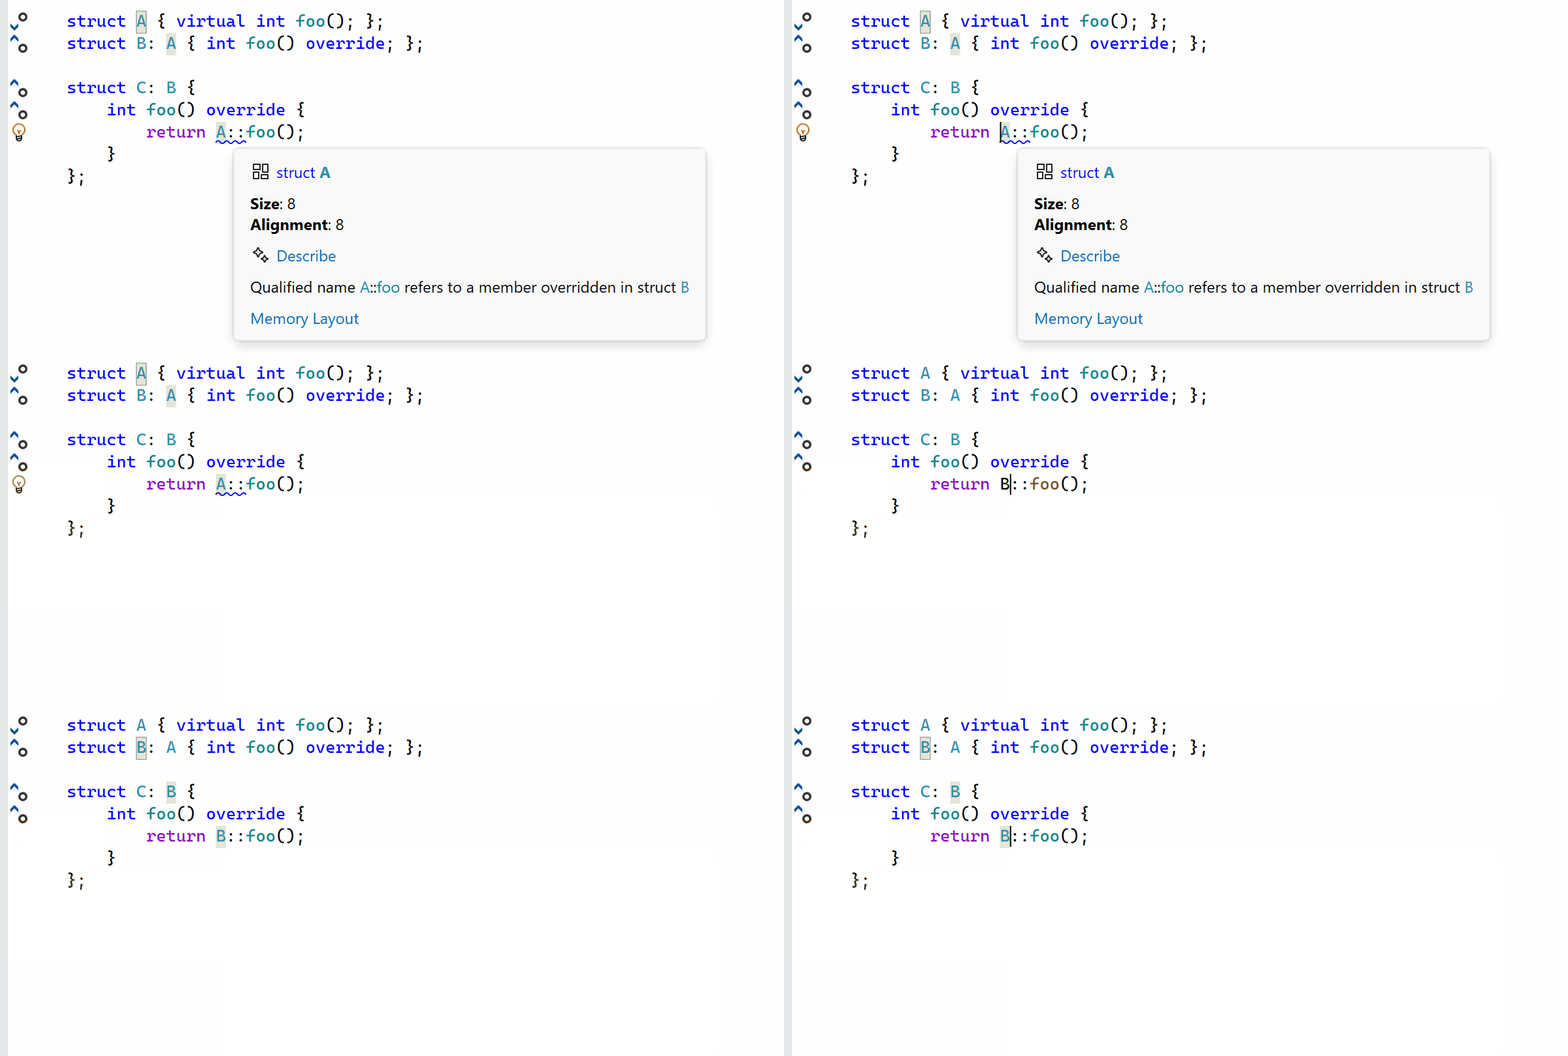
Another new inspection detects qualified calls to base virtual functions that are overridden in a derived class. Calling a base-class virtual function directly rather than through virtual dispatch can be a source of subtle bugs, and this inspection helps catch such cases.

[[jetbrains::used_implicitly]] attribute

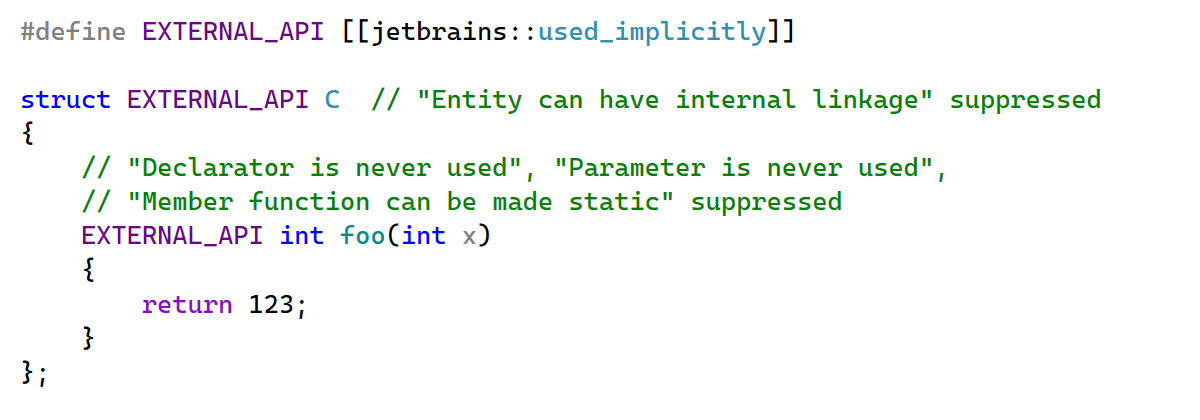
ReSharper C++ now recognizes the [[jetbrains::used_implicitly]] attribute, which can be applied to symbols to suppress inspections that would otherwise suggest changing their signature or linkage. This is useful for symbols that are used through reflection, code generation, or other mechanisms not visible to static analysis.

Coding assistance

Refactoring improvements

Two refactoring improvements make restructuring code easier:

  • Invoking Inline Function on a function declaration now inlines all usages of the function throughout the codebase, not just the usage under the cursor.
  • The Extract Method refactoring is now available inside lambda bodies, letting you factor out parts of a lambda into a separate function.

Context actions

New context actions help with day-to-day tasks:

  • A new context action lets you easily toggle the const qualifier on a member function.
  • You can now quickly insert a #pragma clang diagnostic ignored directive to suppress a specific Clang diagnostic on the current line.
  • In Unreal Engine projects, you can now copy the include path for the currently opened header file from the Copy Code Reference menu, making it easy to paste the correct #include directive.

Tell us your thoughts

This post covered the highlights, but if you want the full details on these improvements, head on over to the What’s New in ReSharper C++ 2026.2 page.

Download the latest release and let us know how it works for your projects.

Read the whole story
alvinashcraft
52 minutes ago
reply
Pennsylvania, USA
Share this story
Delete
Next Page of Stories