Sr. Content Developer at Microsoft, working remotely in PA, TechBash conference organizer, former Microsoft MVP, Husband, Dad and Geek.
152142 stories
·
33 followers

Xbox Game Pass Ultimate gets a price cut but loses new Call of Duty games

1 Share
Vector illustration of the Xbox logo.

After Xbox CEO Asha Sharma admitted last week that "Game Pass has become too expensive for players," Microsoft is dropping the price of Xbox Game Pass Ultimate and PC Game Pass. Starting today, Xbox Game Pass Ultimate drops from $29.99 to $22.99 a month, and PC Game Pass moves to $13.99, down from $16.49 a month.

The price drops are being fueled in part by future of Call of Duty titles no longer joining Game Pass Ultimate or PC Game Pass at launch. "New Call of Duty games will be added to Game Pass Ultimate and PC Game Pass during the following holiday season (about a year later), while existing Call of Duty titles already in the library wi …

Read the full story at The Verge.

Read the whole story
alvinashcraft
32 minutes ago
reply
Pennsylvania, USA
Share this story
Delete

The next evolution of The Verge’s homepage is here

1 Share
Promotional image showing The Verge’s redesigned homepage on a laptop and smartphone, featuring a split layout with a large featured story on the left and a chronological news feed on the right, set against a gray background with bright yellow accents.

When we updated our homepage in 2022, our primary goal was simple: The Verge should be fun to read, every time you visit. With that update, we introduced the homepage StoryStream and Quick Posts, and it was built to redesign the relationship we have with you, our audience. 

It’s been almost four years since then, and a lot has changed. The fall of Twitter, the rise of AI, and major shifts in how people discover and follow news have reshaped how readers find us and engage with our journalism. In all of that, one thing has become especially clear: You, our readers, are not a monolith.

Some of you visit multiple times a day, every day. Others check in a few times a week. Some start with the homepage. Others come via RSS or newsletters. We’re lucky to have an audience that is both broad and deeply loyal. But it also means a single, fixed homepage has a hard time serving everyone well.

One issue stood out in particular: Some of our best work simply didn’t stay visible long enough. Stories would move quickly through the reverse chronological feed and risk being pinned, breaking the flow of that feed, or compete for limited space in top stories. This meant some of our great reporting and ambitious packages could be easy to miss.

This update is our first attempt at better balancing our work, which is part magazine, part firehose of news.

On desktop, that means separating those two modes more clearly. The left side of the homepage is now where we highlight our top stories of the day, followed by story sets, which are collections of stories around a topic. These might center on a live event, a major news moment, or a larger package. The goal is simply to give important work more room to breathe and more time to be seen.

The reverse chronological feed isn’t going away. It now lives on the right side of the homepage as an uninterrupted stream of everything we publish. No pinned stories, no non-chronological interruptions. Just the latest articles and Quick Posts, in order. Behind a toggle, you’ll still find the Following feed, with updates from the topics and authors you care about most.

Elsewhere on the page, we’re continuing to surface collections of articles like Most Popular and Most Discussed, along with the latest from key areas we cover, including tech and reviews.

On mobile, these same ideas translate into feeds you can toggle between at the top of your screen.

All of this is meant to make it easier to move between two very real ways of reading The Verge: seeing our biggest reporting and what we think is most important, or diving into the firehose to pick what is most important to you.

We’ve created a new Verge product updates page where we’ll share what we’re working on and what we ship. We’ve also started a user research group because we want to hear directly from you as we make decisions about what to build or iterate on next. In some cases, we’ll even share and test ideas before they roll out more broadly. We did that with this version of the homepage.

To be clear, we don’t expect this homepage will solve everything for everyone. It’s shorter than the previous version by design because we plan to add to it and evolve it over time.

There’s a lot more we want to explore! Maybe logged-in users can choose whether they land on Top Stories or Latest by default. Maybe articles you’ve already read are grayed out, making it easier to find something new to read. Maybe we try entirely new ways of organizing our work altogether! Some of these ideas will land. Some won’t. That’s part of the process we will be working with going forward.

And this goes beyond the homepage: We’re working on getting dark mode out this year (finally), launching an app, and experimenting with federation. There are so many possibilities, and we’re excited to hear what you care about the most.

This approach will take time to fully ramp up, and not every change will feel immediately valuable to every reader. But our goal remains the same: The Verge should be fun to read, every time you visit. We’re confident working this way, in the open and in collaboration with you, our readers, is how we all get there.


It takes a lot of people to rethink a homepage.

This experience was brought to life by the Verge product team, with contributions and support from teams across The Verge, including editorial, audience, art and design, and customer support. We also partnered closely with teams across Vox Media, including ads, analytics, and QA.

Big thanks to Nilay, Helen, and David for their guidance and support throughout.

We’ll keep sharing what we’re building next on our product updates feed. Follow along — tell us what’s working, what’s not, and what you want to see more of. We want to hear it all!

Read the whole story
alvinashcraft
32 minutes ago
reply
Pennsylvania, USA
Share this story
Delete

Angular Grid at Scale: How Kendo UI Handles Millions of Rows

1 Share

Let’s say the Monday after the Super Bowl, your boss wants to see a dashboard list of the more than 120 million people who watched it. (The reality of this situation does not matter. Just go with it!) Your boss says, “The dashboard needs to show every connected viewer in real time. A grid. Sortable. Filterable. And it can’t be slow.”

You open your code editor, create an HTML table, and try to render one million rows. The browser freezes. The tab crashes. Your Monday just got worse.

You need to display large amounts of data in a grid without killing the browser. The trick is simple: don’t render what the user can’t see.

This is where virtual scrolling comes in. Instead of creating a DOM element for every single row, you only render the rows visible on screen, plus a few extra. The user scrolls smoothly through millions of records, each new batch loading in as needed, and the browser stays fast and responsive.

Let’s do it together! Today, we will build a Super Bowl Dashboard in Angular. We will see how to handle one million viewers using Progress Kendo UI for Angular Grid. We will start with a simple table, see why it fails and then fix it using virtual scrolling and server-side data fetching.

Let’s make this work in a real project.

Setting Up the Project

First, create a new Angular application by running the command:

ng new superbowl-dashboard

Navigate to the project:

cd superbowl-dashboard

Now install the Angular Grid. The ng add command handles dependencies and theme configuration for us:

ng add @progress/kendo-angular-grid --skip-confirmation

This installs the grid package and its peer dependencies and sets up the Kendo UI default theme.

Once the installation is done, we need to activate our Kendo UI license. This step removes the watermark and unlocks all the features.

Don’t have a license? Don’t worry! You can get a completely free trial with no credit card required, so you can follow along and build the dashboard without worrying about the watermark.

To do this, download the license key file from your Telerik account. Then, run this command inside your project folder:

npx kendo-ui-license activate

Because the Kendo UI Grid is so robust, it includes many features that can slightly increase the initial bundle size. We need to prevent Angular from throwing a “bundle initial exceeded maximum budget” error when we run or build an app. Open the angular.json file and increase the budgets config for the initial type to around 5MB for warnings and 10MB for errors.

Perfect! We have a fresh Angular project with Kendo UI Grid installed and styled. Now let’s generate our Super Bowl viewers’ fake data.

Generating One Million Viewers

Before we start with the grid, we need data. We’ll create a single service that handles everything: generating fake viewer data for client-side demos and simulating a paginated server API for server-side scrolling.

To create the service, open the terminal and run the following Angular CLI command:

ng g s services/viewer

First, we will define a simple Viewer interface so our grid knows what fields to expect. Then, our service will include a generateViewers method to create mock data, and a fetchPage method that simulates a paginated server API. We won’t use fetchPage right away, but it will be ready for when we implement server-side virtual scrolling later.

Don’t worry too much about the exact implementation of the helper methods; the main idea here is not how to generate fake users, but how to create a grid capable of supporting massive amounts of data without breaking a sweat!

Open src/app/services/viewer.ts and add the following:

import { Injectable } from "@angular/core";

export interface Viewer {
  id: number;
  username: string;
  watchTimeMin: number;
  isLive: boolean;
}

export interface PagedResult {
  data: Viewer[];
  total: number;
}

const ADJECTIVES = [
  "Swift",
  "Lucky",
  "Bold",
  "Chill",
  "Epic",
  "Happy",
  "Lazy",
  "Wild",
  "Cool",
  "Fast",
];

const NOUNS = [
  "Fan",
  "Eagle",
  "Tiger",
  "Bear",
  "Wolf",
  "Hawk",
  "Fox",
  "Lion",
  "Shark",
  "Bull",
];

@Injectable({ providedIn: "root" })
export class ViewerService {
  private readonly TOTAL_VIEWERS = 1_000_000;

  generateViewers(count: number, startId = 0): Viewer[] {
    const viewers: Viewer[] = [];

    for (let i = 0; i < count; i++) {
      viewers.push({
        id: startId + i + 1,
        username: `${this.randomFrom(ADJECTIVES)}${this.randomFrom(NOUNS)}${this.randomBetween(1, 9999)}`,
        watchTimeMin: this.randomBetween(1, 240),
        isLive: Math.random() > 0.08,
      });
    }

    return viewers;
  }

  /**
   * Simulates a server API call with pagination.
   * Uses a small delay to mimic real network latency.
   */
  async fetchPage(skip: number, take: number): Promise<PagedResult> {
    await new Promise((resolve) => setTimeout(resolve, 80));

    return {
      data: this.generateViewers(take, skip),
      total: this.TOTAL_VIEWERS,
    };
  }

  private randomFrom<T>(arr: T[]): T {
    return arr[Math.floor(Math.random() * arr.length)];
  }

  private randomBetween(min: number, max: number): number {
    return Math.floor(Math.random() * (max - min + 1)) + min;
  }
}

Each viewer has a fun auto-generated username (like SwiftEagle4821), their watch time and a live status. The fetchPage method is an async function that simulates a paginated API with a small delay to mimic network latency. We’ll use generateViewers first and come back to fetchPage later.

With our service ready, let’s see what happens when we try to render all these viewers at once.

The Problem: Rendering All Rows at Once

Let’s try to do it and experience the problem firsthand. Open src/app/app.ts and replace its content:

import { Component, inject, signal } from "@angular/core";
import { CommonModule } from "@angular/common";
import { ViewerService, Viewer } from "./services/viewer";

@Component({
  selector: "app-root",
  standalone: true,
  imports: [CommonModule],
  templateUrl: "./app.html", 
})
export class App {
  private viewerService = inject(ViewerService);
  viewers = signal<Viewer[]>([]);

  loadViewers(count: number): void {
    const data = this.viewerService.generateViewers(count);
    this.viewers.set(data);
  }
}

Now, let’s open our template file, src/app/app.html and add a few buttons for 1K, 10K and 100K viewers. These buttons will call our loadViewers() method to quickly generate different amounts of fake data.

Finally, we’ll use the <kendo-grid> component in our template. The key property to pay attention to is [data]="viewers()", which tells Kendo UI to read from our reactive signal and constantly display the list of viewers.

<h1>Super Bowl Viewers Dashboard</h1>
<p>Connected viewers: {{ viewers().length.toLocaleString() }}</p>

<div class="actions">
  <button (click)="loadViewers(1_000)">1K Viewers</button>
  <button (click)="loadViewers(10_000)">10K Viewers</button>
  <button (click)="loadViewers(100_000)">100K Viewers</button>
  <button (click)="loadViewers(1_000_000)">1M Viewers</button>
</div>

<div class="grid-container" style="height: 600px; overflow: auto;">
  <table border="1" style="width: 100%; border-collapse: collapse;">
    <thead>
      <tr>
        <th>#</th>
        <th>Username</th>
        <th>Watch (min)</th>
        <th>Live</th>
      </tr>
    </thead>
    <tbody>
      @for (viewer of viewers(); track viewer.id) {
      <tr>
        <td>{{ viewer.id }}</td>
        <td>{{ viewer.username }}</td>
        <td>{{ viewer.watchTimeMin }}</td>
        <td>{{ viewer.isLive ? 'Yes' : 'No' }}</td>
      </tr>
      }
    </tbody>
  </table>
</div>

Now we can run our app. Go to the terminal and execute the following command:

ng serve

This will start the local development server. Once it finishes compiling, open your browser and navigate to http://localhost:4200.

Click “1K Viewers” and it feels smooth. Click “10K Viewers” and you will notice a significant lag.

Now click “100K Viewers” … and watch the browser scream for help. The page will freeze, the scroll will be jumpy and you might even get the “Page Unresponsive” dialog.

Page Unresponsive dialog

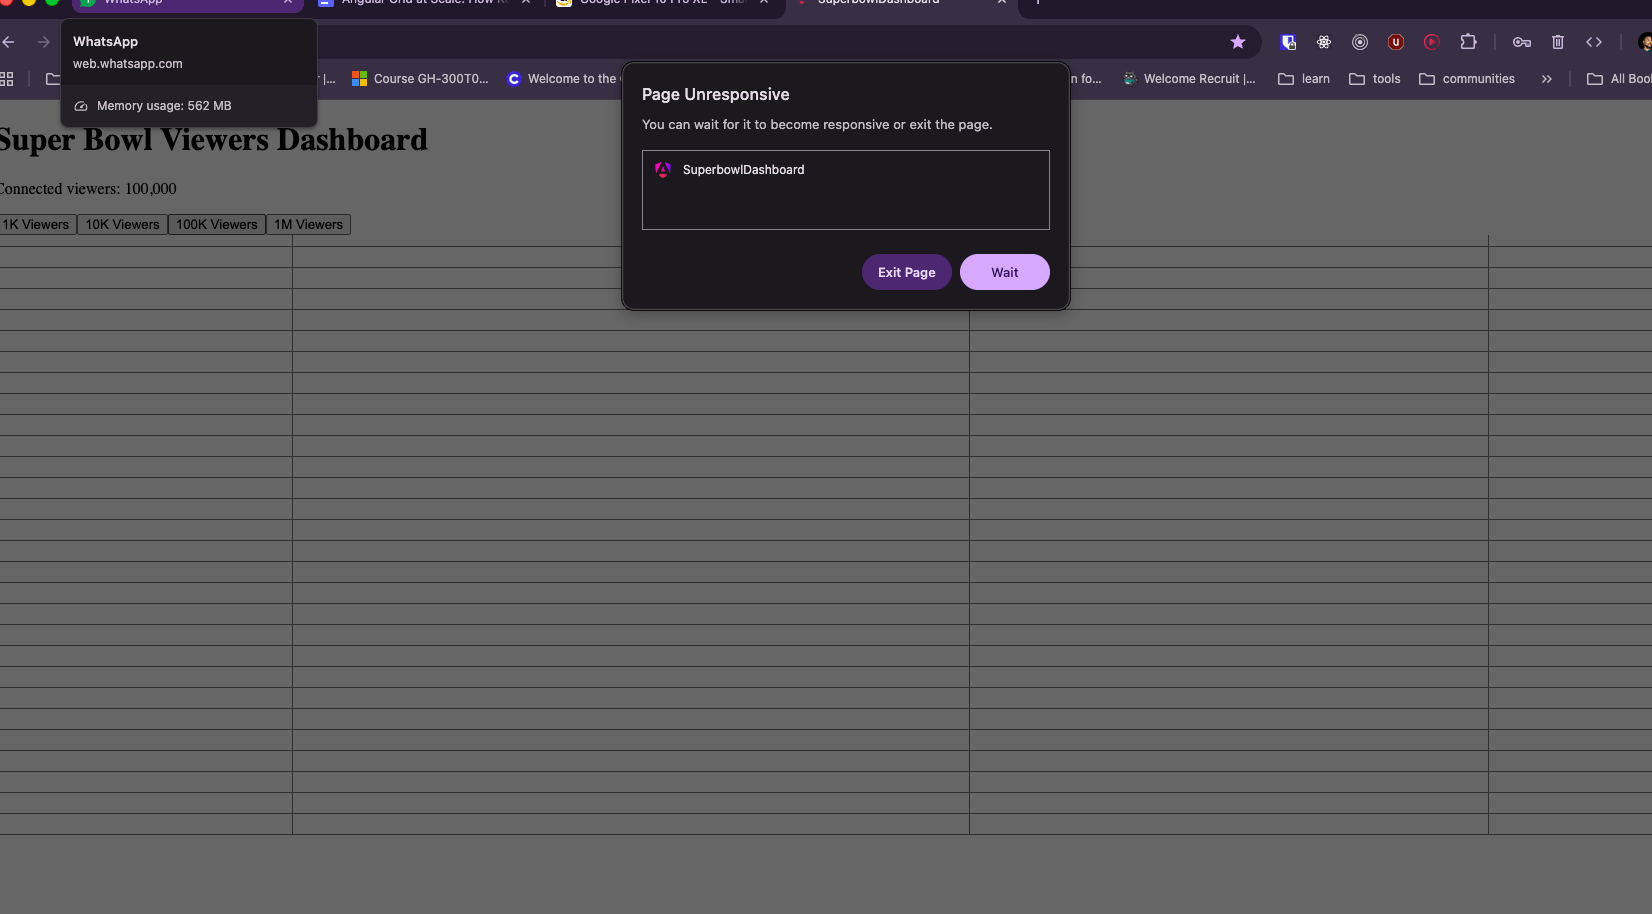
We have seen the problem: standard HTML tables and simple loops cannot handle huge datasets. When you click the 1M Viewers button, the browser stops working.

OK, but how can we fix this?

The Solution: Angular Grid withVirtual Scrolling

If you read about Kendo UI, you know the Kendo UI Grid, but before we to start to use it, I want to explain “virtual scrolling.” Think of virtual scrolling like a camera moving over a big stadium. You only see the seats in the camera frame, maybe 50 seats. The stadium has 1,000,000 seats, but the camera doesn’t need to show all of them at once. It only shows what is visible.

Kendo UI Grid does exactly this with one property: scrollable="virtual". Let’s use it.

First, update your app.ts. We need to import KENDO_GRID and remove the CommonModule because the grid will handle everything now:

import { Component, inject, signal } from "@angular/core";
import { KENDO_GRID } from "@progress/kendo-angular-grid";
import { ViewerService, Viewer } from "./services/viewer";

@Component({
  selector: "app-root",
  imports: [KENDO_GRID],
  templateUrl: "./app.html", 
})
export class App {
  private viewerService = inject(ViewerService);
  viewers = signal<Viewer[]>([]);

  loadViewers(count: number): void {
    const data = this.viewerService.generateViewers(count);
    this.viewers.set(data);
  }
}

Now, let’s update src/app/app.html. We will replace the standard <table> with the <kendo-grid> component:

<h1>Super Bowl Viewers Dashboard</h1>
<p>Connected viewers: {{ viewers().length.toLocaleString() }}</p>

<div class="actions">
  <button (click)="loadViewers(10_000)">10K</button>
  <button (click)="loadViewers(100_000)">100K</button>
  <button (click)="loadViewers(1_000_000)">1M</button>
</div>

<kendo-grid
  [data]="viewers()"
  [height]="600"
  scrollable="virtual"
  [rowHeight]="36"
  [pageSize]="50"
>
  <kendo-grid-column field="id" title="#" [width]="70"></kendo-grid-column>
  <kendo-grid-column field="username" title="Username" [width]="180"></kendo-grid-column>
  <kendo-grid-column field="watchTimeMin" title="Watch (min)" [width]="110"></kendo-grid-column>
  <kendo-grid-column field="isLive" title="Live" [width]="70"></kendo-grid-column>
</kendo-grid>

Why Does This Work?

We added three important properties to the <kendo-grid> to make it fast:

  1. scrollable="virtual": This tells Kendo UI: “Don’t create all the rows at once. Only create the ones the user can see right now.”
  2. [rowHeight]="36": The grid needs to know exactly how tall each row is. This helps the grid calculate the scroll position correctly.
  3. [pageSize]="50": This is how many rows Kendo UI keeps in the DOM. A good tip: set this to 3 times the number of rows visible on your screen.

Now, if you click the buttons, you will see that a page with 10,000, 100,000 or even one million viewers scrolls smoothly. The browser is fast because only ~50 rows are in the DOM at any time.

Kendo UI Grid does all the hard work for the rendering.

But there is one more problem. We fixed the rendering, but we are still loading one million records into the browser’s memory. For a real app, loading 1,000,000 records at once is a bad idea. It uses too much RAM and it is slow to start.

What if we want to show one million users in real-time without using all the RAM? Let’s use the final solution: Server-Side Data Fetching.

Server-Side Data Fetching with Endless Scrolling

Here’s the reality: the Super Bowl has 120 million viewers. We can’t load all of them into the browser at once. Instead, the grid should fetch data page by page as the user scrolls , loading only what’s needed, when it’s needed.

Kendo UI Grid supports this out of the box with the scrollBottom event. When the user scrolls to the bottom of the current data, the grid fires this event, and we simply fetch the next page and append it. Let’s build it!

Generate a new component by running the command in the terminal:

ng g c components/live-grid

Open src/app/components/live-grid/live-grid.ts and replace the content with:

import { Component, inject, signal, ChangeDetectionStrategy } from "@angular/core";
import { KENDO_GRID } from "@progress/kendo-angular-grid";
import { ViewerService, Viewer } from "../../services/viewer";

@Component({
  selector: "app-live-grid",
  imports: [KENDO_GRID],
  templateUrl: "./live-grid.html",
  changeDetection: ChangeDetectionStrategy.OnPush,
})
export class LiveGrid {
  private viewerService = inject(ViewerService);

  isConnected = signal(false);
  loading = signal(false);
  viewers = signal<Viewer[]>([]);
  pageSize = 1_000;

  connect(): void {
    this.isConnected.set(true);
    this.loadMore();
  }

  onScrollBottom(): void {
    if (this.loading()) return;
    this.loadMore();
  }

  private loadMore(): void {
    this.loading.set(true);
    
    this.viewerService.fetchPage(this.viewers().length, this.pageSize).then((result) => {
      this.viewers.update((current) => [...current, ...result.data]);
      this.loading.set(false);
    });
  }
}

The logic here is straightforward. First, connect() starts the process by fetching the initial data page using loadMore(). Then, whenever the user scrolls to the bottom of the grid, the (scrollBottom) event fires, triggering onScrollBottom() to fetch and append the next chunk of data to our viewers signal.

To make this work in the UI, we just need to set scrollable="scrollable" on our Kendo Grid to enable endless scrolling, and bind our loading signal to show a skeleton animation during the fetch.

Now let’s build the template in src/app/components/live-grid/live-grid.html to tie all of this together:

<h2>Live Server Feed</h2>
<p>Viewers: {{ viewers().length }}</p>

<button (click)="connect()" [disabled]="isConnected()">Connect to Live Feed</button>

@if (isConnected()) {
<kendo-grid 
    [data]="viewers()" 
    [height]="600" 
    scrollable="scrollable"
    [loading]="loading()"
    (scrollBottom)="onScrollBottom()">
    <kendo-grid-column field="id" title="#" [width]="70"></kendo-grid-column>
    <kendo-grid-column field="username" title="Username" [width]="180"></kendo-grid-column>
    <kendo-grid-column field="watchTimeMin" title="Watch (min)" [width]="110"></kendo-grid-column>
    <kendo-grid-column field="isLive" title="Live" [width]="70"></kendo-grid-column>
</kendo-grid>
}

Wire the component into the app. Update app.ts:

import { Component } from "@angular/core";
import { LiveGrid } from "./components/live-grid/live-grid";

@Component({
  selector: "app-root",
  imports: [LiveGrid],
  templateUrl: "./app.html",
})
export class App {}

And src/app/app.html:

<h1>Super Bowl Viewers Dashboard</h1>
<app-live-grid />

Run ng serve, open http://localhost:4200 and click “Connect to Live Feed.”

You’ll see the grid load the first 1,000 viewers. Now scroll down. When you reach the bottom, the grid fetches the next 1,000 viewers and appends them and the loading skeleton appears briefly while data is being fetched. Keep scrolling, and watch the viewers counter grow until it gets to 1,000,000. Yeah!!

Super Bowl viewers dashboard being scrolled and scrolled, very smoothly

Recap

We saw the problem: rendering thousands of rows at once makes the browser freeze. Then we added Kendo UI virtual scrolling with scrollable="virtual". This is the secret to showing large datasets without crashing.

Finally, we used server-side data fetching with the (scrollBottom) event. The grid loads data page by page. This keeps the memory usage low and the experience smooth.

In your next challenge don’t worry about the data, Kendo UI Grid makes it easy. With a few properties, your dashboard can handle millions of rows. ✌

Give it a try for free!

Try Kendo UI for Angular

Happy coding!

Source Code: https://github.com/danywalls/kendo-grid-large-app

Read the whole story
alvinashcraft
33 minutes ago
reply
Pennsylvania, USA
Share this story
Delete

Blazor Basics: Getting Started with Blazor Development in VS Code

1 Share

Learn how to use Visual Studio Code for Blazor web development. VS Code is a free, lightweight code editor, and it is available for Mac and Linux users (unlike its more robust sibling Visual Studio, which is exclusive to Windows).

While many developers using Windows love the fully integrated development experience Visual Studio provides, it’s not an option for some of us.

We will learn how to set up Visual Studio Code for Blazor web application development, a few first-hand tips and how to conveniently debug.

Why Use Visual Studio Code for Blazor Web Development?

Maybe you or your team already use Visual Studio Code for software development because of its excellent code editor or GIT integration. Why learn something new if you are happy with what you already have?

Another reason that comes to mind is your preferred operating system.

Visual Studio is only available for Windows. While I am a Windows user and have always loved the fully fledged feature set provided by Visual Studio for .NET development, I understand that there are other options.

For macOS or Linux, you do not have the option to use Visual Studio. Visual Studio Code (VS Code) is a great, lightweight, and free alternative.

Also, licensing can be an issue. While the Visual Studio Community edition has limitations, VS Code is free for .NET development, both personal and commercial.

Last but not least, VS Code uses less RAM, hard-drive space and CPU compared to fully fledged IDEs, such as Visual Studio. For hardware constraint situations, it’s an ideal choice.

Getting Started: The Setup

We need two essential things before we can start developing Blazor web applications with VS Code.

  1. Obviously, we need the latest Visual Studio Code version installed
  2. We also need the latest .NET SDK installed

Make sure you can execute the dotnet --version command in a terminal. If it doesn’t show the version of the installed .NET SDK, add the .NET CLI to the PATH variable of your operating system and restart your computer before trying again.

Installing the C# Dev Kit

Next, we want to install the C# Dev Kit extension for Visual Studio Code.

The marketplace page of the C# Dev Kit Visual Studio Code extension.

This extension adds C# development features, including project and solution management, debugging, syntax highlighting, code navigation, refactorings and more, to VS Code. It’s a mature extension with more than 13 million downloads.

Hint: The C# Dev Kit extension not only adds support for Blazor web development but for all C# project types, including desktop, mobile, web, or cloud-native applications.

Creating a Blazor Web App in VS Code

If you open an empty VS Code instance, you’ll get the Create .NET Project menu option in the Explorer panel.

The Explorer panel in Visual Studio Code in an empty project shows the Create .NET Project button.

Pressing the Create .NET Project button will execute a VS Code command that allows you to select the project type. We select the default Blazor Web App project template and choose the destination folder on the hard drive.

Depending on the project template you choose, you’ll be able to add additional information to influence the outcome of the created project.

After a few seconds, the Explorer now shows the project folder containing the created solution file, the project file and the Components folder containing the example pages and layouts.

The Explorer panel in VS Code in a Blazor Web App shows the folders, such as the Components folder and all the required code files.

Hint: We won’t explore the structure and architecture of the Blazor Web application.

Another option for creating a .NET project is using the .NET CLI from the terminal. The dotnet new blazor command creates the same project as shown above.

Running the Blazor Web Application in VS Code

Running a Blazor Web Application is no different from running any other .NET-based application. In a terminal, you can use the dotnet run or dotnet watch run command to run it.

The dotnet watch run command automatically rebuilds and refreshes the browser (hot reload) when you edit the code and save the file.

A terminal executing the dotnet watch run command in the folder of a Blazor Web App.

The application runs the same whether you run it in Visual Studio or from the command line without VS Code. All three options use the .NET CLI under the hood.

Compared to Visual Studio, VS Code is noticeably faster at applying simple changes to components, such as the text of the default Home page component.

Tip: Using hot reload saves a lot of time. Use the dotnet watch run command and open the Counter.razor component. Change the code in the IncrementCount method from currentCount++ to currentCount+=2 and save the file. Whenever you hit the Click Me button, the counter now increases the value by two instead of one.

Debugging C# Code in VS Code

VS Code not only supports running the Blazor web app, but also debugging it.

To enable debugging:

  1. Open the Run and Debug panel (CTRL+SHIFT+D)
  2. Click the Run and Debug button.
  3. Select C#
  4. Select one of the available project options, or launch the Startup project.
  5. Click on Start Debugging (Green Triangle), or press F5.

You can click left of any C# code line to add a breakpoint. A yellow background highlights the code line when the debugger stops the execution. And you can use the toolbar to step through your code and hover over variables to see their values.

The VS Code debugger stopping at a code line and showing the local variables and the toolbar to control the program execution.

The debugging experience is comparable to that of other fully fledged IDEs and allows you to find bugs and understand code execution.

You can add variables to the watch view to keep their values visible as you step through program execution. You also see the call stack whenever the program execution halts, and you can enable or disable the breakpoints.

Hint: Make sure the application isn’t running from a terminal, such as using the dotnet watch run command.

Conclusion

While I personally prefer using Visual Studio 2026 for most of my development work, I hopefully was able to have shown that Visual Studio Code also offers a first-class development environment.

For Linux or macOS, VS Code would definitely be my first choice because it provides most of the tools I regularly use and contains much less bloat than a fully fledged IDE. VS Code is free for personal and commercial use.

Depending on the scope of your project and how you want to work, VS Code is a good choice to get started with Blazor web development. Especially if you already use VS Code for other projects, such as React or Angular web application development.

If you want to learn more about Blazor development, watch my free Blazor Crash Course on YouTube. And stay tuned to the Telerik blog for more Blazor Basics.

Read the whole story
alvinashcraft
33 minutes ago
reply
Pennsylvania, USA
Share this story
Delete

DALEC Developer Experience: Declarative Builds and IDE Integration

1 Share
From: Microsoft Developer
Duration: 12:36
Views: 39

This episode introduces CNCF Project DALEC, a declarative build tool designed to simplify how developers build, secure, package, and distribute containerized applications.

Traditional container builds often rely on complex Dockerfiles and custom scripting, which can create friction in developer workflows and reduce reproducibility across environments. DALEC approaches this problem differently by allowing developers to define builds using a declarative specification, making builds easier to reason about, maintain, and share across teams.

In this episode, we will explore:
1) The motivation behind DALEC and the problems it aims to solve in modern development workflows
2) How declarative container builds can improve consistency, security, and maintainability
3) A walkthrough of the DALEC developer experience, showing how developers can quickly define and build artefacts

Chapters:
00:12 Introduction
00:30 What is Project DALEC
01:15 How DALEC is different from traditional Dockerfile
03:25 Where DALEC fits in a broader supply chain - DEMO
07:11 How to get started with DALEC
09:20 DALEC Documentation
10:20 What's Next
11:15 How to Contribute

Resources:
GitHub Project: https://github.com/project-dalec/dalec
Documentation: https://project-dalec.github.io/dalec/

📌 Let's connect:
Tatsat Mishra | https://www.linkedin.com/in/tatsat-mishra-2390b45/
Brian Golf | https://www.linkedin.com/in/brian-goff-28a65b13/

Subscribe to the Open at Microsoft: https://aka.ms/OpenAtMicrosoft

Open at Microsoft Playlist: https://aka.ms/OpenAtMicrosoftPlaylist

📝Submit Your OSS Project for Open at Microsoft https://aka.ms/OpenAtMsCFP

New episode on Tuesdays!

Read the whole story
alvinashcraft
33 minutes ago
reply
Pennsylvania, USA
Share this story
Delete

How to use MCPUI and Goose to manage GitHub issues

1 Share
From: GitHub
Duration: 1:59
Views: 120

In this demo from GitHub Universe 2025, we explore how to use the Goose AI agent with the GitHub MCP server. Watch as we automatically create and assign a new GitHub issue straight from the terminal. We also dive into MCPUI, demonstrating how your AI agent can respond with fully interactive visual interfaces like a team project calendar.

#GitHubIssues #MCP #Goose

Watch the full video here: https://www.youtube.com/watch?v=PvdptUZ3XeU

Stay up-to-date on all things GitHub by connecting with us:

YouTube: https://gh.io/subgithub
Blog: https://github.blog
X: https://twitter.com/github
LinkedIn: https://linkedin.com/company/github
Insider newsletter: https://resources.github.com/newsletter/
Instagram: https://www.instagram.com/github
TikTok: https://www.tiktok.com/@github

About GitHub
It’s where over 180 million developers create, share, and ship the best code possible. It’s a place for anyone, from anywhere, to build anything—it’s where the world builds software. https://github.com

Read the whole story
alvinashcraft
34 minutes ago
reply
Pennsylvania, USA
Share this story
Delete
Next Page of Stories