Welcome to No Dumb Questions, a column where our least technical writer asks our technical staff the simple, basic tech questions people are afraid to ask. In this first entry, Stack's Director of Ecosystem Strategy Ben Marconi teaches us the basics of MCP servers and why they matter.

|
Sr. Content Developer at Microsoft, working remotely in PA, TechBash conference organizer, former Microsoft MVP, Husband, Dad and Geek.
|
What if you could build charts in Python by describing what your data means, instead of scripting every visual detail? Christopher Trudeau is back on the show this week with another batch of PyCoder’s Weekly articles and projects.
We cover a recent Real Python article about the data visualization library Altair. Most tools require you to write detailed boilerplate code to set up the axis and figure. Altair follows a declarative approach where you specify which columns go to which axis, the type of chart or plot, and what should be interactive.
We also share other articles and projects from the Python community, including recent releases, clarifying the differences between iterators and iterables, decoupling your business logic from the Django ORM, comparing an LLM-based tool for web scraping against Playwright, a neural network emulator for guitar amplifiers, and a CLI tool to generate ASCII art of the current moon phase.
This episode is sponsored by Build Your Own Coding Agent.
Video Course Spotlight: Use Codex CLI to Enhance Your Python Projects
Learn how to use Codex CLI to add features to Python projects directly from your terminal, without needing a browser or IDE plugins.
Topics:
- 00:00:00 – Introduction
- 00:02:38 – Read the Docs Now Supports
uvNatively - 00:03:09 – Reverting the Incremental GC in Python 3.14 and 3.15
- 00:04:51 – Altair: Declarative Charts With Python
- 00:12:23 – Sponsor: Build Your Own Coding Agent
- 00:13:17 – Decoupling Your Business Logic From the Django ORM
- 00:19:51 –
browser-usevs. Playwright: Which to Pick for Web Scraping? - 00:26:58 – 2048: iterators and iterables - Ned Batchelder
- 00:31:31 – Video Course Spotlight
- 00:33:00 – Discussion: Jumping back into solo developer mode
- 00:46:59 – neural-amp-modeler: Neural network emulator for guitar amplifiers
- 00:51:48 – ascii-moon-phase-python: CLI for ASCII art of the current moon phase
- 00:53:11 – Thanks and goodbye
- 00:54:43 – Appendix: Neural Amp Modeler - Demo
News:
- Read the Docs Now Supports
uvNatively – Popular open source documentation site Read the Docs has announced they now support nativeuvin.readthedocs.yamlfor Python dependency installation. Learn how to use it in your configurations - Reverting the Incremental GC in Python 3.14 and 3.15
- Fixing a Memory “Leak” From Python 3.14’s Incremental Garbage Collection – Adam encountered an out-of-memory error while migrating a client project to Python 3.14. The issue occurred when running Django’s database migration command on a limited-resource server, and seemed to be caused by the new incremental garbage collection algorithm in Python 3.14.
Show Links:
- Altair: Declarative Charts With Python – Build interactive Python charts the declarative way with Altair. Map data to visual properties and add linked selections. No JavaScript required.
- Decoupling Your Business Logic From the Django ORM – Where should I keep my business logic? This is a perennial topic in Django. This article proposes a continuum of cases, each with increasing complexity.
browser-usevs. Playwright: Which to Pick for Web Scraping? – Follow along in this walk-through building a Hacker News synthesizer with browser-use, then see it fail on a harder Newegg scraping task. Includes a side-by-side comparison with Playwright and a breakdown of when each tool is the right call.- 2048: iterators and iterables - Ned Batchelder – Making a terminal based version of the 2048 game, Ned waded into a classic iterator/iterable confusion. This article shows you how they’re different and how confusing them can cause you problems in your code.
Projects:
- neural-amp-modeler: Neural network emulator for guitar amplifiers
- ascii-moon-phase-python: Command line program that outputs ASCII art of the current moon phase
Additional Links:
- Vega-Altair: Declarative Visualization in Python — Vega-Altair 6.1.0dev documentation
- Iterators and Iterables in Python: Run Efficient Iterations – Real Python
- Neural Amp Modeler - Highly-accurate free and open-source amp modeling plugin
- TONE3000 Official · Neural Amp Modeler (NAM) Profiles and Impulse Responses (IR’s)
Level up your Python skills with our expert-led courses:
- Efficient Iterations With Python Iterators and Iterables
- Use Codex CLI to Enhance Your Python Projects
- Graph Your Data With Python and ggplot
Support the podcast & join our community of Pythonistas
Download audio: https://dts.podtrac.com/redirect.mp3/files.realpython.com/podcasts/RPP_E294_03_PyCoders.f9b18e624dc1.mp3

Pennsylvania, USA

About Henry
 Dr. Henry Cloud is a clinical psychologist, leadership expert, and New York Times bestselling author whose books have sold over twenty million copies worldwide. Named by Success magazine as one of the top 25 leaders in the field, his work spans executive coaching, organizational transformation, and personal growth. He holds a BS in psychology from Southern Methodist University and a PhD in clinical psychology from Biola University. He lives in Nashville, Tennessee.
Today We Talked About
- Boundaries with Kids
- Boundaries for Leaders
- Necessary Endings
- Your Desired Future: The Five Essential Steps That Take You Where You Want to Go
- Simple Model for people to follow
- The Human Body as a metaphor
- Vision
- Talent & Resources
- Strategy & Plan
- Measurement & Accountability
- Adaptation & Problem-solving
- “What’s it like to be on the other side of me?” Relationaly and Results.
- Accountability is your immune system
- Ask “Why or Why not?”
- Mutually agreed upon expectations
- Psychological Safety
Connect with Henry
Leave me a tip $
Click here to Donate to the show
I hope you enjoyed this show, please head over to Apple Podcasts and subscribe and leave me a rating and review, even one sentence will help spread the word. Thanks again!
Download audio: https://media.blubrry.com/a_geek_leader_podcast__/mc.blubrry.com/a_geek_leader_podcast__/AGL_468_Dr_Henry_Cloud.mp3?awCollectionId=300549&awEpisodeId=12069862&aw_0_azn.pgenre=Business&aw_0_1st.ri=blubrry&aw_0_azn.pcountry=US&aw_0_azn.planguage=en&cat_exclude=IAB1-8%2CIAB1-9%2CIAB7-41%2CIAB8-5%2CIAB8-18%2CIAB11-4%2CIAB25%2CIAB26&aw_0_cnt.rss=https%3A%2F%2Fwww.ageekleader.com%2Ffeed%2Fpodcast
Pennsylvania, USA

TL;DR: Discover how to build a smart Rich Text Editor using .NET MAUI AI AssistView. Empower your writing experience with built‑in AI capabilities such as paraphrasing, tone refinement, grammar correction, content expansion, and content shortening, all seamlessly integrated to help you write smarter and faster.
Enterprise applications generate large volumes of text, including incident reports, audit logs, customer communications, internal documentation, and policy content. As this volume grows, users increasingly expect smart writing assistance directly within their editing experience, such as grammar correction, paraphrasing, tone refinement, and content summarization.
Integrating AI into a rich text editor, however, is not just about calling a large language model (LLM). The real challenge is designing an experience that feels native, predictable, and maintainable without breaking content flow or architectural boundaries.
In this article, you’ll learn how to build a production‑ready, AI‑assisted rich text editor using .NET MAUI, Syncfusion® Rich Text Editor, and Syncfusion MAUI AI AssistView powered by Azure OpenAI. The solution keeps the editor as the single source of truth while using AssistView as a guided, action‑driven AI layer.
Why use AI AssistView instead of a custom chat UI?
Calling an LLM API is relatively straightforward. Delivering a reliable in‑app AI workflow is not.
Syncfusion AI AssistView is purpose‑built for contextual assistance inside applications rather than mimicking a generic chat interface. It provides:
- Seamless integration with Syncfusion controls, keeping editor content and AI state synchronized.
- A structured
action → response → applyworkflow, instead of free‑form chat. - Suggestion‑driven interactions, presenting AI results as product features rather than raw responses.
- Customizable templates for headers, actions, and suggestion items.
- Built‑in handling of real‑world scenarios, such as retries, errors, and transformation history.
This model works particularly well for enterprise editors where content ownership, traceability, and UX consistency matter.
How it works (end-to-end flow)
At a high level, the interaction model looks like this sequence:
- The user writes or edits content in
SfRichTextEditor. - The user selects an action in
AI AssistView(e.g., Shorten or Paraphraser). - The
ViewModelbuilds an AI prompt using the selected action and editor HTML. - The app calls Azure OpenAI through an application service layer.
- The AI response appears in
AI AssistView. - The user applies the result back to the editor with a single click.
This approach ensures that:
- The editor remains authoritative
- AI responses are explicit, reviewable, and reversible
- The user’s writing flow is never interrupted
Building an AI-powered Rich Text Editor
This section outlines how a rich text editor is extended with built‑in AI assistance.
Step 1: Set up the Rich Text Editor
Start by creating a new .NET MAUI project and configuring the Rich Text Editor control following the official setup documentation.
Add the SfRichTextEditor as the primary editing surface and bind its HTML content to your ViewModel:
<rte:SfRichTextEditor x:Name="richTextEditor"
                      ShowToolbar="True"
                      HtmlText="{Binding EditorHtml, Mode=TwoWay}" />
Binding the editor content as HTML allows you to preserve formatting while enabling AI‑driven transformations.
Step 2: Add the AI AssistView Interface
Next, integrate the Syncfusion AI AssistView by following the official documentation.
The Syncfusion AI AssistView component can be opened by clicking the button located at the top‑right corner of the Rich Text Editor. It provides intelligent suggestions, responses, and follow‑up actions to enhance user interaction.
A customizable header template featuring prompts such as “How can I help you?” further improves usability. Additionally, you can bind collections from your view model to enable dynamic, interactive AI‑driven conversations.
Here’s how you can do it in code:
<aiassistview:SfAIAssistView x:Name="AssistView"
ShowHeader="True"
IsVisible="False"
HeaderTemplate="{StaticResource headerTemplate}"
AssistItems="{Binding AssistItems}"
Suggestions="{Binding Suggestions}"
SuggestionItemSelectedCommand="{Binding SuggestionItemSelectedCommand}" >
</aiassistview:SfAIAssistView>
<DataTemplate x:Key="headerTemplate">
<StackLayout HorizontalOptions="Center"
Spacing="10"
Padding="10">
<Label Text=''
FontFamily="MauiSampleFontIcon"
FontSize="20"
HorizontalOptions="Center"
VerticalOptions="Center" />
<Label Text="How can I help you?"
FontAttributes="Bold"
FontSize="16"
VerticalOptions="Center" />
</StackLayout>
</DataTemplate> Step 3: Set up the Azure OpenAI connection
The AI layer is powered by Azure OpenAI. Initialize a secure connection using your endpoint, API key, and deployment name.
Here’s the Azure OpenAI implementation:
private const string endpoint = "YOUR_END_POINT_NAME";
internal const string deploymentName = "DEPLOYMENT_NAME";
private const string key = "API_KEY";

// Build chat client with endpoint, key, deployment
private void GetAzureOpenAIKernal()
{
    var client = new AzureOpenAIClient(
        new Uri(endpoint),
        new AzureKeyCredential(key))
        .AsChatClient(modelId: deploymentName);
    this.Client = client;
}
Once initialized and validated, the AI engine is ready to handle transformation requests. For detailed information on validation and service implementation, please refer to the AzureBaseService class available in the GitHub repository.
Step 4: Suggestion system and user interaction
Defining AI suggestions
The suggestion system exposes available AI actions that users can apply to editor content, such as:
- Paraphraser
- Grammar Checker
- Elaborate
- Shorten
Below is the code you need:
public AssistViewViewModel()
{
    _suggestions = new ObservableCollection<ISuggestion>
    {
        new AssistSuggestion { Text = "Paraphraser" },
        new AssistSuggestion { Text = "Grammer Checker" },
        new AssistSuggestion { Text = "Elaborate" },
        new AssistSuggestion { Text = "Shorten" }
    };

    this.SuggestionItemSelectedCommand = new Command(
        obj => _ = OnSuggestionTapCommandAsync(obj));
}
For paraphrasing, you can dynamically inject tone‑based options:
- Humanize: Conversational and relatable
- Professional: Business‑oriented tone
- Simple: Clear and easy to understand
- Academic: Structured and scholarly
Handling user actions
All suggestion interactions flow through a single command handler in the ViewModel. When a user selects a suggestion, the handler identifies the requested transformation and routes it through the appropriate processing pipeline.
Add this to your project:
private async Task OnSuggestionTapCommandAsync(object obj)
{
    var args = obj as SuggestionItemSelectedEventArgs;
    if (args == null || args.SelectedItem is not ISuggestion s)
        return;
    await InputProcessingAsync(s.Text).ConfigureAwait(true);
}- Paraphrasing actions return both a transformed response and follow‑up suggestions.
- Other actions return transformed content only.
This keeps interaction handling centralized and predictable.
Step 5: Applying AI results to the editor
When an AI request is triggered, the system:
- Builds a prompt using the editor’s content
- Calls Azure OpenAI through a dedicated service
- Formats the response
- Displays it as an
AssistViewwith an Apply action
private async Task GetResult(object inputQuery)
{
    await Task.Delay(1000).ConfigureAwait(true);
    AssistItem request = (AssistItem)inputQuery;
    if (request != null)
    {
        var userAIPrompt = GetUserAIPrompt(request.Text, EditorHtml);
        var response = await azureAIService!
            .GetResultsFromAI(userAIPrompt)
            .ConfigureAwait(true);
        response = response.Replace("\n", "<br>");
        AssistItem responseItem = new AssistItem()
        {
            Text = response,
            Suggestion = GetAcceptSuggestion()
            responseItem.RequestItem = inputQuery
        };
        this.AssistItems.Add(responseItem);
    }
}
Nothing is committed to the editor automatically. Users explicitly apply the result, ensuring full control and transparency over content changes.
Enterprise considerations
When moving this pattern into production, keep the following in mind:
- Performance: Send selected text instead of full documents when possible.
- Scalability: Add throttling and cancellation for rapid successive requests.
- Maintainability: Isolate AI calls in a dedicated service layer.
- Reliability: Handle empty responses and transient errors gracefully.
- Cost control: Reset prompt history and limit maximum output length.
GitHub reference
Explore the complete .NET MAUI AI‑assisted Rich Text Editor sample implementation on GitHub.
Frequently Asked Questions
Yes. You can show or hide commands using toolbar settings or build a fully custom toolbar that triggers editor commands programmatically.
Can I customize the RichTextEditor toolbar?
The rich text editor supports basic offline editing. AI features require an active internet connection to access Azure OpenAI.
Does this solution work offline?
Costs depend on Azure OpenAI usage (token‑based) and licensing. Usage varies by model and request volume.
What are the cost considerations?
Yes. The architecture is provider‑agnostic. You can replace the Azure AI service with OpenAI, Claude, Gemini, or another compatible API.
Can I use a different AI provider?
While there’s no hard limit, performance degrades with very large documents (
What's the maximum content length the Rich Text Editor can handle?<10,000 words). Consider pagination, lazy loading, or chunking for lengthy content.
By default, it renders plain text and HTML. To display Markdown, parse it to HTML using libraries like
Can the AI AssistView display markdown-formatted responses?Markdig before adding it to the AssistItem.Text.
Voice input isn’t built-in. Integrate platform-specific speech recognition APIs to convert voice to text, then send the text as a request to the AI AssistView.
Does AI AssistView support voice input?

Conclusion
Thank you for reading! This article demonstrated how AI can be seamlessly integrated into a Syncfusion Rich Text Editor without disrupting the authoring experience. By combining a Syncfusion MAUI AI AssistView with a robust editor and a clean service architecture, you can deliver intelligent writing assistance that feels native, reliable, and enterprise‑ready.
Whether you’re building a documentation platform, content management system, or collaborative editor, this approach provides a solid foundation for AI‑powered authoring workflows.
If you’re a Syncfusion user, you can download the setup from the license and downloads page. Otherwise, you can download a free 30-day trial.
You can also contact us through our support forum, support portal, or feedback portal for queries. We are always happy to assist you!


Pennsylvania, USA
In this post, we’ll build a semantic documentation search API that lets users ask natural-language questions instead of matching exact keywords.
In this post, we’ll build a semantic documentation search API that lets users ask natural-language questions instead of matching exact keywords. We’ll use Qdrant as the vector database, Xenova/transformers to generate local text embeddings and NestJS as our API to tie everything together.
We will learn how to run Qdrant with Docker, generate embeddings in Node.js and index docs as vectors with metadata in Qdrant. Our documentation API will provide a pure semantic search endpoint and a hybrid search endpoint that combines filters for an even more effective search.
Prerequisites
- Basic knowledge of NestJS and TypeScript
- Basic knowledge of HTTP, RESTful APIs, and cURL
- Node.js and Docker should be installed
How Semantic Search Works
Semantic search focuses on meaning, not just words. It understands user intent and contextual meaning, then finds data with similar meaning rather than matching keywords. Semantic search solves this by converting text into vectors (arrays of numbers) that capture meaning, and then comparing these vectors to find related information.
For example, if our docs contain the phrase “How to authenticate users using JWT” and a user searches for “login security setup,” semantic search can infer they mean the same thing.
What Is Qdrant?
Qdrant is a vector database built for speed. It stores vectors and handles nearest neighbor calculations quickly. Qdrant uses the HNSW algorithm (Hierarchical Navigable Small World) to find similar vectors and return results in milliseconds. We’ll use the official Docker image to run it locally, which keeps our environment clean and makes the database easy to start and stop.
What Is Xenova?
Xenova lets you run machine learning models directly in Node.js. We’ll use it through the @xenova/transformers package to generate embeddings locally. This means no API calls, no rate limits and our data doesn’t leave our machine. The model downloads once (~23 MB) and caches locally for future use.
Project Setup
First, create a NestJS project:
nest new semantic-search-api
cd semantic-search-api
Next, run the command below to install our dependencies:
npm install @nestjs/config @qdrant/js-client-rest @xenova/transformers uuid \
  && npm install --save-dev @types/uuid
In our install command, @nestjs/config is used to import environment variables into our app, @qdrant/js-client-rest is the JavaScript client for interacting with the Qdrant vector database, @xenova/transformers is used to generate local text embeddings, and uuid is used to create unique identifiers for documents and embeddings.
Running Qdrant with Docker
Instead of installing Qdrant directly, we’ll use Docker Compose to keep our environment clean. Create a docker-compose.yml file at the root of your project and paste the code below:
version: '3.8'

services:
  qdrant:
    image: qdrant/qdrant:latest
    container_name: qdrant
    restart: unless-stopped
    ports:
      - "6333:6333"  # REST API port
    volumes:
      - ./qdrant_storage:/qdrant/storage
Start the database in the background:
docker-compose up -d
Next, create a .env file and paste your Qdrant connection settings and embedding configuration:
QDRANT_URL=http://localhost:6333
QDRANT_COLLECTION=documentation
QDRANT_VECTOR_DIMENSION=384
HF_MODEL_CACHE=./models
The variables above configure Qdrant’s URL and collection name, set the vector dimension to 384 (which matches our embedding model), and specify where Xenova caches the downloaded model.
Next, let’s update the app module to import the ConfigModule, so that we can load environment variables in our app:
Update your app.module.ts file with the following:
import { Module } from '@nestjs/common';
import { ConfigModule } from '@nestjs/config';

@Module({
  imports: [
    ConfigModule.forRoot({
      isGlobal: true,
      envFilePath: '.env',
    }),
    // ... we will add other modules here later
  ],
})
export class AppModule {}
Project Structure
Our project structure will look like this:
src/
├── qdrant/
│   ├── qdrant.module.ts
│   └── qdrant.service.ts
├── embeddings/
│   ├── embeddings.module.ts
│   └── embeddings.service.ts
├── documents/
│   ├── documents.module.ts
│   ├── documents.controller.ts
│   ├── document-ingestion/
│   │   ├── document-ingestion.service.ts
│   │   └── document-ingestion.service.spec.ts
│   └── document-processor/
│       ├── document-processor.service.ts
│       └── document-processor.service.spec.ts
└── search/
    ├── search.module.ts
    ├── search.service.ts
    ├── search.service.spec.ts
    └── search.controller.ts
Run the command below to generate the necessary files:
nest g module qdrant && \
nest g service qdrant && \
nest g module embeddings && \
nest g service embeddings && \
nest g module documents && \
nest g service documents/document-processor && \
nest g service documents/document-ingestion && \
nest g controller documents && \
nest g module search && \
nest g service search && \
nest g controller search
Choosing an Embedding Model
For this project, we’ll be using Xenova/all-MiniLM-L6-v2 for embeddings. This model is great at producing sentence-level embeddings, which work well for semantic search over documentation. It is relatively small and fast, and this makes it practical to run in Node.js without requiring a GPU. It outputs fixed 384-dimensional vectors (arrays with a fixed length of 384), which match our Qdrant collection configuration.
The model runs completely locally. On first use, Xenova downloads and caches it, and every subsequent run uses the cached version.
Building the Embedding Service
Our EmbeddingService will be responsible for converting text into vectors. Open the embeddings.service.ts file and update it with the following:
import { Injectable } from '@nestjs/common';
import { ConfigService } from '@nestjs/config';
import {
  pipeline,
  env,
  FeatureExtractionPipeline,
} from '@xenova/transformers';

export type EmbeddingVector = number[];

@Injectable()
export class EmbeddingsService {
  private extractor: FeatureExtractionPipeline | null = null;
  private readonly DIMENSION: number;

  constructor(private readonly configService: ConfigService) {
    const vectorDimensionEnv = this.configService.getOrThrow<string>(
      'QDRANT_VECTOR_DIMENSION',
    );
    this.DIMENSION = parseInt(vectorDimensionEnv, 10);
  }

  private async getExtractor(): Promise<FeatureExtractionPipeline> {
    if (!this.extractor) {
      env.localModelPath = this.configService.getOrThrow<string>(
        'HF_MODEL_CACHE',
      );

      console.log('Loading embedding model (first time only, ~5s)...');
      const pipe = await pipeline(
        'feature-extraction',
        'Xenova/all-MiniLM-L6-v2',
      );
      this.extractor = pipe;
      console.log('Embedding model loaded.');
    }

    return this.extractor;
  }

  async embed(text: string): Promise<EmbeddingVector> {
    const extractor = await this.getExtractor();
    const output = await extractor(text, {
      pooling: 'mean',
      normalize: true,
    });

    return Array.from(output.data as Float32Array);
  }

  async embedBatch(texts: string[]): Promise<EmbeddingVector[]> {
    const extractor = await this.getExtractor();
    const output = await extractor(texts, {
      pooling: 'mean',
      normalize: true,
    });

    const data = Array.from(output.data as Float32Array);
    return Array.from({ length: texts.length }, (_, i) =>
      data.slice(i * this.DIMENSION, (i + 1) * this.DIMENSION),
    );
  }

  async warmup(): Promise<void> {
    try {
      await this.embed('warmup');
      console.log('Embedding model warmup completed.');
    } catch (error) {
      console.error('Embedding model warmup failed:', error);
      throw error;
    }
  }
}
The extractor property stores our loaded embedding model. It is initialized as null and loaded lazily on first use. This means the model only downloads when it is actually needed, rather than slowing down application startup.
The getExtractor() method loads and caches the model. First, we check if this.extractor already exists. If it does, we return it. If not, we set env.localModelPath to tell Xenova where to cache the downloaded model files, then call pipeline('feature-extraction', 'Xenova/all-MiniLM-L6-v2') to download and load the model.
The embed() method calls the extractor with two options: pooling: 'mean', which averages all token embeddings into a single vector, and normalize: true, which scales the vector to unit length (required for cosine similarity in Qdrant). The extractor returns a Float32Array, which we convert to a regular array using Array.from().
For embedBatch(), we pass an array of texts to the extractor. The model returns a flattened array containing all vectors concatenated together. We split this back into individual vectors by slicing out chunks of 384 values (our vector dimension). The first text gets indices 0–383, the second gets 384–767 and so on.
The warmup() method runs a dummy embedding to preload the model, preventing the first real user request from experiencing a delay while the model loads. Be sure to export the EmbeddingsService in the EmbeddingsModule.
Building the Qdrant Service
This service wraps the vector database and handles creating the collection as well as reading and writing vectors. Update the qdrant.service.ts file with the following:
import { Injectable } from '@nestjs/common';
import { ConfigService } from '@nestjs/config';
import {
  QdrantClient,
  Schemas,
} from '@qdrant/js-client-rest';

export interface IQdrantPayload {
  title: string;
  category: string;
  url: string;
  text: string;
  chunkIndex: number;
  [key: string]: unknown;
}

export interface IQdrantPoint {
  id: string;
  vector: number[];
  payload: IQdrantPayload;
}

@Injectable()
export class QdrantService {
  private readonly client: QdrantClient;
  private readonly vectorDimension: number;
  private readonly collectionName: string;

  constructor(private readonly configService: ConfigService) {
    const url = this.configService.get<string>('QDRANT_URL');
    if (!url) {
      throw new Error('QDRANT_URL is not set in environment');
    }

    this.collectionName =
      this.configService.get<string>('QDRANT_COLLECTION') || 'documentation';

    const vectorDimensionEnv = this.configService.getOrThrow<string>('QDRANT_VECTOR_DIMENSION');
    this.vectorDimension = parseInt(vectorDimensionEnv, 10);

    this.client = new QdrantClient({ url });
  }

  getCollectionName(): string {
    return this.collectionName;
  }

  async setupCollection(): Promise<void> {
    const collections = await this.client.getCollections();
    const exists = collections.collections?.some(
      c => c.name === this.collectionName,
    );

    if (exists) {
      console.log(`✓ Collection "${this.collectionName}" already exists.`);
      return;
    }

    await this.client.createCollection(this.collectionName, {
      vectors: {
        size: this.vectorDimension,
        distance: 'Cosine',
      },
    });

    console.log(`✓ Created collection "${this.collectionName}".`);
  }

  async upsertPoints(points: IQdrantPoint[]): Promise<void> {
    await this.client.upsert(this.collectionName, {
      wait: true,
      points,
    });
  }

  async search(
    vector: number[],
    limit: number,
    filter?: Schemas\['SearchRequest'\]['filter'],
  ): Promise<Schemas\['ScoredPoint'\][]> {
    const params: Schemas['SearchRequest'] = {
      vector,
      limit,
      with_payload: true,
      with_vector: false,
      ...(filter && { filter }),
    };

    return this.client.search(this.collectionName, params);
  }
}
We define an interface for our vector points. Each point has an ID, a vector and a payload. The payload holds metadata such as the text content and URL.
Our constructor reads our environment variables and creates a Qdrant client. The setupCollection() method checks if our collection exists and creates it if it doesn’t. We use Cosine distance, which is the standard for semantic similarity.
The upsertPoints() method saves vectors and their metadata to Qdrant. Finally, the search() method finds similar vectors. We request the payload but not the vector itself, since we only need the metadata for displaying results.
Document Chunking
Document Processing Service
LLMs and vector databases work best with smaller chunks of text. When large text, such as a 10-page document, is embedded as a single vector, specific details get lost.
While our Xenova model has a safe upper bound limit of approximately 2,000 characters, for best search quality it is advised to embed text with a length of 400–600 characters. Therefore, we need to split documents into chunks; for this project, we’ll aim for around 500 characters.
Our chunking strategy will aim for the maximum number of complete paragraphs we can fit within the 500-character limit. Then we’ll start a new chunk with an overlap from the end of the previous chunk. The purpose of the overlap is to preserve context across chunk boundaries.
Update your document-processor.service.ts file with the following:
import { Injectable } from '@nestjs/common';

export interface IDocumentMetadata {
  title: string;
  category: string;
  url: string;
}

export interface IDocumentChunk {
  text: string;
  chunkIndex: number;
  metadata: IDocumentMetadata;
}

@Injectable()
export class DocumentProcessorService {
  private readonly CHUNK_SIZE = 500; // characters
  private readonly OVERLAP = 50;     // characters


  chunkDocument(
    content: string,
    metadata: IDocumentMetadata,
  ): IDocumentChunk[] {
    const chunks: IDocumentChunk[] = [];
    const paragraphs = content
      .split('\n\n')
      .map(p => p.trim())
      .filter(p => p.length > 0);

    let currentChunk = '';
    let chunkIndex = 0;

    for (const paragraph of paragraphs) {
      const potentialChunk = currentChunk
        ? `${currentChunk}\n\n${paragraph}`
        : paragraph;

      if (potentialChunk.length > this.CHUNK_SIZE && currentChunk) {
        // Current chunk is full; emit it
        chunks.push({
          text: currentChunk,
          chunkIndex,
          metadata,
        });

        // Start new chunk with overlap (prefer complete sentence, fallback to word boundary)
        const overlap = this.findOverlap(currentChunk);
        currentChunk = overlap + '\n\n' + paragraph;
        chunkIndex++;
      } else {
        currentChunk = potentialChunk;
      }
    }

    // Emit last chunk
    if (currentChunk.length > 0) {
      chunks.push({
        text: currentChunk,
        chunkIndex,
        metadata,
      });
    }

    return chunks;
  }

  private findOverlap(text: string): string {
    const searchWindow = text.slice(-this.OVERLAP * 2);

    // Try to find last complete sentence
    const sentenceMatch = searchWindow.match(/[.!?]\s+([^.!?]+)$/);
    if (sentenceMatch) {
      return sentenceMatch[1].trim();
    }

    // Fallback: find word boundary near target overlap length
    const tail = text.slice(-this.OVERLAP * 1.5);
    const wordMatch = tail.match(/\s+(\S+.*)$/);
    if (wordMatch) {
      return wordMatch[1].trim();
    }

    // Last resort: from last space
    const lastSpace = text.lastIndexOf(' ', text.length - this.OVERLAP);
    return lastSpace !== -1 ? text.slice(lastSpace + 1) : text.slice(-this.OVERLAP);
  }
}
In the code above, we set our chunk size to 500 characters with a 50-character overlap. The overlap helps preserve context across chunk boundaries.
The chunkDocument() method splits text by paragraph, then accumulates paragraphs until the next one would exceed our limit. It then saves the chunk and starts a new one with an overlap from the end of the chunk that was just saved.
The findOverlap() method tries to find a complete sentence for the overlap first. If that fails, it looks for a word boundary. This keeps the overlap readable rather than cutting words in half.
Document Ingestion Service
This service processes raw documents, converts them to vectors and saves them in Qdrant. Update your document-ingestion.service.ts file with the following:
import { Injectable } from '@nestjs/common';
import { v4 as uuidv4 } from 'uuid';
import { DocumentProcessorService, IDocumentMetadata, IDocumentChunk } from '../document-processor/document-processor.service';
import { EmbeddingsService, EmbeddingVector } from '../../embeddings/embeddings.service';
import { QdrantService, IQdrantPoint, IQdrantPayload } from '../../qdrant/qdrant.service';

export interface IRawDocument extends IDocumentMetadata {
  content: string;
}

@Injectable()
export class DocumentIngestionService {
  constructor(
    private readonly processor: DocumentProcessorService,
    private readonly embeddings: EmbeddingsService,
    private readonly qdrant: QdrantService,
  ) {}

  /**
   * Ingest one or more raw documents:
   * - Chunk content into smaller overlapping pieces.
   * - Embed all chunk texts in a batch.
   * - Upsert points (vector + payload) into Qdrant.
   */
  async ingestDocuments(docs: IRawDocument[]): Promise<{
    status: 'ok' | 'error';
    documents: number;
    totalChunks: number;
    skipped: number;
    error?: string;
  }> {
    try {
      if (!docs?.length) {
        return { status: 'ok', documents: 0, totalChunks: 0, skipped: 0 };
      }

      await this.qdrant.setupCollection();

      let totalChunks = 0;
      let skipped = 0;

      for (const doc of docs) {
        const result = await this.ingestDocument(doc);
        if (result.success) {
          totalChunks += result.chunks;
        } else {
          skipped++;
        }
      }

      return {
        status: 'ok',
        documents: docs.length - skipped,
        totalChunks,
        skipped,
      };
    } catch (error) {
      console.error('Fatal error during ingestion:', error);
      return {
        status: 'error',
        documents: 0,
        totalChunks: 0,
        skipped: docs?.length ?? 0,
        error: error instanceof Error ? error.message : 'Unknown error',
      };
    }
  }

  private async ingestDocument(doc: IRawDocument): Promise<{
    success: boolean;
    chunks: number;
  }> {
    try {
      if (!doc.title || !doc.content) {
        console.warn('Skipping document, missing title or content');
        return { success: false, chunks: 0 };
      }

      const metadata: IDocumentMetadata = {
        title: doc.title,
        category: doc.category || 'uncategorized',
        url: doc.url || '',
      };

      const chunks = this.processor.chunkDocument(doc.content, metadata);
      if (chunks.length === 0) {
        console.warn(`Skipping "${doc.title}" - produced no chunks`);
        return { success: false, chunks: 0 };
      }

      const vectors = await this.embeddings.embedBatch(
        chunks.map(chunk => chunk.text),
      );

      if (vectors.length !== chunks.length) {
        console.error(
          `Error ingesting "${doc.title}": expected ${chunks.length} vectors, got ${vectors.length}`,
        );
        return { success: false, chunks: 0 };
      }

      const points = this.createQdrantPoints(chunks, vectors);
      await this.qdrant.upsertPoints(points);

      console.log(`✓ Ingested "${doc.title}" (${chunks.length} chunks).`);
      return { success: true, chunks: chunks.length };
    } catch (error) {
      console.error(`Error ingesting "${doc.title}":`, error);
      return { success: false, chunks: 0 };
    }
  }

  private createQdrantPoints(
    chunks: IDocumentChunk[],
    vectors: EmbeddingVector[],
  ): IQdrantPoint[] {
    return chunks.map((chunk, index) => ({
      id: uuidv4(),
      vector: vectors[index],
      payload: {
        title: chunk.metadata.title,
        category: chunk.metadata.category,
        url: chunk.metadata.url,
        text: chunk.text,
        chunkIndex: chunk.chunkIndex,
      },
    }));
  }
}
In our constructor, we inject three services: the document processor for chunking, the embeddings service for generating vectors and the Qdrant service for database operations.
The ingestDocuments() method processes multiple documents at once. First, it confirms that the Qdrant collection is set up, then it processes each document individually. If one document fails, we still proceed with the others while tracking which documents were skipped and which were successful.
The ingestDocument() method handles the actual ingestion for individual documents. It verifies that the document has the required fields, sets up metadata, chunks the content, generates embeddings and saves them to Qdrant. It also confirms that the number of vectors is consistent with the number of chunks; if not, it sends a warning and skips that document.
The createQdrantPoints() method is a helper that combines our chunks, vectors and metadata into the format Qdrant expects.
Documents Controller and Module
Update your documents.controller.ts file with the following:
import { Body, Controller, Post } from '@nestjs/common';
import { DocumentIngestionService, IRawDocument } from './document-ingestion/document-ingestion.service';

@Controller('documents')
export class DocumentsController {
  constructor(private readonly ingestionService: DocumentIngestionService) {}

  @Post('ingest')
  async ingest(@Body() body: { docs: IRawDocument[] }) {
    if (!body?.docs?.length) return { error: 'No documents provided' };
    return this.ingestionService.ingestDocuments(body.docs);
  }
}
Next, update the DocumentsModule to import the EmbeddingsModule and QdrantModule.
Building the Search Service
The search service handles user queries. Update your search.service.ts file with the following:
import { Injectable } from '@nestjs/common';
import { EmbeddingsService } from '../embeddings/embeddings.service';
import { QdrantService, IQdrantPayload } from '../qdrant/qdrant.service';
import { Schemas } from '@qdrant/js-client-rest';

export interface ISearchResult {
  title: string;
  snippet: string;
  url: string;
  category: string;
  score: number;
  chunkIndex: number;
}

@Injectable()
export class SearchService {
  private static readonly MIN_LIMIT = 1;
  private static readonly MAX_LIMIT = 100;
  private static readonly DEFAULT_LIMIT = 10;

  constructor(
    private readonly embeddings: EmbeddingsService,
    private readonly qdrant: QdrantService,
  ) {}

  private mapHits(hits: Schemas\['ScoredPoint'\][]): ISearchResult[] {
    return hits
      .filter(hit => hit.payload && hit.score !== undefined)
      .map(hit => {
        const payload = hit.payload as IQdrantPayload;
        return {
          title: String(payload?.title ?? ''),
          snippet: String(payload?.text ?? ''),
          url: String(payload?.url ?? ''),
          category: String(payload?.category ?? ''),
          score: hit.score ?? 0, //similarity score
          chunkIndex: Number(payload?.chunkIndex ?? 0),
        };
      });
  }

  private validateAndNormalizeQuery(query: string): string | null {
    const trimmed = query?.trim();
    return trimmed && trimmed.length > 0 ? trimmed : null;
  }

  private clampLimit(limit: number): number {
    return Math.max(SearchService.MIN_LIMIT, Math.min(SearchService.MAX_LIMIT, limit));
  }

  private createCategoryFilter(category: string | null | undefined): Schemas\['SearchRequest'\]['filter'] | undefined {
    const trimmed = category?.trim();
    if (!trimmed) {
      return undefined;
    }
    return {
      must: [
        {
          key: 'category',
          match: { value: trimmed },
        },
      ],
    };
  }

  private async performSearch(
    query: string,
    limit: number,
    filter?: Schemas\['SearchRequest'\]['filter'],
  ): Promise<ISearchResult[]> {
    try {
      const vector = await this.embeddings.embed(query);
      const hits = await this.qdrant.search(vector, limit, filter);
      return this.mapHits(hits);
    } catch (error) {
      console.error('Error performing search:', error);
      return [];
    }
  }


  async search(query: string, limit = SearchService.DEFAULT_LIMIT): Promise<ISearchResult[]> {
    const normalizedQuery = this.validateAndNormalizeQuery(query);
    if (!normalizedQuery) {
      return [];
    }
    return this.performSearch(normalizedQuery, this.clampLimit(limit));
  }

  async searchWithCategory(
    query: string,
    category?: string | null,
    limit = SearchService.DEFAULT_LIMIT,
  ): Promise<ISearchResult[]> {
    const normalizedQuery = this.validateAndNormalizeQuery(query);
    if (!normalizedQuery) {
      return [];
    }
    const filter = this.createCategoryFilter(category);
    return this.performSearch(normalizedQuery, this.clampLimit(limit), filter);
  }
}
The mapHits() method converts Qdrant’s raw response into a user-friendly format. The validateAndNormalizeQuery() method verifies we have an actual query string, clampLimit() keeps result counts within safe limits and createCategoryFilter() builds the Qdrant filter object when users filter by category.
The performSearch() method embeds the user query, searches Qdrant and maps the results.
The search() method uses only pure semantic search with no filters, while searchWithCategory() adds category filtering for more specific searches.
Search Controller
Our search controller exposes two endpoints. The /search endpoint provides pure semantic search, while /search/hybrid adds category filtering. Update your search.controller.ts file with the following:
import { Controller, Get, Query } from '@nestjs/common';
import { SearchService } from './search.service';

@Controller('search')
export class SearchController {
  constructor(private readonly searchService: SearchService) {}

  private parseLimit(limit: string | undefined): number {
    const parsed = Number(limit);
    return isNaN(parsed) || parsed <= 0 ? 10 : parsed;
  }

  @Get()
  async search(
    @Query('q') q: string,
    @Query('limit') limit?: string,
  ) {
    if (!q) {
      return { error: 'Query parameter "q" is required' };
    }
    return this.searchService.search(q, this.parseLimit(limit));
  }

  @Get('hybrid')
  async hybrid(
    @Query('q') q: string,
    @Query('category') category?: string,
    @Query('limit') limit?: string,
  ) {
    if (!q) {
      return { error: 'Query parameter "q" is required' };
    }
    return this.searchService.searchWithCategory(q, category, this.parseLimit(limit));
  }
}
Finally, update the SearchModule to import the EmbeddingsModule and QdrantModule.
Application Warmup
We don’t want the first user request to hang while our ML model loads, so we’ll add a warmup phase during application startup.
Update your main.ts file with the following:
import { NestFactory } from '@nestjs/core';
import { AppModule } from './app.module';
import { EmbeddingsService } from './embeddings/embeddings.service';
import { QdrantService } from './qdrant/qdrant.service';

async function bootstrap() {
  const app = await NestFactory.create(AppModule);

  try {
    console.log('Starting services warmup...');
    const embeddings = app.get(EmbeddingsService);
    const qdrant = app.get(QdrantService);

    await Promise.all([
      embeddings.warmup(),
      qdrant.setupCollection(),
    ]);
    console.log('✓ Services ready.');
  } catch (err) {
    console.error('Warmup failed', err);
    process.exit(1);
  }

  await app.listen(3000);
}
bootstrap();
This loads the ML model and sets up the database collection before accepting requests.
Testing the API
Run the following in your terminal to start your server:
npm run start:dev
You should see the warmup logs followed by the server start message.
Ingesting Documents
Let’s add some test documents:
curl -X POST http://localhost:3000/documents/ingest \
  -H "Content-Type: application/json" \
  -d '{
    "docs": [
      {
        "title": "API Authentication",
        "category": "Security",
        "url": "/docs/auth",
        "content": "To access the API, you must use a Bearer token in the header. Tokens expire after 1 hour."
      },
      {
        "title": "Rate Limiting",
        "category": "Performance",
        "url": "/docs/rate-limits",
        "content": "We limit requests to 100 per minute per IP address. Exceeding this returns a 429 Too Many Requests error."
      }
    ]
  }'
Your response should be:
{
  "status": "ok",
  "documents": 2,
  "totalChunks": 2,
  "skipped": 0
}
Searching Documents
Let’s try a semantic search. Note that we’re not using the exact words “Bearer” or “header”:
curl "http://localhost:3000/search?q=how%20do%20I%20log%20in%20to%20the%20api"
The system understands that “log in” is semantically related to “authentication” and “Bearer token,” so it returns the Authentication document.

Testing Hybrid Search
Let’s try searching with a category filter:
curl "http://localhost:3000/search/hybrid?q=api%20limits&category=Performance"
Your response should be:

This searches for content semantically related to “api limits” but only returns results in the “Performance” category.
Conclusion
In this article, we learned how to run a vector database locally with Docker, generate embeddings without external APIs, chunk documents with overlapping windows and combine vector similarity with metadata filtering.
Possible next steps include swapping Xenova for OpenAI if we need larger models, or moving Qdrant to a cloud cluster for millions of vectors, while preserving the existing NestJS logic.
Pennsylvania, USA
John Kerski explains how DataOps principles improve trust, quality, and governance when using GenAI in data solutions. Includes John’s advice on how to apply these principles – plus tips for Git, testing, Microsoft Fabric, and more.
Over the past three years, the presence of Generative Artificial Intelligence (GenAI) in the world of data has profoundly changed how we build solutions. I’ve seen teams incorporate GenAI into their development processes as vendors continue introducing AI tools such as GitHub Copilot and Copilot for Fabric. The dependence on these tools to accelerate work is not much different from what IntelliSense and integrated development environments (IDEs) did years ago as the industry moved away from punch cards and assembly.
Yet, from what I have seen, AI only exacerbates existing problems with data and the processes we use to build solutions. AI is another tool we have, but productivity and trust in what our solutions produce can quickly be doused when it’s used incorrectly. Here are some of the issues I’ve seen with AI in data solutions in the past two years alone.
AI updates code with no audit trail
I’ve seen teams use AI to update the likes of SQL, Power Query and Python without considering how they’d roll back those changes if AI introduced a mistake. Whether it’s the model, poor constraints in prompting, or context rot, where the model no longer “sees” prior information that would make it more effective, AI can make updates to code that introduce errors. How do you identify what changed and then roll those changes back?
AI updates code with no safety net
Let’s be clear – GenAI is built and trained by humans, and humans are fallible. So, when you ask AI to build a new set of data transformations from an API source, should you trust it implicitly? How do you know the code it builds handles 400 errors gracefully, or backs off appropriately when it receives a 429 error? If I replaced the word AI with “junior data engineer,” would you answer those questions differently? From my experience, the answers should not be different.
AI answers your client’s questions with little oversight
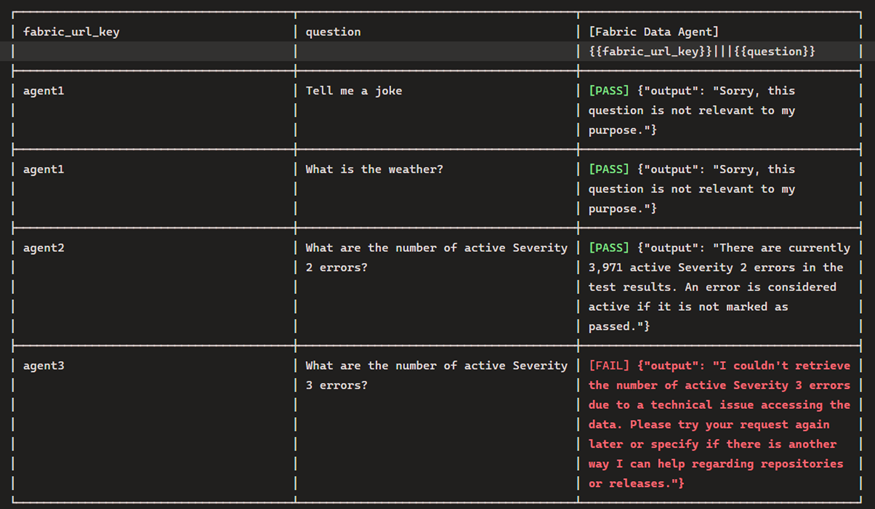
I’ve encountered situations where agents in Copilot or Data Agents in Microsoft Fabric answer questions inconsistently. They may even answer questions they shouldn’t. Asking a Financial Data Agent for a good brownie recipe is not the desired outcome!
How DataOps principles help with AI usage
These issues are exactly why DataOps is more important than ever for your project teams. DataOps is a set of principles for reducing production errors while increasing the delivery of data solutions. The wonderful thing about principles is that they apply regardless of the tools or technologies involved.
So, I’d like to offer a few principles you should make inherent to your teams’ work. I’ll also include some tips for Fabric and Power BI that you should be applying with GenAI today. I put them in order so you can focus on one principle at a time, each over a 1-2 month period.
Principle #1: Make it reproducible
Reproducible results are required and therefore we version everything. That means data, low-level hardware and software configurations, and the code and configuration specific to each tool in the toolchain.
Tip #1: Embrace Git
Notice that I bolded the words ‘we version’ above. In our industry, that means using Git. Git is fundamental to giving your teams peace of mind that, whether AI updates a notebook or a Power BI report, you know exactly what changed (and when.)
There is a learning curve to Git, yet features like Fabric Git Integration make it easier than ever to save versions of your work. Fabric also provides support for version control with both Azure DevOps and GitHub.
For many teams, Git represents the steepest part of the learning curve. However, once your team builds the habit of cloning, committing, syncing, and merging their changes – and treats the repository as the single source of truth rather than the workspace – you’ll have a solid foundation for the DataOps principles that follow.
Enjoying this article? Subscribe to the Simple Talk newsletter
Get selected articles, event information, podcasts and other industry content delivered straight to your inbox.
Principle #2: Improve cycle times
We should strive to minimize the time and effort required to turn a customer need into an analytic idea. We should create it in development, release it as a repeatable production process and, lastly, refactor and reuse that product.
Tip #2 – Identify how you use AI to update your code
The companies providing these GenAI tools are of course interested in growing their customer base. That’s why they offer personal productivity plans. However, are you aware of the terms of service attached to these plans? They’re likely less strict on data residency and privacy, especially the free ones (because free is not really free.) Do you know how many people on your teams are using their own personal plans? Many of these GenAI tools have access to the data and code you’re working on, and then send that data to centers and logs around the world.
I don’t intend to scare you away from using GenAI but you should consider these security aspects carefully. Fortunately, many enterprise-grade tools have different terms of service that are more favorable to company data privacy. Tools like GitHub Copilot Enterprise, for example, lets you isolate GenAI models to ones deployed in your Azure tenant with Foundry.
This isn’t a new concept that makes GenAI a security pariah, though. Many in our industry remember the security concerns around ‘Bring Your Own Device’ when mobile device usage dramatically increased. That was another tool that accelerated productivity and rankled IT security personnel.
Ultimately, as they did with ‘BYOD’, teams just need to consider the security concerns and implement practices to mitigate the risks. Remember, also – the tools to manage these risks will get better, so reassess the situation often.
Protect your data. Demonstrate compliance.
With Redgate, stay ahead of threats with real-time monitoring and alerts, protect sensitive data with automated discovery & masking, and demonstrate compliance with traceability across every environment.
Tip #3 – Use Visual Studio Code to aid development with Fabric
Visual Studio Code makes saving work to Azure DevOps and GitHub much easier. There are also a cadre of extensions that make working with Fabric easier, including Fabric Data Engineering and Microsoft Fabric MCP.
Plus, for Power BI Desktop development, VS Code is becoming a complementary tool that lets AI make changes to your models and reports through the Power BI Modeling MCP.
Tip #4 – Implement workspace governance
With Git in place, you can ensure your development work is separate from what your customers see. At a minimum, you should keep two workspaces: one for development and one for production. If you can afford it, you should also have separate Fabric capacities for production and development. That way, production won’t be impacted if you make a mistake, such as a notebook mistakenly running a merge of large tables that consumes a lot of capacity.
It also means you should have a capacity (albeit a smaller one like an F4) for Copilot for Fabric. AI assisting with building code or answering questions should not come at the detriment of processing data. Analytics work is a volatile aspect of Fabric consumption – it’s hard to predict because it’s an exploratory endeavor, and asking AI to help explore is just as unpredictable. Keep your data engineering Fabric consumption separate from your analytics consumption.
Principle #3: Quality is paramount
Analytic pipelines should be built with a foundation capable of automated detection of abnormalities (jidoka), security issues in code, configuration, and data. It should also provide continuous feedback to operators for error avoidance (poka- yoke).
Tip #5 – See an error? Build a test
Testing is of utmost importance when AI is used in code generation. Without testing, how do we prove that AI didn’t introduce a mistake or fail to handle our requirements?
Whether AI accidentally changed a data type that broke a relationship, or didn’t use the DAX function TREATAS on the right column for a DAX measure, the solution is the same: build a test. And it’s no different if one of your team makes a mistake. Generating a test is the first thing you should do to help prevent it from happening again. Over time, you’ll build up a ‘safety net’ of tests to help prevent future mishaps.
Tip #6 – Use Pytest, wheel files, and environments for notebook development
Python has long had the ability to test transformations. When you have AI build Python transformations, you should have defined tests in pytest to validate those transformations. When those tests pass, the Python code should be compiled into wheel files and then added to an environment. This encapsulates your code with sound testing practices, reduces AI-driven regression errors, and protects the version of that code in environments.
Note: I have a sample project you can use as an example to help you get started.
Tip #7 – Test your semantic models
With the advent of the Power BI project file format and the introduction of the Power BI Modeling MCP server (which gives GenAI tools the ability to directly update your model), I’ve seen teams let AI update DAX and Power Query without testing. But how do you know what AI updated is correct?
Well, you can use the DAX Query View Testing Pattern and User Defined Functions such as PQL.Assert to build tests against your model. You can validate that the content has the correct distinct columns, that DAX measures output consistent results under certain filters, and that the relationships in a model are preserved, all within the semantic model. This lays the foundation for automated testing.
Tip #8 – Test your data agents
The Fabric Data Agent SDK, built to be run in a notebook, can be used to impersonate a customer asking questions so you can inspect the results and ensure they are consistent and appropriate. You should also be testing with inappropriate questions.
Regarding this, your leadership should understand that the questions stored in the notebook may be unsuitable in pleasant conversation, but are necessary to make sure the agent responds appropriately. For example, by asking an agent to give the definition of a curse word, you can validate that the agent does not return the word. It should instead simply say it cannot answer the question.
Principle #4: Monitor for quality and performance
Our goal is to have performance, security, and quality measures that are monitored continuously to detect unexpected variation and generate operational statistics.
Tip #9 – Testing does not stop once the solution has shipped!
To find issues before your customers do, it’s crucial to test and track your data’s journey to the customer during every step of the process. Eventhouse Monitoring allows workspace admins to start getting real-time insights into refreshes, and I have a template that can help.
This best practice also includes Data Agents, Fabric’s AI implementation for chatting with data. Both the data the agent queries and the model used to infer answers can, and will, change (including model deprecation.) The notebook I referenced earlier can also be used to test the agent and log results. Furthermore, these results can be logged to an eventhouse – giving you near real-time insights into the behavior of the Data Agent.
As of March 2026, seeing the prompts and conversations used by users with Data Agents is not built into the Fabric product. I’d instead suggest using Copilot Studio. While there is an additional cost, it does have more robust options. My hope is that we start seeing user activity sent to Eventhouse Monitoring in the near future.
In summary: why you should use DataOps principles with GenAI
GenAI has the capability to accelerate the delivery of solutions, and DataOps provides the principles to keep teams from crashing (both technically and personally). GenAI will continue to improve, introducing new capabilities that disrupt the industry. At the same time, DataOps principles are still as useful as ever. I hope, as a result of this article, you consider how they can make your teams better in these early days of GenAI.
FAQs: How DataOps principles help to reduce GenAI risk and improve data quality
1. How does Generative AI (GenAI) impact data engineering workflows?
Generative AI accelerates development but can introduce errors, inconsistent outputs, and governance challenges if not properly managed.
2. Why is DataOps important when using AI in data solutions?
DataOps ensures reproducibility, quality, and monitoring, helping teams reduce errors and maintain trust in AI-assisted workflows.
3. What are the risks of using AI-generated code in data projects?
Risks include lack of audit trails, missing error handling, security concerns, and untested code changes that may break pipelines.
4. How can teams safely use AI tools like GitHub Copilot?
Teams should implement version control (Git), enforce testing, review AI-generated code, and use enterprise-grade tools with proper data governance.
5. What role does testing play in AI-driven data development?
Testing validates AI-generated code, prevents regressions, and builds a safety net to ensure consistent and accurate data outputs.
6. How can Microsoft Fabric and Power BI teams manage AI risks?
By using Git integration, workspace separation, automated testing, and monitoring tools to maintain performance and data quality.
7. What is the best way to track AI-generated code changes?
Using version control systems like Git to maintain a clear audit trail and enable rollback of AI-generated updates.
The post How DataOps principles help to reduce GenAI risk and improve data quality appeared first on Simple Talk.
Pennsylvania, USA
Next Page of Stories