Sr. Content Developer at Microsoft, working remotely in PA, TechBash conference organizer, former Microsoft MVP, Husband, Dad and Geek.
142417 stories
·
32 followers

Centering a WPF TreeViewItem in the TreeView ScrollViewer

1 Share

Digital Tree Banner.jgp

The TreeView control in WPF is a pain of a control with so many obvious features that should be but are automatically handled. One of the problems is trying to select an item and keeping it visible and centered in the active Viewport. You would think that would be automatic or at least there would be an easy way to bring an item into a prominently visible view, but you'd be wrong!

In my use case I need to programmatically filter or rather unfilter a bunch of nodes in a TreeView and I want to make sure that the item focused stays visible when the tree is reorganized. Well... the default behavior doesn't do this unfortunately.

There is a TreeViewItem.BringIntoView() method and it seems like that should do the trick. Unfortunately it does a really crappy job at it, bringing the TreeViewItem into the view at the edges - top or bottom, rather than where you would likely want to see it which is closer to or smack in the center of the control.

I've dealt with this one too many times in my apps on a one-off basis I finally created a small helper method that does this right and that's what this post is about.

What's the Problem with BringIntoView

Using just BringIntoView() the default behavior looks like this:
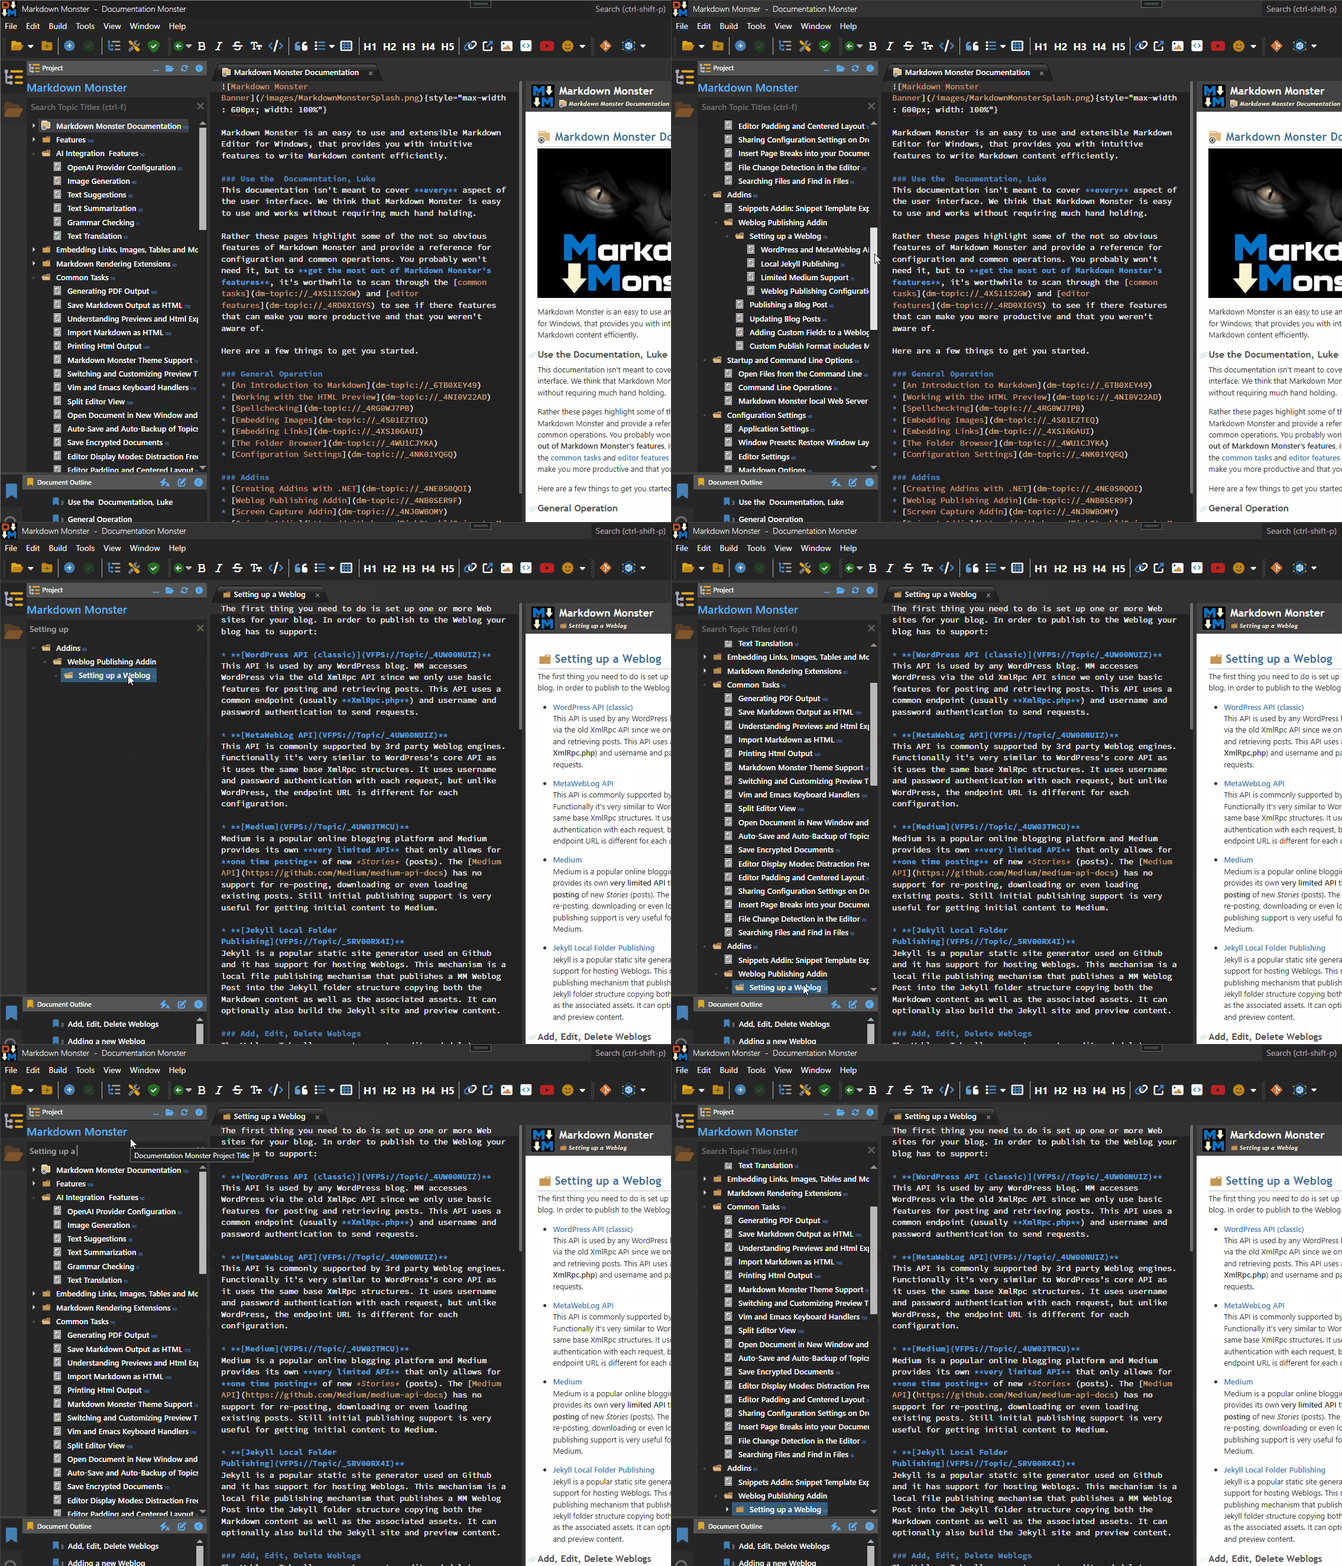
Bad Centering Tree View
Figure 1 - BringIntoView() brings the TreeViewItem into view, but does so at the edges: Very top or bottom where it doesn't feature prominently.

Note that the selected item ends up at the very bottom of the TreeView. It's easy to miss there and let's be frank - functionally it looks like shit in that position. In a pinch this works, but it's not really good UI.

In this UI scenario I'm using a search filter to filter the list of topics in a documentation project. In this case the match is a somewhat deeply nested header item which filters down to just a couple of items, and when I undo the filter I want that item to show up in the TreeView preferably centered, so it's easy to see. Not at the very tippy top or bottom.

Let's start with the base application code needed to make this happen. This code is needed regardless of the item placement within the view so we'll need that the bad and the good implementations and in the example it's fired from the handler of the Clear SearchBox button click:

public void MakeTopicVisible(DocTopic topic)  // bound data item
{
    if (topic == null)
        return;

    var tvi = WindowUtilities.GetNestedTreeviewItem(topic, TreeTopicBrowser);
    if (tvi == null) return;

    // expand all parents
    var tvParent = tvi;
    while (tvParent?.Parent is TreeViewItem parentTvi)
    {
        tvParent.IsExpanded = true;
        if (tvParent.DataContext is DocTopic dt)
            dt.IsExpanded = true;
        tvParent = parentTvi;
    }

    tvi.IsSelected = true;
    tvi.Focus();
    tvi.BringIntoView();
}

As is typical for UI operations on a TreeView you need to first map the Model value that you have access to (most likely via TreeView.SelectedItem) and convert that into a TreeviewItem. I use a helper function called GetNestedTreeViewItem() (see below) which walks the TreeView hierarchy and looks at the DataContext items for a match. I have another version that lets you provide a delegate to filter, but it's not needed here. So that gets me the tvi TreeViewItem.

Once I have the TreeViewItem I then have to expand all the parent items to ensure the item will actually be visible.

Finally, once that's all done, the item is selected, focused and hopefully brought into the View. But as shown in the Screen Capture above, if the item is not already visible it'll be pulled into the active Viewport, but likely at the very bottom or top of the view port.

That's a lot of work for a simple thing that should be built into the bloody base control since this is something one does all the time with a TreeView!

The main problem at hand here is that BringIntoView() really does an inadequate job of what it's designated job - it gets the TreeViewItem into view, but not where you typically want it.

Ooooohhmmmmm... Centering the Tree

Alright so how does this get fixed? Manually, my friend. Manually, by explicitly moving the ScrollViewer so the the TreeViewItem is centered.

Here's the code that does the trick:

/// <summary>
/// Centers a TreeViewItem inside of the scrollviewer unlike ScrollIntoView
/// which scrolls the item just into the top or bottom if not already
/// in the view
/// </summary>
/// <param name="treeView">TreeView to scroll</param>
/// <param name="treeViewItem">TreeView Item to scroll to</param>
public static void CenterTreeViewItemInScrollViewer(TreeView treeView, TreeViewItem item)
{
    if (item == null)
        return;

    // Ensure item is visible in layout
    item.IsSelected = true;
    item.BringIntoView();

    treeView.Dispatcher.BeginInvoke(DispatcherPriority.Loaded, new Action(() =>
    {
        var scrollViewer = FindVisualChild<ScrollViewer>(treeView);
        if (scrollViewer == null)
            return;

        // Find the header content presenter
        var header = FindVisualChild<ContentPresenter>(item);
        if (header == null)
            return;

        // Get header position relative to ScrollViewer
        var transform = header.TransformToAncestor(scrollViewer);
        var position = transform.Transform(new System.Windows.Point(0, 0));

        double headerHeight = header.ActualHeight;
        double viewportHeight = scrollViewer.ViewportHeight * scrollViewer.ScrollableHeight / scrollViewer.ExtentHeight;

        double targetOffset = scrollViewer.VerticalOffset + position.Y - (viewportHeight / 2) + (headerHeight / 2);
        scrollViewer.ScrollToVerticalOffset(targetOffset);
    }));
}

This code measures the size of the TreeViewItem's Content and then adjusts the Viewport by the height or width to try and bring the item into the center of the Viewport - shifting the offset from its current location.

Note that this code specifically looks at the Content object (the ContentPresenter) rather than the entire TreeViewItem using FindVisualChild<ScrollViewer>() (code below). Why? Because a TreeViewItem contains all of its children and you don't want to center an expanded TreeViewItem with all of its items which would show the selected item in the wrong place at best and not at all at worst.

So rather than the TreeViewItem the code looks for the ContentPresenter which then lets me correctly center the actual item in the Viewport rather than the whole block.

I can now fix my calling code to use this function instead of BringIntoView():

tvi.IsSelected = true;
tvi.Focus();

WindowUtilities.CenterTreeViewItemInScrollViewer(TreeTopicBrowser, tvi);    

Here's what the desired behavior looks like:
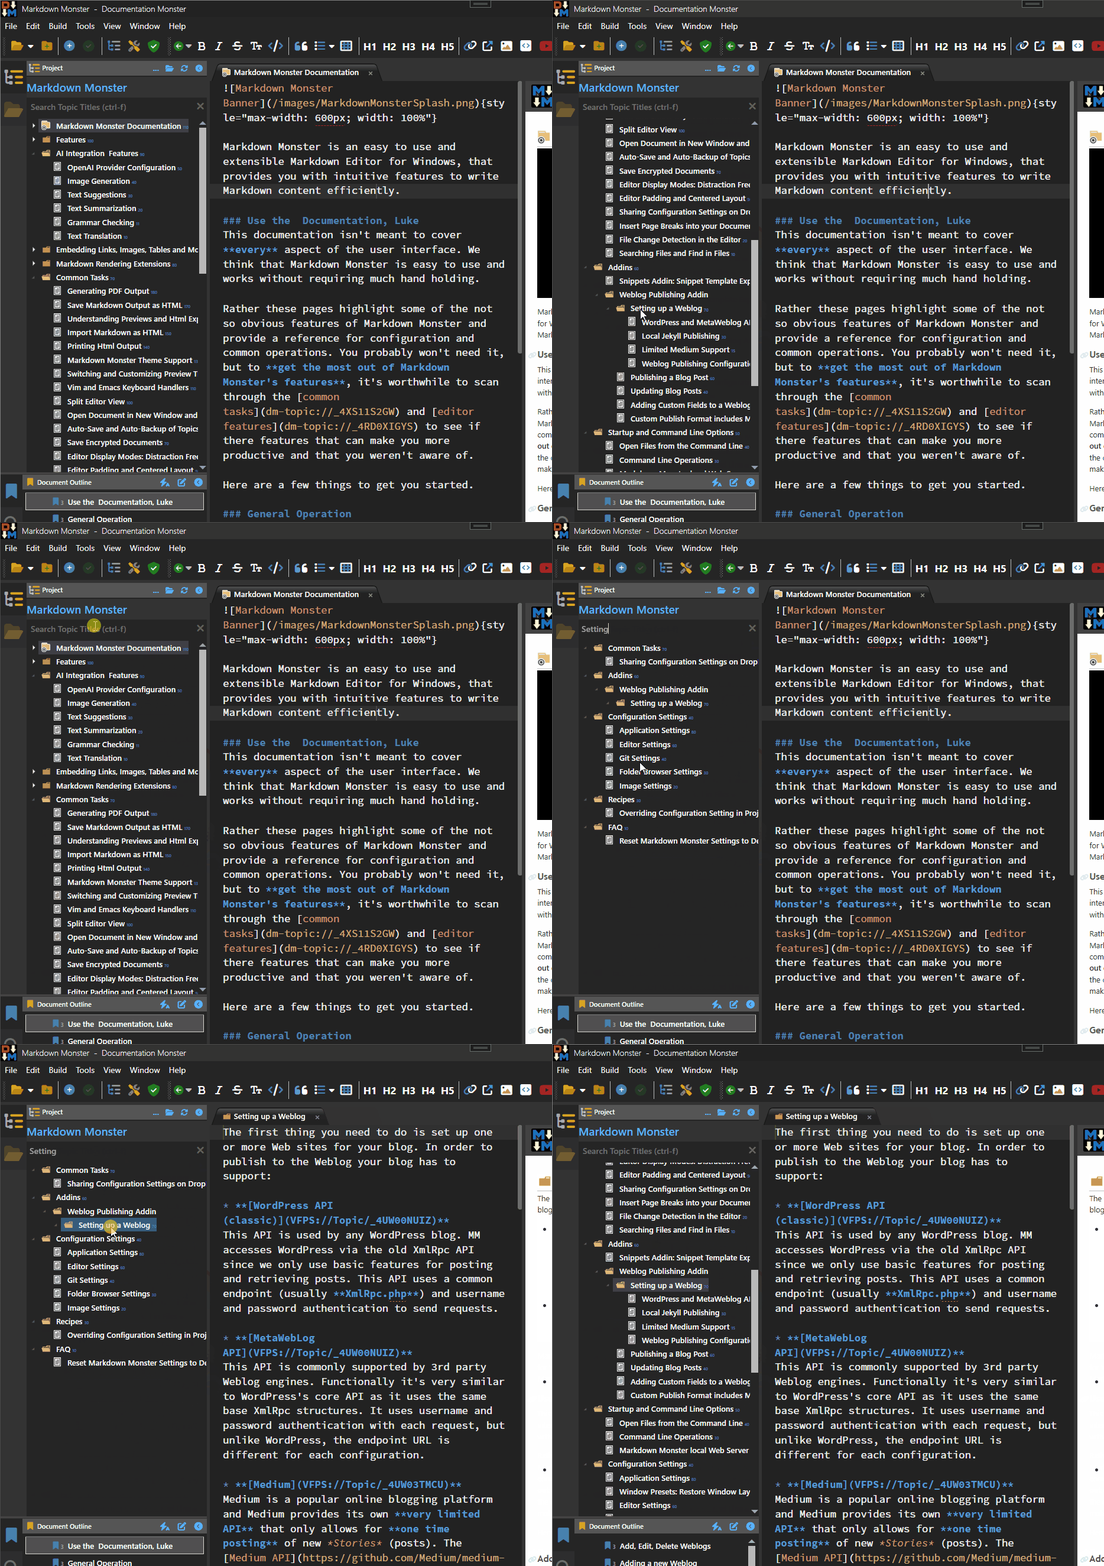
Proper Centering Tree View

Et Voila!

This is what BringIntoView() should be doing in the first place, but this helper does the trick if you want the TreeViewItem centered. If you don't care about the centering, you can still just BringIntoView() or if you need it at some other location you can tweak the method above to put it where you want it. Centering seems like the right thing to do most of the time.

Some refinements for alternate behavior might allow checking if the item is already visible or at least slightly off the top and bottom and not scrolling the viewer in that case to avoid jumping around the UI. Positioning might be another option - top, center, bottom, where top and bottom would be closer to the top or bottom without directly butting up against the top or bottom. Not something I need, but if you need some extra credit homework - there you go...

Support methods

For completeness sake here are the two helper functions referenced in the code snippets above:

FindVisualChild
Finds a child control by its control type.

public static T FindVisualChild<T>(DependencyObject currentControl) where T : DependencyObject
{
    if (currentControl != null)
    {
        for (int i = 0; i < VisualTreeHelper.GetChildrenCount(currentControl); i++)
        {
            var child = VisualTreeHelper.GetChild(currentControl, i);
            if (child is T)
            {
                return (T) child;
            }

            T childItem = FindVisualChild<T>(child);
            if (childItem != null) return childItem;
        }
    }

    return null;
}

GetNestedTreeViewItem
Looks up a Treeview item by its model value.

public static TreeViewItem GetNestedTreeviewItem(object item, ItemsControl parent)
{
    // look at this level
    var tvi = parent.ItemContainerGenerator.ContainerFromItem(item) as TreeViewItem;
    if (tvi != null)
        return tvi;

    // otherwise, recurse into each generated TreeViewItem
    foreach (object child in parent.Items)
    {
        if (parent.ItemContainerGenerator.ContainerFromItem(child) is TreeViewItem childContainer)
        {
            var result = GetNestedTreeviewItem( item, childContainer);
            if (result != null)
                return result;
        }
    }

    return null;
}

Summary

File this one away under Things that should just Work, but don't! So many things that have to do with the TreeView control are not designed in anyway to deal with the hierarchical nature of this control that it's almost comical. The good news is that the tools to do this manually are available and it's relatively straight forward to build reusable helpers that solve that problem.

Of course if you're anything like me, you'll do this manually a 100 times before you wisen up and build something reusable. And that's the point of this post - it'll serve as a reminder to me and quickly find the solution.

Or you can ask an LLM and get an incomplete solution... ask me how I know! 😂 And yeah, that's why I still bother writing helper functions like this, and even write them up in a blog post.

© Rick Strahl, West Wind Technologies, 2005-2025
Posted in WPF  
Read the whole story
alvinashcraft
5 hours ago
reply
Pennsylvania, USA
Share this story
Delete

SE Radio 677: Jacob Visovatti and Conner Goodrum on Testing ML Models for Enterprise Products

1 Share

Jacob Visovatti and Conner Goodrum of Deepgram speak with host Kanchan Shringi about testing ML models for enterprise use and why it's critical for product reliability and quality. They discuss the challenges of testing machine learning models in enterprise environments, especially in foundational AI contexts. The conversation particularly highlights the differences in testing needs between companies that build ML models from scratch and those that rely on existing infrastructure. Jacob and Conner describe how testing is more complex in ML systems due to unstructured inputs, varied data distribution, and real-time use cases, in contrast to traditional software testing frameworks such as the testing pyramid.

To address the difficulty of ensuring LLM quality, they advocate for iterative feedback loops, robust observability, and production-like testing environments. Both guests underscore that testing and quality assurance are interdisciplinary efforts that involve data scientists, ML engineers, software engineers, and product managers. Finally, this episode touches on the importance of synthetic data generation, fuzz testing, automated retraining pipelines, and responsible model deployment—especially when handling sensitive or regulated enterprise data.

Brought to you by IEEE Computer Society and IEEE Software magazine.


Download audio: https://traffic.libsyn.com/secure/seradio/677-jacob-visovatti-conner-goodrum-testing-ml-models.mp3?dest-id=23379
Read the whole story
alvinashcraft
5 hours ago
reply
Pennsylvania, USA
Share this story
Delete

Things That Caught My Attention Last Week - July 13

1 Share

caught-my-i

Architecture

Documenting Decisions: A Practical Guide to (Architecture) Decision by NimblePros

Dealing with Eventual Consistency, and Causal Consistency using Predictable Identifiers by Oskar Dudycz

.NET

AutoMapper and MediatR Roadmaps by Jimmy Bogard

Simplify Your .NET Development with Aspire by Joseph Guadagno

The Ultimate .NET 2025 Roadmap by Anton Martyniuk

Critter Stack Futures for the rest of 2025 ΓÇô The Shade Tree Developer by Jeremy D. Miller

Vibe Coding a BINGO Caller by Sarah Dutkiewicz

Using .NET Aspire With the Docker Publisher by Milan Jovanović

Software Design

How SQL is screwing up your DDD by Author image. Philippe Vaillancourt

REST/APIs

Why ownership is the key to successful APIs by Daniel Kocot

When API Clients Have a Mind of Their Own by Mike Amundsen

There Is Only API Consumption by Kin Lane

Caching, up-front by Alexander Karan

Azure

Markdown Support Arrives for Work Items by Azure DevOps Blog

Software Development

The JavaScript Date Quiz by Sam Rose

AI

Does AI actually boost productivity? The evidence is murky by Kim Honey

Microsoft says AI saved it $500 million - despite it also confirming massive job cuts by

Rethinking the AI coding payoff - YouTube by CNBC Television

AI coding tools can slow down seasoned developers by 19% by Gyana Swain

LLMs bring new nature of abstraction by Martin Fowler

Pondering About Using AI for Coding by Shawn Wildermuth

Cloud

Building Event-Driven Go applications with Azure Cosmos DB and Azure Functions by Azure Cosmos DB Blog

Computing

A walkthrough of the original Microsoft Building 3 by Raymond Chen

Read the whole story
alvinashcraft
5 hours ago
reply
Pennsylvania, USA
Share this story
Delete

Trump claims deep state wrote fake documents about imaginary list that doesn't exist

1 Share
President Donald Trump (Joshua Sukoff / Shutterstock.com)

America's Commander-in-Conspiracy wants his followers to believe that the Justice Department fabricated documents that don't exist to cover up revelations they never had about a list they just confirmed was imaginary.

For years, QAnon grifters have promised to reveal explosive Epstein documents that would shake the foundations of the deep state. — Read the rest

The post Trump claims deep state wrote fake documents about imaginary list that doesn't exist appeared first on Boing Boing.

Read the whole story
alvinashcraft
5 hours ago
reply
Pennsylvania, USA
Share this story
Delete

Daily Reading List – July 15, 2025 (#587)

1 Share

A lot of AI stuff today. But also lots of insight about it, versus cheerleading. Dig in!

[blog] Context Engineering: Bringing Engineering Discipline to Prompts. This post gave me greater appreciation for what “context engineering” is about. Don’t assume it’s just a silly new term for something we were already doing.

[blog] AI from Google Cloud steps up to the plate at the MLB All-Star Game. The game’s tonight, and we’re adding a few cool experiences to the game.

[blog] Starter GEMINI.md file within a project directory for Gemini CLI. Pay attention to these posts that help us write effective agent instructions that improve the output of our tools.

[blog] The three great virtues of an AI-assisted programmer. What are you doing while waiting for your LLM to answer? How are you keeping control of the exercise? I liked Sean’s take here.

[article] The Pragmatic Engineer 2025 Survey: What’s in your tech stack? Surveys are surveys, but there’s data here that might validate (or invalidate) some of your assumptions about today’s developers.

[article] AI coding tools are shifting to a surprising place: the terminal. The survey above happened during April and May. I suspect the data would already look markedly different thanks to the rapid (and sustainable) rise in agentic terminal tools.

[blog] The Internal Platform Scorecard: Speed, Safety, Efficiency, and Scalability. I like the attributes along with corresponding KPIs and metrics that matter. Know how you’re measuring the success of your platform!

[blog] Gemini CLI Tutorial Series — Part 6 : More MCP Servers. Even more ways to use MCP servers in the Gemini CLI, including accessing Google Workspace and media services.

[blog] Next-Level Data Automation: Gemini CLI, Google Sheets, and MCP. Interacting with Google Sheets, Docs, and Slides from an agentic CLI opens up a ton of possibilities.

[blog] Tools: Code Is All You Need. A contrary opinion to the MCP hype. Maybe just use code instead?

[blog] The AWS Survival Guide for 2025: A Field Manual for the Brave and the Bankrupt. Amusing. You don’t have to put up with all this if you want a better cloud alternative.

[blog] AI Engineers and the Hot Vibe Code Summer. When I hear “AI engineer” I think of someone building AI models or doing ML work. Not a developer using AI tools. Kate looks at that term, and vibe coding to figure out what it all means.

[article] Global IT spend keeps growing despite trade war concerns. Spending still up for the year, but trimmed expectations. El Reg has a more pessimistic take on the same data.

[blog] The Fastest Way to Run the Gemini CLI: A Deep Dive into Package Managers. Super interesting content, especially if you care about performance.

Want to get this update sent to you every day? Subscribe to my RSS feed or subscribe via email below:


Read the whole story
alvinashcraft
5 hours ago
reply
Pennsylvania, USA
Share this story
Delete

AWS Free Tier update: New customers can get started and explore AWS with up to $200 in credits

1 Share

When you’re new to Amazon Web Services (AWS), you can get started with AWS Free Tier to learn about AWS services, gain hands-on experience, and build applications. You can explore the portfolio of services without incurring costs, making it even easier to get started with AWS.

Today, we’re announcing some enhancements to the AWS Free Tier program, offering up to $200 in AWS credits that can be used across AWS services. You’ll receive $100 in AWS credits upon sign-up and can earn an additional $100 in credits by using services such as Amazon Elastic Compute Cloud (Amazon EC2), Amazon Relational Database Service (Amazon RDS), AWS Lambda, Amazon Bedrock, and AWS Budgets.

The enhanced AWS Free Tier program offers two options during sign-up: a free account plan and a paid account plan. The free account plan ensures you won’t incur any charges until you upgrade to a paid plan. The free account plan expires after 6 months or when you exhaust your credits, whichever comes first.

While on the free account plan, you won’t be able to use some services typically used by large enterprises. You can upgrade to a paid plan at any time to continue building on AWS. When you upgrade, you can still use any unused credits for any eligible service usage for up to 12 months from your initial sign-up date.

When you choose the paid plan, AWS will automatically apply your Free Tier credits to the use of eligible services in your AWS bills. For usage that exceeds the credits, you’re charged with the on-demand pricing.

Get up to $200 credits in action
When you sign up for either a free plan or a paid plan, you’ll receive $100 credit. You can also earn an additional $20 credits for each of these five AWS service activities you complete:

  • Amazon EC2 – You’ll learn how to launch an EC2 instance and terminate it.
  • Amazon RDS – You’ll learn the basic configuration options for launching an RDS database.
  • AWS Lambda – You’ll learn to build a straightforward web application consisting of a Lambda function with a function URL.
  • Amazon Bedrock – You’ll learn how to submit a prompt to generate a response in the Amazon Bedrock text playground.
  • AWS Budgets – You’ll learn how to set a budget that alerts you when you exceed your budgeted cost amount.

You can see the credit details in the Explore AWS widget in the AWS Management Console.

These activities are designed to expose customers to important building blocks of AWS, including cost and usage that show up in the AWS Billing Console. These charges are deducted from your Free Tier credits and help teach new AWS users about selecting the appropriate instance sizes to minimize your costs.

Choose Set up a cost budget using AWS Budgets to earn your first $20 credits. It redirects to the AWS Billing and Cost Management console.

To create your first budget, choose Use a template (simplified) and Monthly cost budget to notify you if you exceed, or are forecasted to exceed, the budget amount.

When you choose the Customize (advanced) setup option, you can customize a budget to set parameters specific to your use case, scope of AWS services or AWS Regions, the time period, the start month, and specific accounts.

After you successfully create your budget, your begin receiving alerts when your spend exceeds your budgeted amount.

You can go to the Credits page in the left navigation pane in the AWS Billing and Cost Management Console to confirm your $20 in credits. Please note, it can take up to 10 minutes for your credits to appear.

You can receive an additional $80 by completing the remaining four activities. Now you can use up to $200 in credits to learn AWS services and build your first application.

Things to know
Here are some of things to know about the enhanced AWS Free Tier program:

  • Notifications – We’ll send an email alert when 50 percent, 25 percent, or 10 percent of your AWS credits remain. We’ll also send notifications to the AWS console and your email inbox when you have 15 days, 7 days, and 2 days left in your 6-month free period. After your free period ends, we’ll send you an email with instructions on how to upgrade to a paid plan. You’ll have 90 days to reopen your account by upgrading to a paid plan.
  • AWS services – The free account can access parts of AWS services including over 30 services that offer always-free tier. The paid account can access all AWS services. For more information, visit AWS Free Tier page.
  • Legacy Free Tier – If your AWS account was created before July 15, 2025, you’ll continue to be in the legacy Free Tier program, where you can access short-term trials, 12-month trials, and always free tier services. The always-free tier is available under both the new Free Tier program and the legacy Free Tier program.

Now available
The new AWS Free Tier features are generally available in all AWS Regions, except the AWS GovCloud (US) Regions and the China Regions. To learn more, visit the AWS Free Tier page and AWS Free Tier Documentation.

Give the new AWS Free Tier a try by signing up today, and send feedback to AWS re:Post for AWS Free Tier or through your usual AWS Support contacts.

Channy

Read the whole story
alvinashcraft
8 hours ago
reply
Pennsylvania, USA
Share this story
Delete
Next Page of Stories