Content Developer II at Microsoft, working remotely in PA, TechBash conference organizer, former Microsoft MVP, Husband, Dad and Geek.
122647 stories
·
29 followers

ASP.NET Core Basics: Authentication and Authorization with JWT

1 Share

Discover JSON Web Token in this post—one of the most common token standards in the world—and learn how to use it in ASP.NET Core through a practical example.

JSON Web Token (JWT) is one of the most popular inter-application authentication methods today. Its acceptance is largely due to its ease of implementation and integration with different platforms and programming languages. In addition, it uses a very widespread data type, JSON.

In this post, we will see how JWT works and how to implement it in an ASP.NET Core application using the Swagger interface.

What is JWT?

JSON Web Token—JWT—is an open standard (RFC 7519) that provides a simple way to securely transmit information between parties via a JSON object.

Verification takes place through a signature. This signature allows only a server that has the key to decode and verify the content of the tokens received and grant or deny access to their resources.

In simple terms, tokens are like access keys, with information and a lifetime.

To make tokens secure, we can encrypt them, so if someone discovers your token, they will not be able to see anything other than a sequence of numbers and letters (hash) like the one below:

eyJhbGciOiJIUzI1NiIsInR5cCI6IkpXVCJ9.eyJzdWIiOiIxMjM0NTY3ODkwIiwibm FtZSI6IkpvaG4gRG9lIiwiaWF0IjoxNTE2MjM5MDIyfQ.SflKxwRJSMeKKF2QT4 fwpMeJf36POk6yJV_adQssw5c

When we describe this token we have the following data:

{
  "alg": "HS256",
  "typ": "JWT"
}

{
  "sub": "1234567890",
  "name": "John Doe",
  "iat": 1516239022
}

Note that the token is divided by dots (.) where each dot separates each of the three sections of the JWT. In this image, in red is the header, in purple is the payload and in blue is the signature:
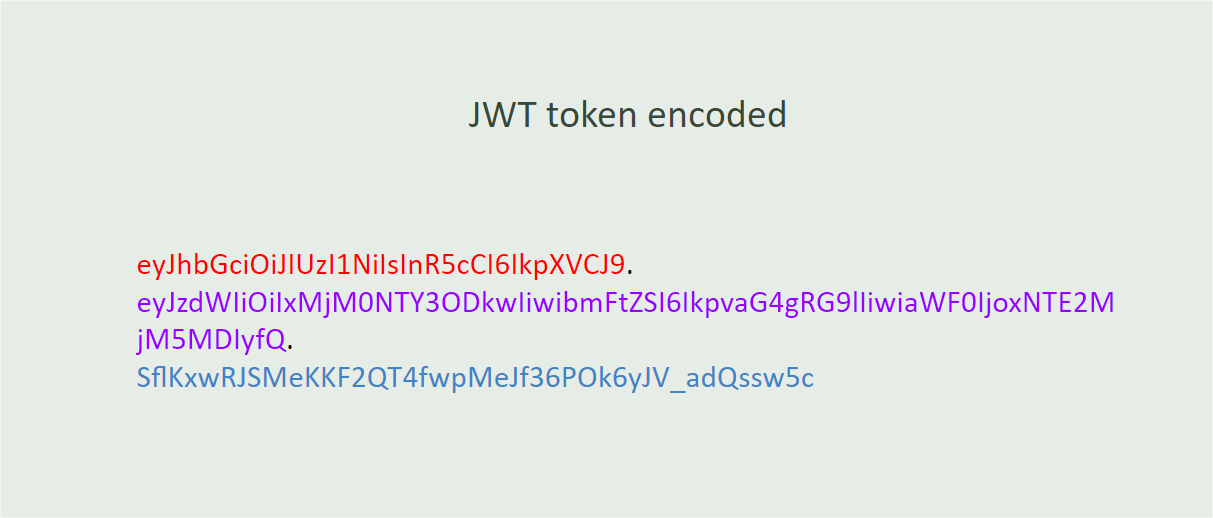
JWT example

JWTs consist of three parts:

  1. Header: The header typically consists of two parts—the token type (JWT) and the signature algorithm used, such as HMAC SHA256 or RSA.

  2. Payload: The second part of the token is the payload, which contains the declarations. Claims are statements about an entity (typically the user) and additional data. There are three types of claims: registered, public and private.

  3. Signature: To create the signature part, you have to take the encoded header, the encoded payload, a secret and the algorithm specified in the header, and sign it.

JWTs are often used for authentication and information exchange in web development. When a user logs in, a server can generate a JWT and send it back to the client. The client can then include the JWT in the headers of subsequent requests to prove its identity. The server can check the JWT to check that its claims are valid and the token has not been tampered with.

The flowchart below demonstrates the request and authentication process via JWT
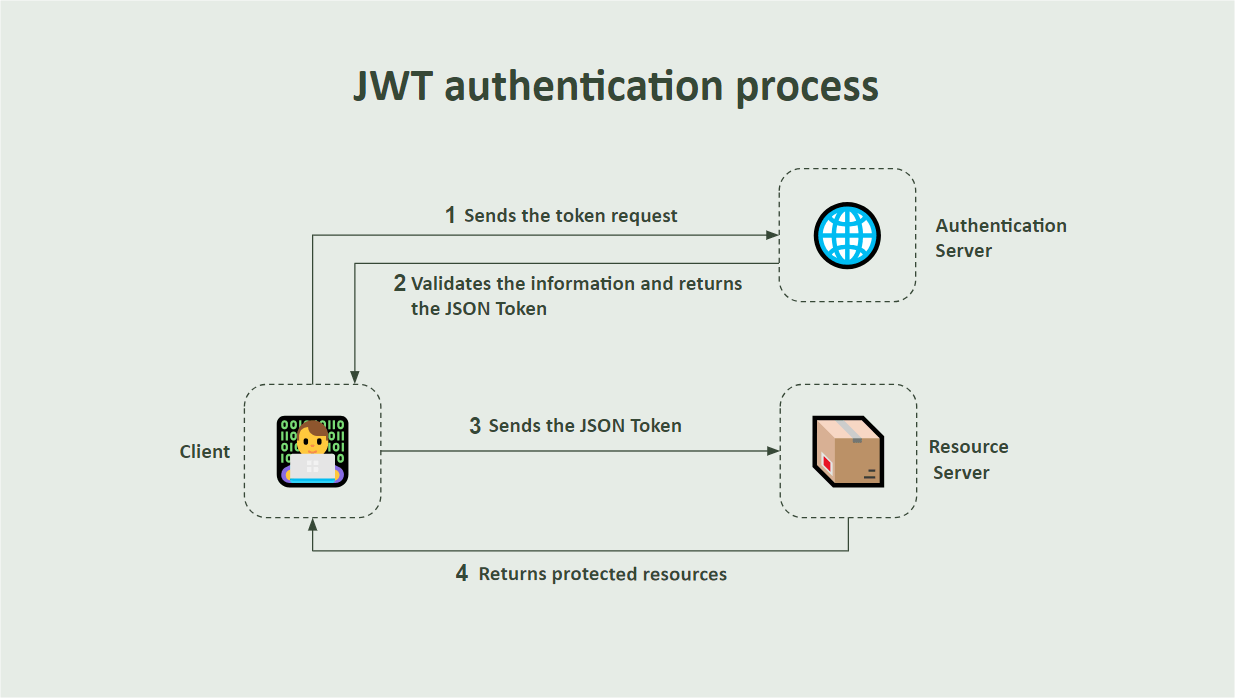
JWT authentication process

JWT in ASP.NET Core

ASP.NET Core has robust support for JWT, through libraries and tools that facilitate the generation, validation and use of JWT in web applications.

In this post, let’s create a simple application in ASP.NET Core and apply endpoints with JWT validation.

You can access the complete source code here: AuthCore source code.

Creating the Application and Downloading the Dependencies

To create the application, you need to have installed .NET 8 or higher and an IDE. This tutorial will use Visual Studio Code.

In the terminal, execute the following commands:

dotnet new web -o AuthCore
cd AuthCore
dotnet add package Swashbuckle.AspNetCore
dotnet add package Microsoft.AspNetCore. Authentication.JwtBearer

Creating the Private Key

The private key refers to the cryptographic key used to sign the JWTs. JWTs are digitally signed to better safeguard their integrity and authenticity. The private key is used by the server to create the signature, and the corresponding public key is used by clients to verify the signature.

This way, when a user logs in or performs an authentication action, the server creates a JWT and signs it with the private key. The private key must be kept secure and must only be known to the server.

In this example, the private key is configured locally for learning purposes, but for real-world applications, this key must be stored in a safe and private location, such as a secret manager in the cloud.

Then, in the application project, create a new folder called “Helpers” and within it create the class below:

  • AuthSettings
namespace AuthCore.Helpers;

public static class AuthSettings
{
  public static string PrivateKey { get; set; } = "MIICWwIBAAKBgHZO8IQouqjDyY47ZDGdw9jPDVHadgfT1kP3igz5xamdVaYPHaN24UZMeSXjW9sWZzwFVbhOAGrjR0MM6APrlvv5mpy67S/K4q4D7Dvf6QySKFzwMZ99Qk10fK8tLoUlHG3qfk9+85LhL/Rnmd9FD7nz8+cYXFmz5LIaLEQATdyNAgMBAAECgYA9ng2Md34IKbiPGIWthcKb5/LC/+nbV8xPp9xBt9Dn7ybNjy/blC3uJCQwxIJxz/BChXDIxe9XvDnARTeN2yTOKrV6mUfI+VmON5gTD5hMGtWmxEsmTfu3JL0LjDe8Rfdu46w5qjX5jyDwU0ygJPqXJPRmHOQW0WN8oLIaDBxIQQJBAN66qMS2GtcgTqECjnZuuP+qrTKL4JzG+yLLNoyWJbMlF0/HatsmrFq/CkYwA806OTmCkUSm9x6mpX1wHKi4jbECQQCH+yVb67gdghmoNhc5vLgnm/efNnhUh7u07OCL3tE9EBbxZFRs17HftfEcfmtOtoyTBpf9jrOvaGjYxmxXWSedAkByZrHVCCxVHxUEAoomLsz7FTGM6ufd3x6TSomkQGLw1zZYFfe+xOh2W/XtAzCQsz09WuE+v/viVHpgKbuutcyhAkB8o8hXnBVz/rdTxti9FG1b6QstBXmASbXVHbaonkD+DoxpEMSNy5t/6b4qlvn2+T6a2VVhlXbAFhzcbewKmG7FAkEAs8z4Y1uI0Bf6ge4foXZ/2B9/pJpODnp2cbQjHomnXM861B/C+jPW3TJJN2cfbAxhCQT2NhzewaqoYzy7dpYsIQ==";
}

Creating the Auth User

Now let’s create a user, which will be used to authenticate in the system. It will have an email and password that will be verified when generating the token. Within the application, create a new folder called “Models” and within it create the class below:

  • User
namespace AuthCore.Models;

public record User(Guid Id, string Name, string Email, string Password, string[] Roles);

Creating the Auth Service

Now let’s create a service class that will store all the methods to manage the creation of tokens used during requests.

Inside the project, create a new folder called “Services.” Inside that, create a new class called “AuthService” and put in it the code below.

using System.IdentityModel.Tokens.Jwt;
using System.Security.Claims;
using System.Text;
using AuthCore.Helpers;
using AuthCore.Models;
using Microsoft.IdentityModel.Tokens;

namespace AuthCore.Services;

public class AuthService
{
    public string GenerateToken(User user)
    {
        var handler = new JwtSecurityTokenHandler();
        var key = Encoding.ASCII.GetBytes(AuthSettings.PrivateKey);
        var credentials = new SigningCredentials(
            new SymmetricSecurityKey(key),
            SecurityAlgorithms.HmacSha256Signature);

        var tokenDescriptor = new SecurityTokenDescriptor
        {
            Subject = GenerateClaims(user),
            Expires = DateTime.UtcNow.AddMinutes(15),
            SigningCredentials = credentials,
        };

        var token = handler.CreateToken(tokenDescriptor);
        return handler.WriteToken(token);
    }

    private static ClaimsIdentity GenerateClaims(User user)
    {
        var claims = new ClaimsIdentity();
        claims.AddClaim(new Claim(ClaimTypes.Name, user.Email));

        foreach (var role in user.Roles)
            claims.AddClaim(new Claim(ClaimTypes.Role, role));

        return claims;
    }
}

Analyzing the Code

In the code above we have a method called GenerateToken() where an instance of the JwtSecurityTokenHandler class is created.

The JwtSecurityTokenHandler class is part of the System.IdentityModel.Tokens.Jwt namespace and is responsible for creating, validating and manipulating JWT tokens.

Note that the handler variable has two methods, one to create the token (CreateToken()) and another to serialize the token into a compressed string format (WriteToken(token)).

Next, a variable called key is created that obtains the private key from the AuthSettings class created previously and then converts it into bytes, through the method Encoding.ASCII.GetBytes().

Then, the credentials variable receives the instance of the SigningCredentials object containing the signing credentials that were created using the private key and the HMAC-SHA256 algorithm, which is a secure encryption algorithm, creating a 256-bit hash.

The tokenDescriptor variable is also created, which receives an instance of the SecurityTokenDescriptor class. The SecurityTokenDescriptor class contains the settings and information required to generate a JWT token. This information includes the following properties:

  • Subject: This represents the subject of the token, that is, information about the user for which the token is being generated.

  • Expires: This specifies the time at which the token will expire. The code is set to 15 minutes from the current time (DateTime.UtcNow). This means that the token will be valid for 15 minutes from the time it was generated.

  • SigningCredentials: It is used to specify the signing credentials for the token. In the code, credentials represent a previously created SigningCredentials object, using a symmetric key and the HMAC-SHA256 algorithm to sign the token.

The method GenerateClaims() creates a ClaimsIdentity object containing claims for the user’s email and roles. Each role is added as a separate declaration of type ClaimTypes.Role. This way, each role sent in the request will be added to the claim, and the list of claims is returned at the end.

Testing Token Generation

The last step before testing the token generation is to create an endpoint that will call the token generation method and return the token in the response. Replace the existing code in the Program.cs file with the code below:

using AuthCore.Models;
using AuthCore.Services;
using Microsoft.OpenApi.Models;

var builder = WebApplication.CreateBuilder(args);
builder.Services.AddTransient<AuthService>();
builder.Services.AddEndpointsApiExplorer();
builder.Services.AddSwaggerGen(c =>
{
    c.SwaggerDoc("v1", new OpenApiInfo { Title = "AuthCore API", Version = "v1" });
});
var app = builder.Build();

if (app.Environment.IsDevelopment())
{
    app.UseSwagger();
    app.UseSwaggerUI(c =>
    {
        c.SwaggerEndpoint("/swagger/v1/swagger.json", "AuthCore API V1");
    });
}

app.MapPost("/authenticate", (User user, AuthService authService)
    => authService.GenerateToken(user));

app.Run();

Now just run the application. You can do this by running the dotnet run command in the terminal.

You can access the Swagger interface through the browser in the http://localhost:PORT/swagger/index.html, and then send the authenticate request with the body request below:

{
    "email": "johnsmith@samplemail.com",
    "roles": [
        "admin"
    ]
}

The token will be generated as shown in the image below:
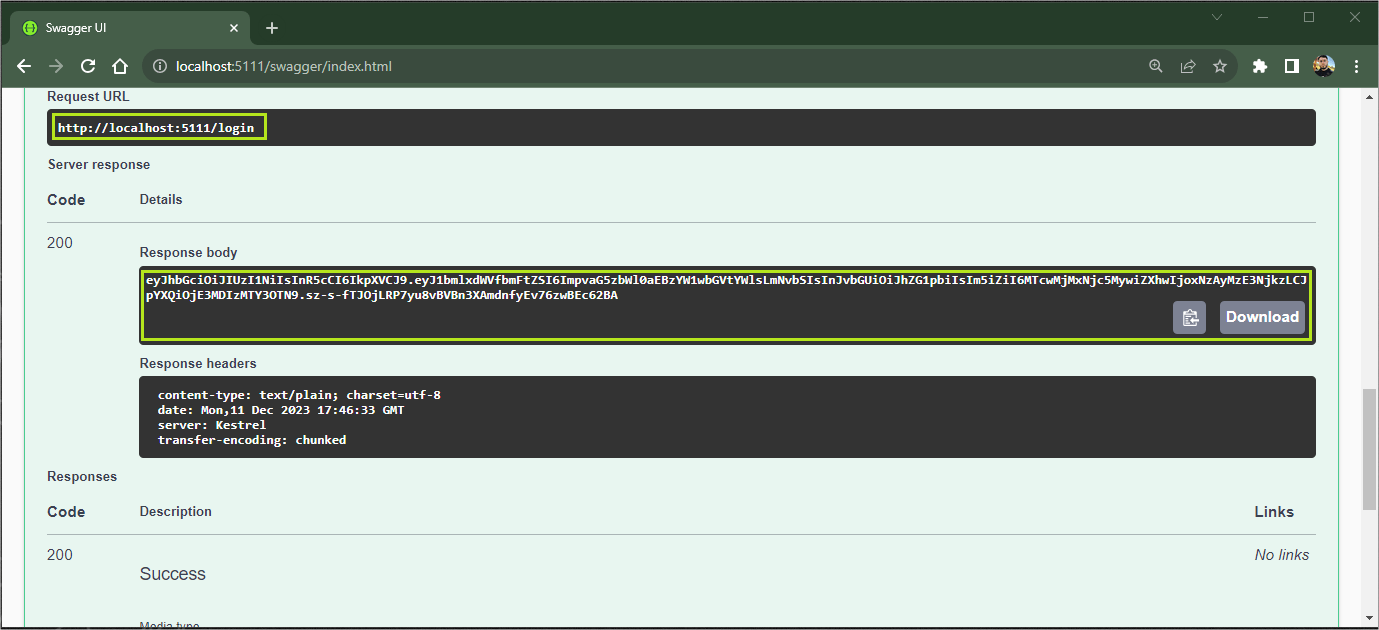
Generate token

To verify that the token is an authentic JWT token, simply access the official JWT website jwt.io and paste the token obtained through the request. Note that it is possible to verify the information in the right tab of the page:
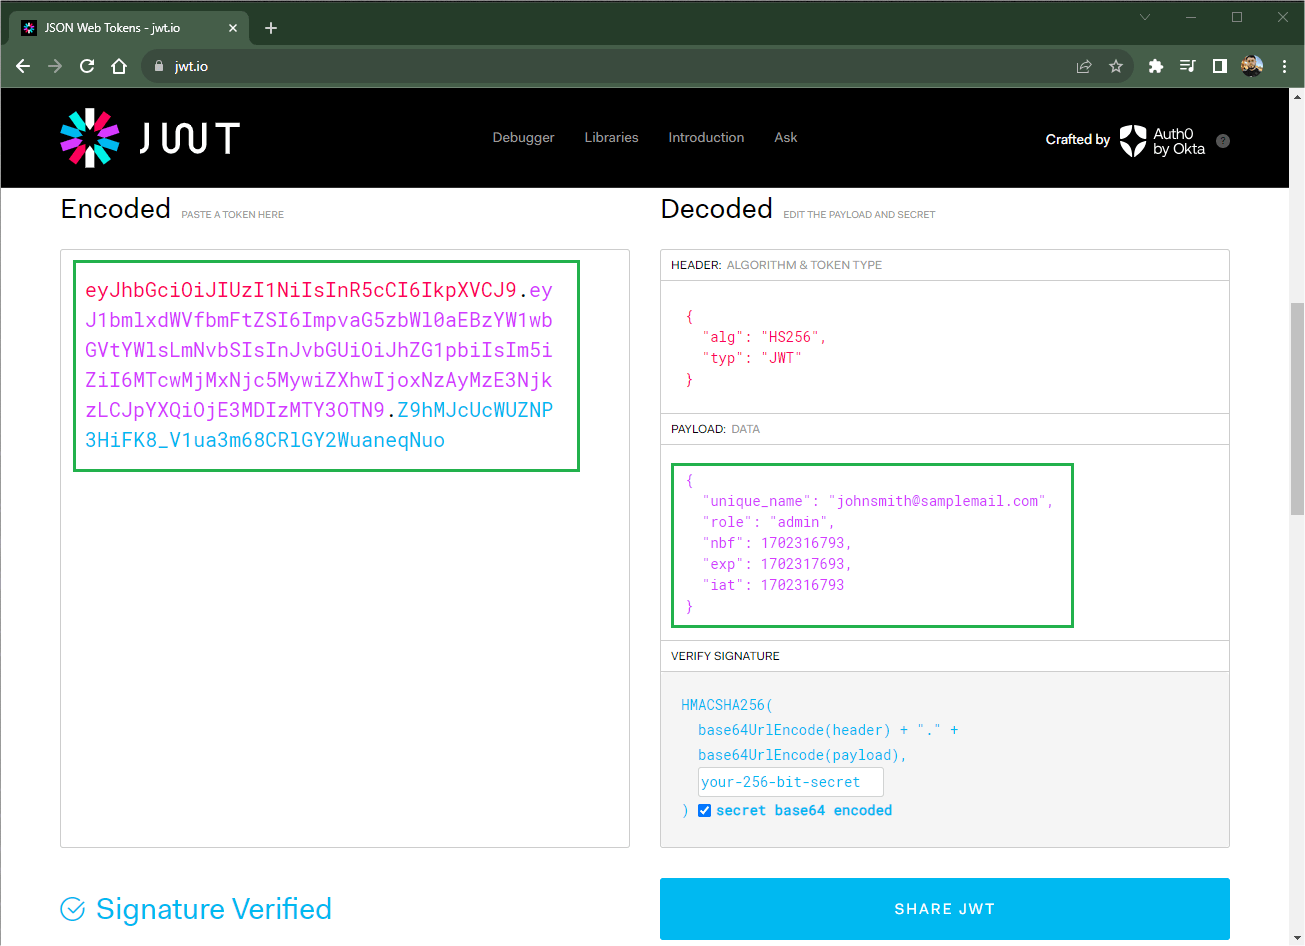
Verifying JWT

Using the JWT Token to Authenticate and Authorize

All the previous steps were to create the JWT token. For this, we created an HTTP route called authenticate that returns the token. Let’s create a route that uses the token for authentication and authorization.

To add support for authentication and authorization middleware, in the Program.cs file, right below where the builder variable is created, add the following code:

builder.Services
    .AddAuthentication(x =>
    {
        x.DefaultAuthenticateScheme = JwtBearerDefaults.AuthenticationScheme;
        x.DefaultChallengeScheme = JwtBearerDefaults.AuthenticationScheme;
    })
    .AddJwtBearer(x =>
    {
        x.RequireHttpsMetadata = false;
        x.SaveToken = true;
        x.TokenValidationParameters = new TokenValidationParameters
        {
            IssuerSigningKey = new SymmetricSecurityKey(Encoding.ASCII.GetBytes(AuthSettings.PrivateKey)),
            ValidateIssuer = false,
            ValidateAudience = false
        };
    });
builder.Services.AddAuthorization();

And just below where the app variable is created add the following:

app.UseAuthentication();
app.UseAuthorization();

You also need to add the following namespaces:

using Microsoft.AspNetCore.Authentication.JwtBearer;
using Microsoft.IdentityModel.Tokens;
using System.Text;
using AuthCore.Helpers;

Now let’s analyze the details of the code above.

  • AddAuthentication method: This method is used to configure the authentication system in the application. It receives a delegate x, which is used to configure authentication options.

  • DefaultAuthenticateScheme and DefaultChallengeScheme are set to JwtBearerDefaults.AuthenticationScheme. This means that, by default, authentication and challenges will be handled using the JWT Bearer authentication scheme. JWT Bearer is an authentication scheme used in web applications to provide a more secure way to transmit authentication information between parties. In the Bearer scheme, the JWT token is passed as a string in an HTTP header, usually in the Authorization field. The string starts with the word “Bearer” followed by a space and then the JWT token.

  • AddJwtBearer method: This method adds the JWT Bearer authentication scheme to the system.

  • RequireHttpsMetadata is set to false, which means HTTPS will not be required for authentication traffic.

  • SaveToken is set to true, indicating that the received token must be saved. This is useful if you need to access the token later.

  • TokenValidationParameters are configured to define JWT validation parameters.

  • IssuerSigningKey: Defines the secret key used to sign and verify the token signature. The key is obtained from a string contained in AuthSettings.PrivateKey that we created previously.

  • ValidateIssuer and ValidateAudience are both set to false, which means that issuer and audience validation will not be performed. Sometimes, you may want to enable these validations so that tokens are only valid for specific destinations.

Adding JWT Bearer Token Support to Swagger and Testing the API

First, let’s add JWT Bearer support for Swagger—this way we can send the token obtained through the Swagger interface and check if the authentication system is working.

Still in the Program.cs file, within the AddSwaggerGen method, add the code below:

var securityScheme = new OpenApiSecurityScheme
    {
        Name = "JWT Authentication",
        Description = "Enter your JWT token in this field",
        In = ParameterLocation.Header,
        Type = SecuritySchemeType.Http,
        Scheme = "bearer",
        BearerFormat = "JWT"
    };

    c.AddSecurityDefinition("Bearer", securityScheme);

    var securityRequirement = new OpenApiSecurityRequirement
    {
        {
            new OpenApiSecurityScheme
            {
                Reference = new OpenApiReference
                {
                    Type = ReferenceType.SecurityScheme,
                    Id = "Bearer"
                }
            },
            new string[] {}
        }
    };

    c.AddSecurityRequirement(securityRequirement);

Note that in the code above, an object of the OpenApiSecurityScheme class is created and some settings are assigned to it, such as BearerFormat which in this case will be JWT, then we pass the object to the AddSecurityDefinition() method, along with the name (Bearer).

An object of type OpenApiSecurityRequirement is also created, which receives the schema settings with the type and id.

The object is then passed to the AddSecurityRequirement() method, which indicates that to access the API endpoints, it is necessary to satisfy the security scheme defined by the reference to Bearer. The empty list of strings indicates that no specific scope is needed.

Now let’s create an endpoint to validate authentication with the JWT token. In Program.cs file, below the /authenticate endpoint, add the following code:

app.MapGet("/signin", () => "User Authenticated Successfully!").RequireAuthorization();

This endpoint only returns a success message, but note that it contains the RequireAuthorization() method, which is used to indicate that access to this route requires authentication. If a user is not authenticated, they will be redirected to the authentication flow before accessing the /signin endpoint.

This call is a way to apply authorization policies directly to the route definition, indicating that only authenticated users can access that specific route. This is useful in scenarios where you want to better protect specific endpoints and restrict access to certain parts of your application.

Now let’s check if the authentication is working correctly, then run the application and then access the Swagger interface.

Try running the signin endpoint, but note that the response will be a 401 code—Error: Unauthorized. This happened because authentication was carried out.
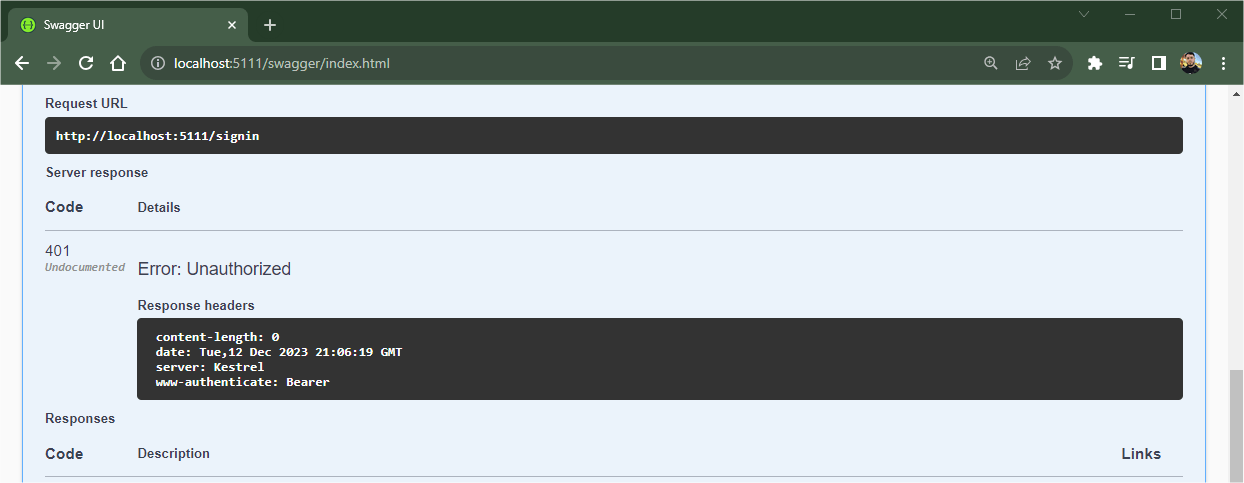
Sign in error

Now let’s try again, but this time with authentication. Run the authenticate endpoint with the previous credentials and copy the returned token.

Then, on the signin route, click on the padlock icon. In the tab that opens, paste the token in the Value field, click on Authorize, close the tab and finally execute the signin endpoint request.
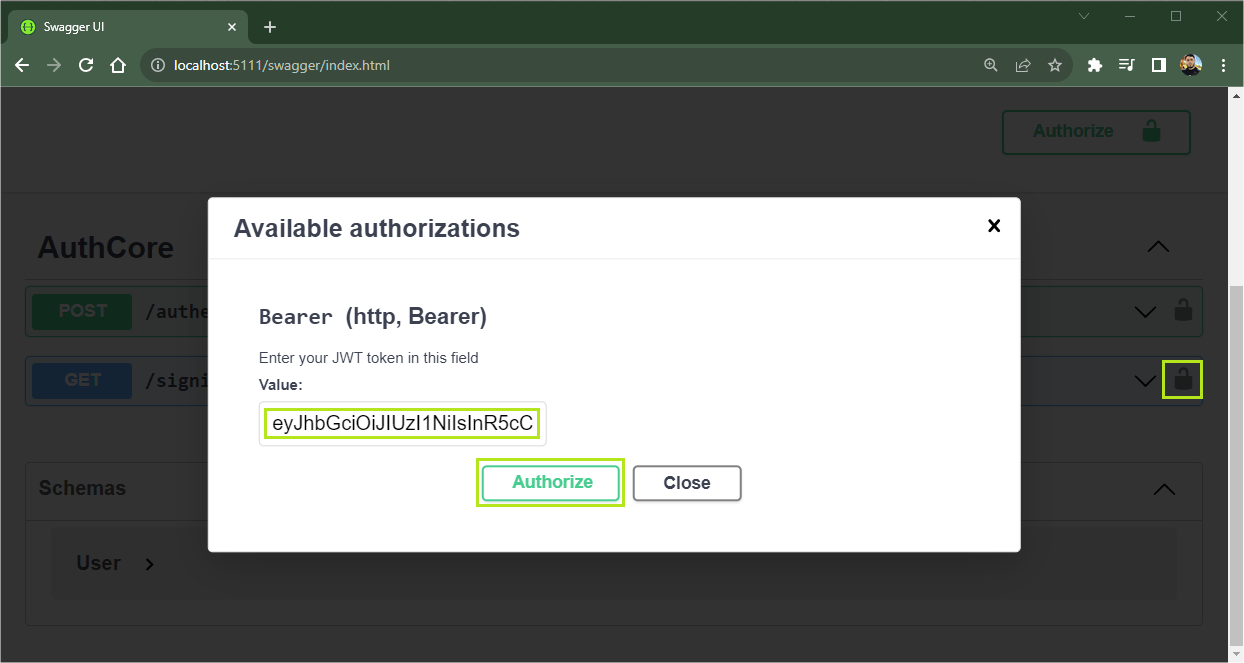
Sign authorize

This time, the return was a 200 success code with the message: “User Authenticated Successfully!” This means that the token has been validated and authenticated.
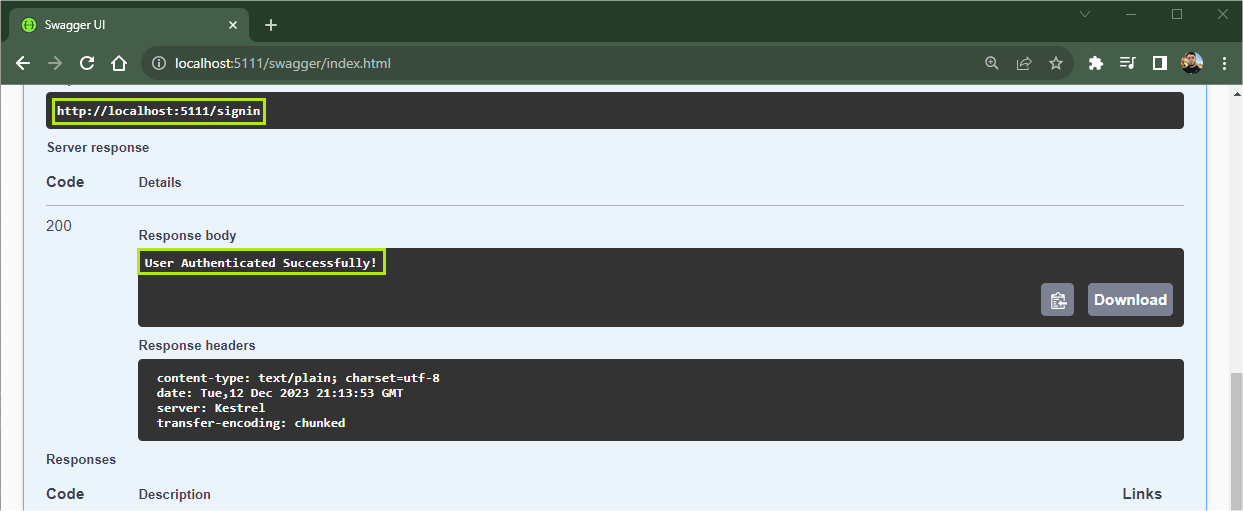
Sign success

Adding Validation Policies

Policies are used to restrict access to certain parts of the application, granting access only to users who have a previously configured role.

For example, when a user attempts to access a resource protected by the Admin policy, the authorization system will check whether the user has the admin role and allow or deny access based on that check.

To implement the policies in the example in the post, replace the code:

builder.Services.AddAuthorization();

with the code below:

builder.Services.AddAuthorization(options =>
{
  options.AddPolicy("Admin", policy => policy.RequireRole("admin"));
});

Note that we added the Admin policy that expects the admin role. In this case, we need the user who will generate the token to have the admin role.

Next, replace the code:

app.MapGet("/signin", () => "User Authenticated Successfully!").RequireAuthorization();

with the following:

app.MapGet("/signin", () => "User Authenticated Successfully!").RequireAuthorization("Admin");

Note that the only difference here is that we pass the Admin policy method to the RequireAuthorization method.

Now, run the application again and try to generate the token, but this time using a different role in the request. Then use the generated token to execute the signin endpoint. Note that this will generate an error 403 - Error: Forbidden, as the user who generated the token had a role other than admin.

To be able to authenticate successfully, just send the expected value to the role—in this case, admin—and then the response will be 200 - Success, as shown in the GIF below.
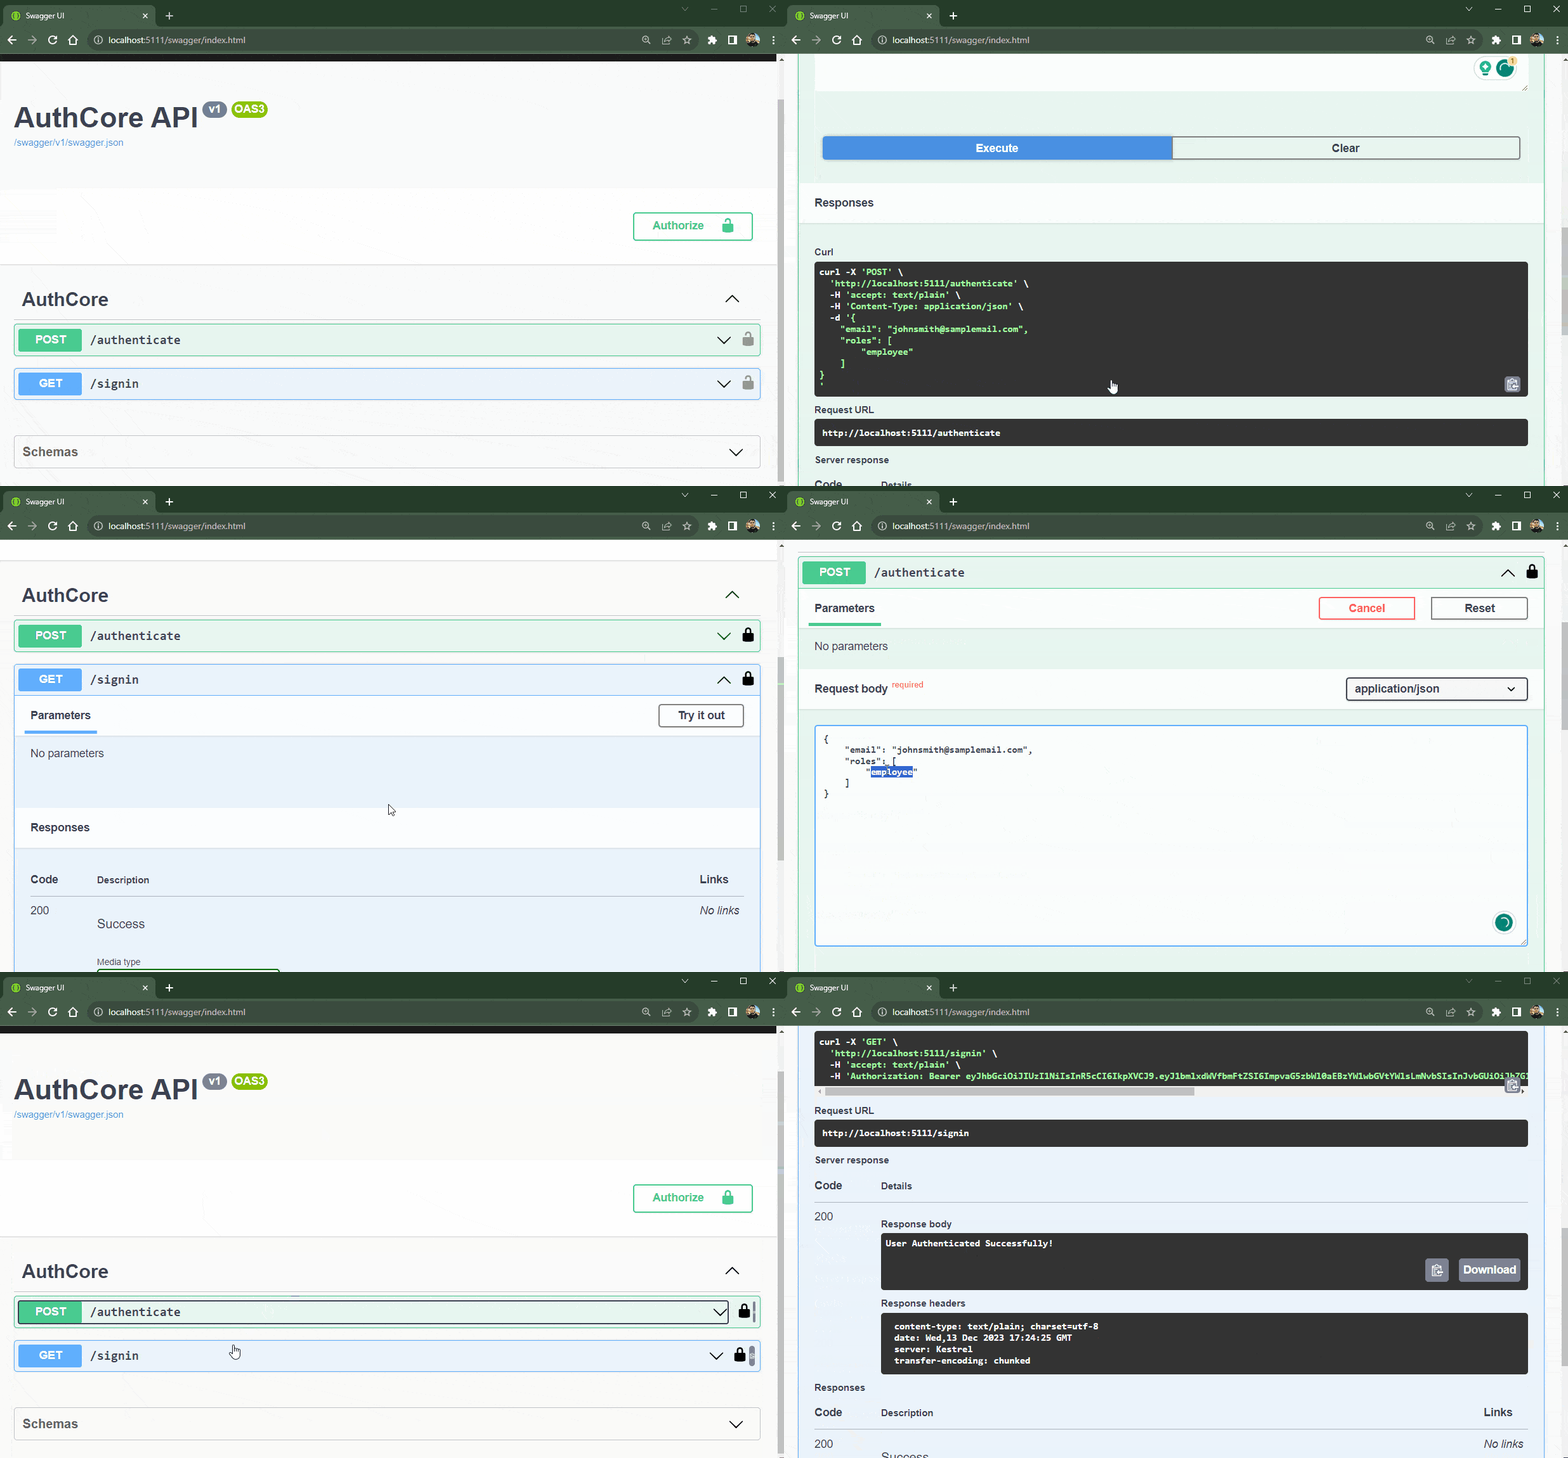
Validating policies

Conclusion

JSON Web Token is one of the most widely used authentication methods today due to its reliability and simplicity.

In this post, we learned how a JWT token works and how to implement it in an API in ASP.NET Core, using the Swagger interface to check access and we also create authorization “roles” using the native resources of .NET and JWT.

Some important points must be considered when working with JWT such as choosing secure algorithms, storing keys in reliable locations, exposing as little information as possible, and validating the JWT signature to check that the token has not been tampered with, among others.

By considering these points when implementing JWTs, you will increase the security and reliability of your authentication and authorization system.
Read the whole story
alvinashcraft
3 hours ago
reply
West Grove, PA
Share this story
Delete

Enhancing Your Application with GraphQL-Based CRUD Operations in React Grid

1 Share

Enhancing Your Application with GraphQL-Based CRUD Operations in Syncfusion React Grid

TL;DR: Learn to use GraphQL with Syncfusion React Data Grid for efficient data management. This blog covers sorting, filtering, paging, and CRUD actions. Boost productivity with GraphQL’s single endpoint.

Introduction

Welcome to this blog post, where we will explore how to utilize GraphQL to connect data with the Syncfusion React Data Grid component. We will cover various operations such as sorting, filtering, grouping, paging, and CRUD (Create, Read, Update, Delete) actions. By the end of this blog, you will have a better understanding of how GraphQL can enhance your data management capabilities within the React Data Grid.

GraphQL

As per the official GraphQL website, GraphQL is a query language for your API and a server-side runtime for executing queries using a type system you define for your data. Unlike traditional REST APIs, GraphQL provides a flexible and efficient approach to querying and manipulating data. It separates the frontend and backend layers by enabling clients to specify the precise data requirements they need in a single request.

GraphQL vs. REST API

One significant advantage of GraphQL over traditional REST APIs is its use of a single endpoint. In a REST API, you usually have multiple endpoints for different resources, which requires sending multiple requests to retrieve related data. However, with GraphQL, clients can retrieve the required data precisely through a single endpoint. This reduces the number of network requests, minimizes the amount of data transferred, and leads to improved performance and efficiency.

One of GraphQL’s main advantages is its flexibility in data fetching. Instead of depending on predetermined endpoints with fixed data structures, GraphQL enables clients to specify the exact fields they require, allowing them to fetch only the necessary data. This feature empowers clients to optimize their queries and avoid fetching excessive or insufficient data.

Additionally, GraphQL is independent of the underlying storage or database system, serving as a layer on top of your existing code and data to maximize backend logic.

Comparison of REST API and GraphQL

REST API

GraphQL API

Multiple endpoints (GET/POST/PUT).

Single endpoint.

Supports JSON data exchange.

Supports JSON data exchange.

Can work with all types of databases.

Can work with all types of databases.

REST API

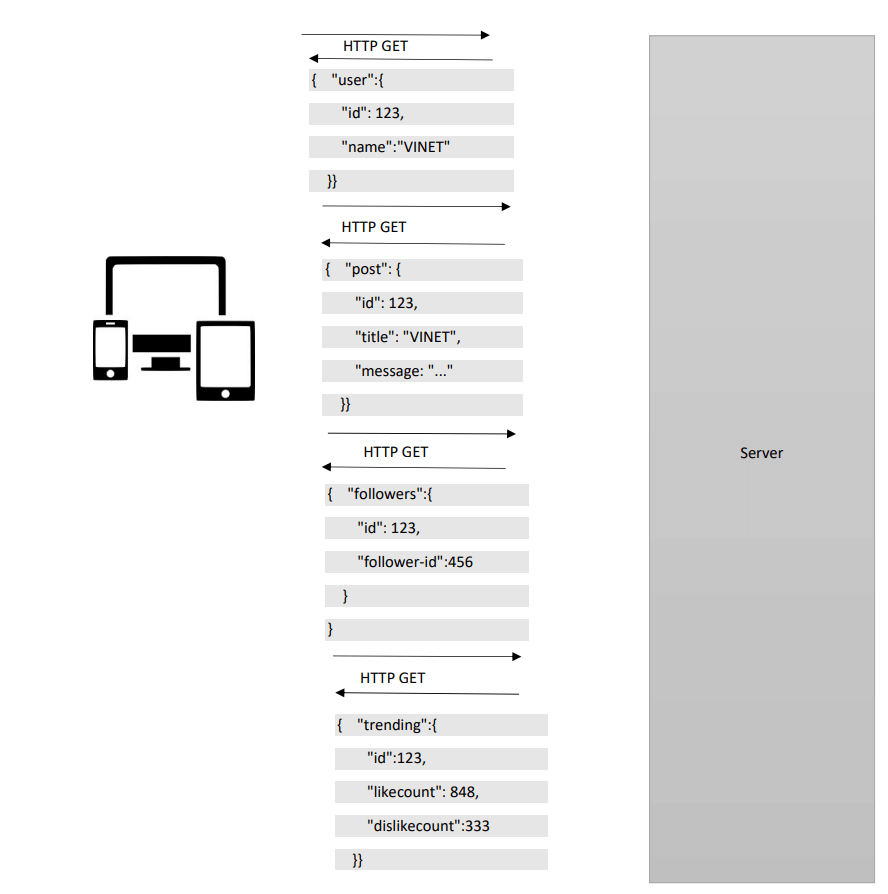
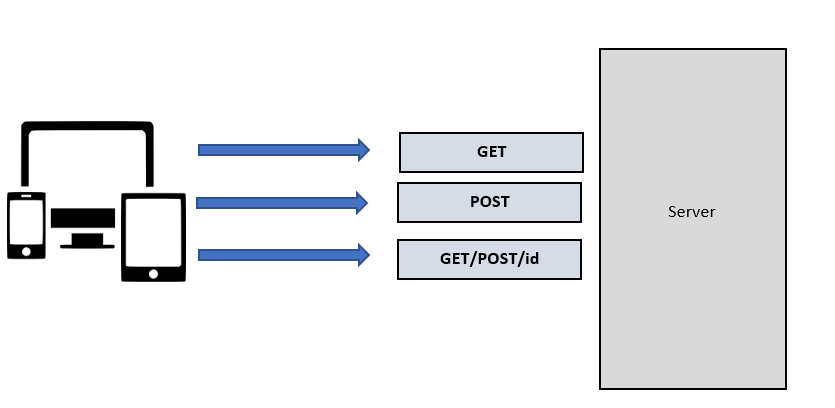
As I mentioned earlier, the REST API has multiple endpoints. Therefore, it will send individual requests to the server for each data operation.

Refer to the following image.Rest API Architecture

Example

Consider a social media application that uses REST API. In this application, we need to send individual HTTP API requests to fetch details such as user ID, posts, like count, and follower count.

Refer to the following image.Rest API example

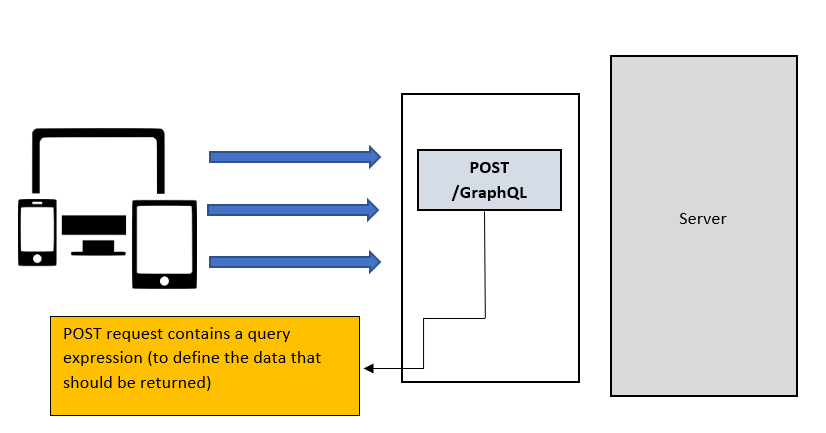
GraphQL

GraphQL has a single endpoint and can send multiple queries in a single request, resulting in better performance compared to the REST API.

Refer to the following image.GraphQL API architecture

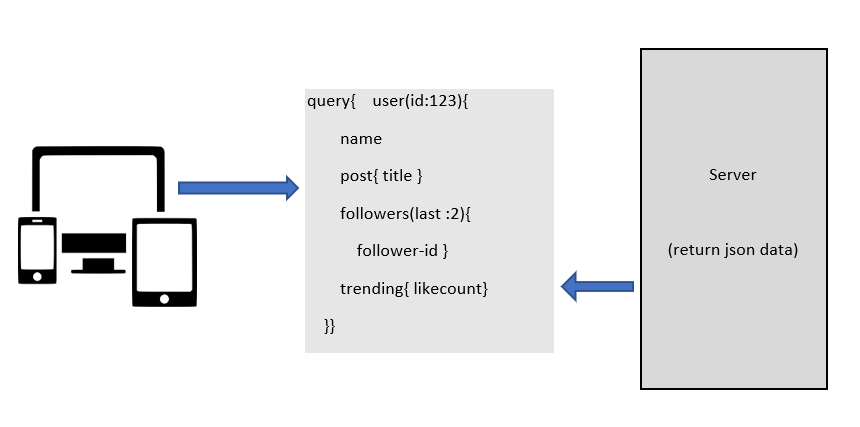
Example

You can easily retrieve the user ID, posts, like count, and follower count in a social media application by sending a single HTTP request using GraphQL.

Refer to the following image.GraphQL example

Fundamentals of GraphQL

To  begin with GraphQL, it is essential to understand the following:

  • Schema and types
  • Queries
  • Mutations
  • Resolvers

Schema and types

In GraphQL, APIs are organized based on types, and it is essential to define the precise type for each field based on our data structure. The Schema is a fundamental concept in GraphQL implementation, serving as the contract between the client and the server. It defines the available operations, object types, and relationships within the API.

type Order {
  OrderID: Int!
  CustomerID: String!
  Employees: [Employee]
}
 
type Employee {
  EmployeeID: Int!
  FirstName: String!
  LastName: String     // it accepts null value.
}

Query

In GraphQL, the query is used to read or fetch data from the GraphQL server. With GraphQL, clients can specify the exact data they require, reducing excessive or insufficient data and enabling efficient data retrieval. The following is an example of a basic query declaration in GraphQL.

{
Employee {
EmployeeID
FirstName
}
}

Mutation

In GraphQL, the mutation is used to perform Create, Read, Update, and Delete (CRUD) actions on the data in the GraphQL server. Mutations allow clients to modify or manipulate data by sending requests to the GraphQL server. The following is an example of a basic mutation declaration in GraphQL.

Mutation: {
// Perform Insert
createOrder: (parent, { value }, context, info) => {
return value;
}
}

Resolver

In GraphQL, a resolver is a function that helps to handle and resolve the fields in a GraphQL query. Resolvers are responsible for fetching the data from the appropriate data source and returning the requested values to the client. The following is an example of a basic resolver declaration in GraphQL.

const resolvers = {
  Query: {
    getOrders: (parent, { datamanager }, context, info) => {
      if (datamanager.search) {
        // Perform searching
      }
    }
  }
}

Syncfusion DataManager with GraphQLAdaptor

The GraphQLAdaptor in our Syncfusion DataManager enables efficient data management by performing CRUD operations and handling advanced data operations such as paging, sorting, and filtering. It achieves this by sending the required arguments to the GraphQL server, allowing for precise data retrieval based on the client’s needs.

Using the GraphQLAdaptor, you can seamlessly integrate Syncfusion components with a GraphQL backend and leverage its capabilities to manage and display data effectively. The GraphQLAdaptor abstracts away the complexities of working with GraphQL queries and mutations, making it easier to interact with the GraphQL server and fetch data in a structured manner.

Syncfusion React Data Grid

Our Syncfusion React Data Grid is a versatile control for displaying data in a tabular format. It offers a wide range of functionalities, including data binding, editing, Excel-like filtering, and selection. Additionally, It supports exporting data to Excel, CSV, and PDF formats.

Let’s explore how to bind data in our Syncfusion React Data Grid through the GraphQL server and carry out sorting, filtering, and other CRUD operations.

Required software

Configure GraphQL server

First, install the GraphQL server using the Graphpack npm package.

Then, include the following code in the package.json file to configure the GraphQL server.

package.json

{
  "name": "graphql-server",
  "version": "1.0.0",
  "description": "",
  "main": "index.js",
  "scripts": {
    "dev": "graphpack --port 4200",
    "build": "graphpack build"
  },
  "author": "",
  "license": "ISC",
  "devDependencies": {
    "graphpack": "^1.0.9"
  },
  "dependencies": {
    "@syncfusion/ej2-data": "^21.2.6"
  }
}

Create a database file

Next, create the database file, db.js, using JSON data in the GraphQL server.

Refer to the following code example.

export let orderData = [
  { 
    OrderID: 10248, CustomerID: 'VINET', EmployeeID: 5, OrderDate: new Date("07 12 1996 02:00:23"), 
    ShipName: 'Vins et alcools Chevalier', ShipCity: 'Reims', ShipAddress: '59 rue de l Abbaye', 
    ShipRegion: 'CJ', ShipPostalCode: '51100', ShipCountry: 'France', Freight: 32.38, Verified: !0 
  },
  { 
    OrderID: 10249, CustomerID: 'TOMSP', EmployeeID: 6, OrderDate: new Date("07 12 1996 00:03:23"), 
    ShipName: 'Toms Spezialitäten', ShipCity: 'Münster', ShipAddress: 'Luisenstr. 48', 
    ShipRegion: 'CJ', ShipPostalCode: '44087', ShipCountry: 'Germany', Freight: 11.61, Verified: !1 
  },
  { 
    OrderID: 10250, CustomerID: 'HANAR', EmployeeID: 4, OrderDate: new Date("07 12 1996 00:00:23"), 
    ShipName: 'Hanari Carnes', ShipCity: 'Rio de Janeiro', ShipAddress: 'Rua do Paço, 67', 
    ShipRegion: 'RJ', ShipPostalCode: '05454-876', ShipCountry: 'Brazil', Freight: 65.83, Verified: !0 
  },
  { 
    OrderID: 10251, CustomerID: 'VICTE', EmployeeID: 3, OrderDate: new Date(8367642e5), 
    ShipName: 'Victuailles en stock', ShipCity: 'Lyon', ShipAddress: '2, rue du Commerce', 
    ShipRegion: 'CJ', ShipPostalCode: '69004', ShipCountry: 'France', Freight: 41.34, Verified: !0 
  }
]

Create a schema definition for GraphQL

Then, create the Schema named Schema.graphql for the GraphQL server with the following code.

# Grid sort direction
input Sort {
  name: String!
  direction: String!
}
# Grid aggregates type
input Aggregate {
  field: String!
  type: String!
}
# Syncfusion DataManager query params
input DataManager {
  skip: Int
  take: Int
  sorted: [Sort]
  group: [String]
  table: String
  select: [String]
  where: String
  search: String
  requiresCounts: Boolean,
  aggregates: [Aggregate],
  params: String
}
# Grid field names
input OrderInput {
  OrderID: Int!
  CustomerID: String
  EmployeeID: Int
  ShipCity: String
  ShipCountry: String
}
type Order {
  OrderID: Int!
  CustomerID: String
  EmployeeID: Int
  ShipCity: String
  ShipCountry: String
}
# need to return type as 'result (i.e. current pager data)' and count (i.e., the total number of records in your database)
type ReturnType {
  result: [Order]
  count: Int
  aggregates: String
}
type Query {
  getOrders(datamanager: DataManager): ReturnType
}
type Mutation {
  createOrder(value: OrderInput): Order!
  updateOrder(key: Int!, keyColumn: String, value: OrderInput): Order
  deleteOrder(key: Int!, keyColumn: String, value: OrderInput): Order!
}

Create a resolver and mutation for the GraphQL server

Then, create the resolvers and mutation for the GraphQL server. I’m going to name this resolver.js.

Refer to the following code example.

const resolvers = {
  Query: {
    getOrders: (parent, { datamanager }, context, info) => {
      var ret = DataUtil.processData(datamanager, orderData);
      return ret;
    }
  },
  Mutation: {
    createOrder: (parent, { value }, context, info) => {
      const newOrder = value;
      orderData.push(newOrder);
      return newOrder;
    },
    updateOrder: (parent, { key, keyColumn, value }, context, info) => {
      let newOrder = orderData.find(order => order.OrderID === parseInt(key));
      newOrder.CustomerID = value.CustomerID;
      newOrder.EmployeeID = value.EmployeeID;
      newOrder.ShipCity = value.ShipCity;
      newOrder.ShipCountry = value.ShipCountry;
      return newOrder;
    },
    deleteOrder: (parent, { key, keyColumn, value }, context, info) => {
      const orderIndex = orderData.findIndex(order => order.OrderID === parseInt(key));
      if (orderIndex === -1) throw new Error("Order not found." + value);
      const deletedOrders = orderData.splice(orderIndex, 1);
      return deletedOrders[0];
    }
  }
};
export default resolvers;

Run the GraphQL server

Finally, run the GraphQL server using the following commands.

First, install the necessary packages:

npm install

Then, run the server:

npm run dev

Now, the server will be hosted at the URL http://localhost:4200/. We can communicate with GraphQL by assigning this URL to the dataManager.url property.

Add the Syncfusion React Data Grid component

Refer to the Getting Started with React Data Grid documentation, set up the React environment, and add the Syncfusion React Data Grid component to your app.

Data Fetching

In the sample, we have added the GraphQLAdaptor, which allows you to fetch data from the GraphQL server. You can interact with the GraphQL server by adding the query property and specifying the response format using the response.result and response.count properties.

const data = new DataManager({
    adaptor: new GraphQLAdaptor({
        query: `query getOrders($datamanager: DataManager) {
              getOrders(datamanager: $datamanager) {
                 count,
                 result{OrderID, CustomerID, EmployeeID, ShipCountry}
               }
             }`,   
        response: {
            count: 'getOrders.count',
            result: 'getOrders.result'
        },
    }),
    url: 'http://localhost:4200/'
});

Render React Grid component

Now, the above data is added to the Grid dataSource property.

<GridComponent dataSource={data} allowPaging={true} allowFiltering={true} allowSorting={true} allowGrouping={true} editSettings={{allowAdding:true, allowEditing:true, allowdeleting:true}} toolbar={["Add", "Edit", "Delete", "Update", "Cancel"]}>
 <ColumnsDirective>
  <ColumnDirective field='OrderID' headerText="Order ID" isPrimaryKey={true} width='100' textAlign="Right" />
  <ColumnDirective field='CustomerID' headerText="Customer ID" width='100' />
  <ColumnDirective field='ShipCountry' headerText="ShipCountry" width='100' />
  <ColumnDirective field='EmployeeID' headerText="Employee ID" width='100' textAlign="Right" />
 </ColumnsDirective>
 <Inject services={[Filter, Page, Sort, Group, Edit, Toolbar]} />
</GridComponent>

Also, we have enabled the Paging, Filtering, Sorting, and Grouping features in the Grid component. when sending data fetching requests, the query parameters requiresCounts, skip, take, sorted, and where details to be sent with the variables.Grid component Paging, Filtering, Sorting & Grouping features enabled with query parameters.

This is the schema for the parameters in the GraphQL server.

input DataManager {
    skip: Int
    take: Int
    sorted: [Sort]
    group: [String]
    where: String
    requiresCounts: Boolean
}
input Sort {
    name: String!
    direction: String!
}

You can get these values in the resolver method getOrders, process the data, and return the response as a result and count pair.

Query: {
  getOrders: (parent, { datamanager }, context, info) => {
    if (datamanager.sorted) {
      // Perform sorting
    }
    if (datamanager.where) {
      // Perform filtering
    }
    if (datamanager.skip && datamanager.take) {
      // Perform Paging
    }
    return { result: data, count: data.length };
  }
}

Performing CRUD operations

You can perform CRUD actions by returning the mutation inside the getMutation method based on the action.

var data = new ej.data.DataManager({
    adaptor: new ej.data.GraphQLAdaptor({
        query: `query getOrders($datamanager: DataManager) {
                getOrders(datamanager: $datamanager) {
                    count,
                    result{OrderID, CustomerID, EmployeeID, ShipCountry}
                }
            }`, 
        getMutation: function (action) {
            if (action === 'insert') {
                return `mutation Create($value: OrderInput!){
                            createOrder(value: $value){
                                OrderID, CustomerID, EmployeeID, ShipCountry
                            }}`;
            }
            if (action === 'update') {
                return `mutation Update($key: Int!, $keyColumn: String,$value: OrderInput){
                            updateOrder(key: $key, keyColumn: $keyColumn, value: $value) {
                                OrderID, CustomerID, EmployeeID, ShipCountry
                            }}`;
            } else {
                return `mutation Remove($key: Int!, $keyColumn: String, $value: OrderInput){
                        deleteOrder(key: $key, keyColumn: $keyColumn, value: $value) {
                                OrderID, CustomerID, EmployeeID, ShipCountry
                            }}`;
            }
        },
        response: {
            count: 'getOrders.count',
            result: 'getOrders.result'
        },
    }),
    url: 'http://localhost:4200/'
});

Note: Refer to the Editing in React Data Grid documentation for more details.

Run the application

To run the client application, you must install the required packages using the commands below.

npm install
npm start

Using the React Data Grid component, you can efficiently perform sorting, paging, filtering, and CRUD operations.

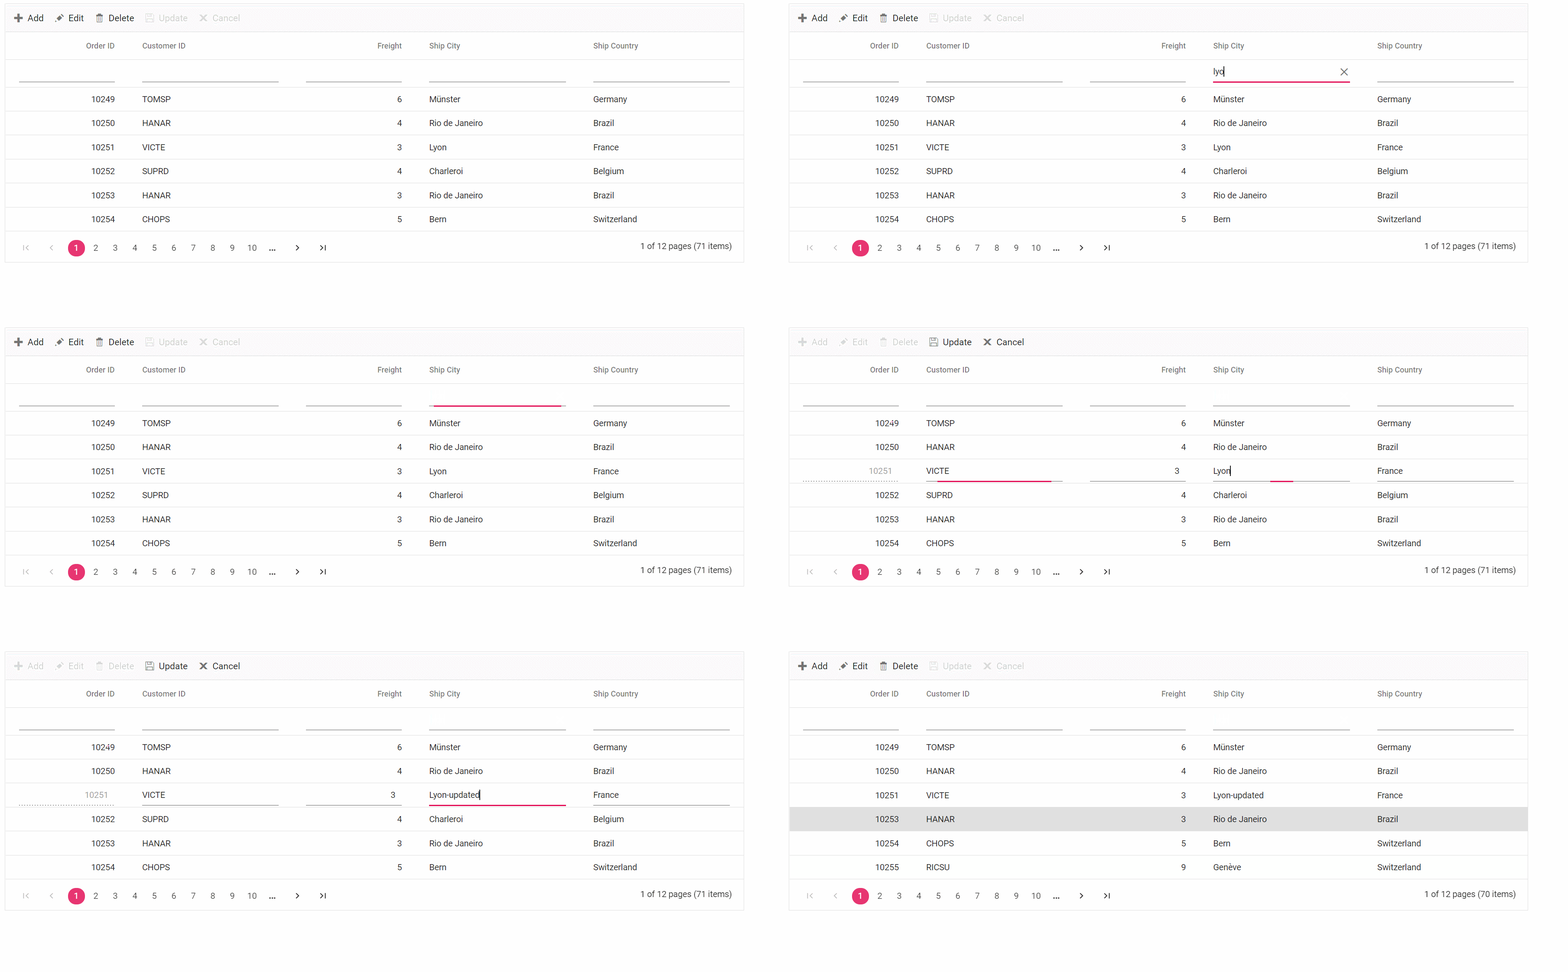
Refer to the following GIF image.

Performing CRUD Operation in React Data Grid using GraphQL

GitHub reference

For more details, refer to the example Performing CRUD Operation in React Data Grid using GraphQL GitHub demo.

Conclusion

Thank you for taking the time to read! I hope you now have a clear understanding of how to use the GraphQL server in our Syncfusion React Data Grid component to bind data and perform CRUD operations in it. Since GraphQL has a single endpoint, it can save you time and significantly boost your productivity when fetching data. I encourage you to follow the steps in this blog post and share your feedback in the comments section below!

The Syncfusion DataGrid component is also available in the Blazor, ASP.NET (CoreMVC), JavaScript, AngularReactVueXamarinFlutterUWPWinFormsWPF, and WinUI platforms. Use it to build great applications!

For existing customers, the latest version of Essential Studio is available for download from the License and Downloads page. If you are not a Syncfusion customer, try our 30-day free trial to check out our available features.

You can contact us through our support forumsupport portal, or feedback portal. We are here to help you succeed!

Related blog

Read the whole story
alvinashcraft
3 hours ago
reply
West Grove, PA
Share this story
Delete

Advanced Query Building Techniques in Angular: Queries with Different Connectors

1 Share

Advanced Query Building Techniques in Angular Queries with Different Connectors

TL;DR: Discover advanced query-building methods with Angular Query Builder, enabling the queries creation with various connectors within the same group. Learn to customize templates and use buttons for rule and group management, along with CSS adjustments for a tailored user interface.

What is Query Builder?

The Query Builder is a graphical user interface component designed for building queries. It supports various functionalities such as data binding, templates, importing/exporting queries from/to JSON and SQL, and parsing queries to predicates for the data manager. It can be populated using an array of Javascript objects.

Create queries with various connectors

The Angular Query Builder is a powerful tool for creating complex database queries. However, by default, it only allows users to create queries with a single connector within the same group. However, users often need to create queries with different connectors, such as (X = ‘A’ AND Y = ‘B’ OR Z = ‘C’), which is not supported by default.

This blog post explains how to overcome this limitation in our Query Builder using rule and header templates. Before we dive into the solution, let’s briefly define these templates.

Rule Template

The rule template allows you to define your user interface for columns. To implement the  ruleTemplate, you can create the user interface using ngTemplate and assign the values through the actionBegin event.

The #ruleTemplate is a template variable that identifies the NgTemplate content as the corresponding column.

Header Template

The header template allows you to define your own user interface for the header, which includes creating or deleting rules and groups and customizing the AND/OR condition and NOT condition options.

To implement the header template, you can create the user interface using ngTemplate and assign the values when requestType is header-template-create in the actionBegin event.

The #headerTemplate is a template variable that identifies the NgTemplate content as the header.

Create an Angular application with Query Builder

To harness the power of Query Builder within an Angular application, follow these steps outlined in the getting started documentation.

Refer to the following code example to specify the width and columns properties to render the query builder. The columns property is used to specify the columns that are used to create filters in the query builder.

app.component.html

<ejs-querybuilder id="querybuilder" [columns]="filter" #querybuilder width="100%">
</ejs-querybuilder>

app.component.ts

To specify the three columns, including EmployeeID, EmployeeName, and Designation, for creating filters in the query builder using the following code example.

export class AppComponent {
    @ViewChild('querybuilder')
  public qryBldrObj!: QueryBuilder;
  public filter: ColumnsModel[] = [
     { field: 'EmployeeID', label: 'Employee ID', type: 'number'},
     { field: 'EmployeeName', label: 'Employee Name', type: 'string'},
     { field: 'Designation', label: 'Designation', type: 'string'}
  ];
}

app.module.ts

Import the QueryBuilderModule to integrate the query builder component into your Angular application.

import { QueryBuilderModule } from '@syncfusion/ej2-angular-querybuilder';
@NgModule({
   imports: [
    QueryBuilderModule
   ]
})

Rule model to connect conditions with different connectors

By default, conditions are connected with the same connector using the using the condition property of the rule model object, which has rules property (referred to as a group). To connect conditions with different connectors, you need to specify the condition property of the rule model object, which doesn’t have a rules property(referred to as a rule), to connect the conditions with different connectors.

Specify the condition property of the rule model object with rules property to join the groups with other connectors. The root-level group will not account for this since we have connected the conditions and groups within that group.

Refer to the following code example.

public importRules: any = {
  'condition': '',
  'rules': [{
    'condition': 'or',
    'rules': [{
      'label': 'Employee ID', 'field': 'EmployeeID', 'type': 'number',
      'operator': 'equal', 'value': 1001, 'condition': 'and'
    },
    {
      'label': 'Employee Name', 'field': 'EmployeeName', 'type': 'string',
      'operator': 'equal', 'value': 'Nancy', 'condition': 'or'
    },
    {
      'label': 'Designation', 'field': 'Designation', 'type': 'string',
      'operator': 'equal', 'value': 'Developer'
    }]
  },
  {
    'condition': '',
    'rules': [{
      'label': 'Employee ID', 'field': 'EmployeeID', 'type': 'number',
      'operator': 'equal', 'value': 1002
    }]
  }]
};

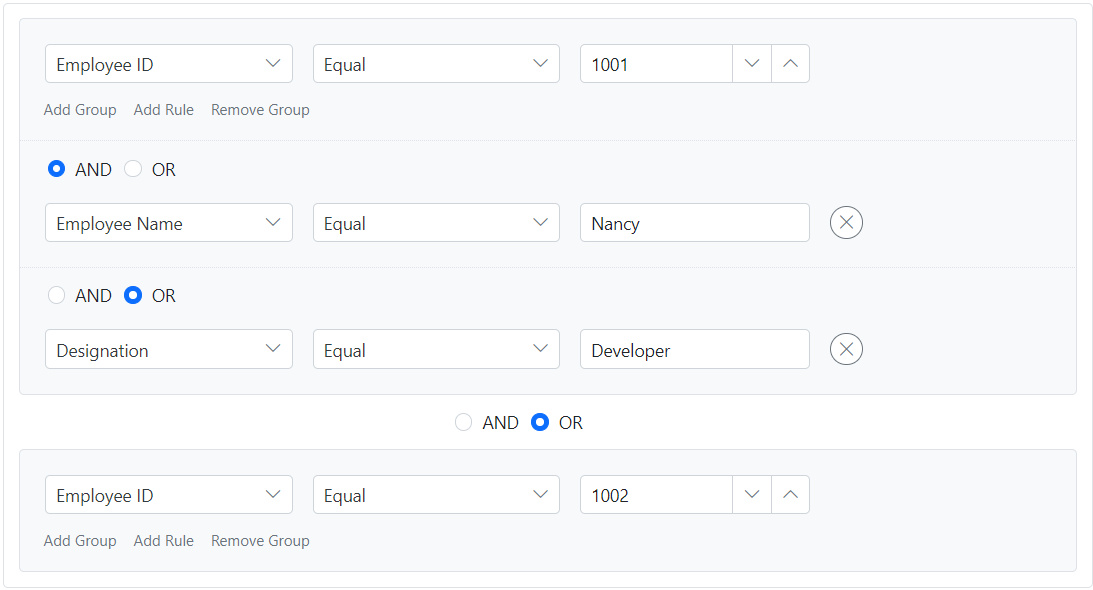
In the above code example, we have connected the first two conditions(EmployeeID = 1001 and EmployeeName = ‘Nancy’)with the AND operator, and the third condition(Designation = ‘Developer’) with the OR operator. The two groups are then connected using the OR operator. The second group of conditions(EmployeeID = 1002) is connected with the first group (EmployeeID = 1001 and EmployeeName= ‘Nancy’ or Designation = ‘Developer’) using the OR operator.

So, the resulting SQL query looks like as follows.

(EmployeeID = 1001 and EmployeeName= 'Nancy' or Designation = 'Developer') or (EmployeeID = 1002)

User Interface for creating conditions with different connectors

Customizing the query builder’s user interface is necessary to achieve this, as our default interface groups conditions and connects them using a single connector. However, separate connectors are needed to link each condition and group.

This customization is accomplished by modifying the rule container and group header using rule and header templates, respectively.

The following image illustrates the query builder’s user interface to support this customization.

User Interface for creating conditions with different connectorsCustomize the user interface of a group header

Customize the user interface of a group header by using the headerTemplate property. This customization involves rendering only radio buttons for connecting groups, while the options to add conditions/groups are displayed within the rule container. To achieve this interface, the group header for the root group and the first group’s header should be hidden. The actionBegin event manages the header creation, and the grpConditionChange event updates the connectors to the rule model.

Refer to the following code example; radio buttons are integrated using the header template property of a query builder, which helps to render only radio buttons without add/ delete options.

app.component.html

<ejs-querybuilder id="querybuilder" (actionBegin)="actionBegin($event)">
  <ng-template #headerTemplate let-data>
    <div class="e-groupheader">
      <ejs-radiobutton id="{{data.ruleID}}_radio1" name="{{data.ruleID}}_andor" label="AND"  value="and" [checked]="data.condition == 'and'" (change)="grpConditionChange($event)"></ejs-radiobutton>
     <ejs-radiobutton id="{{data.ruleID}}_radio2" name="{{data.ruleID}}_andor" label="OR" value="or" [checked]="data.condition == 'or'" (change)="grpConditionChange($event)"></ejs-radiobutton>
    </div>
  </ng-template>
</ejs-querybuilder>

app.component.ts

In the following code example, the radio button component gets updated in the actionBegin event. This event is triggered when we’re adding groups. Also, we bind the radio button’s change event to update the rule model whenever there’s a change.

export class AppComponent {
  …
  actionBegin(args: any): void {
    let target: HTMLElement; let childElems: Array<HTMLElement>;
    let group: RuleModel;
    if (args.requestType === 'header-template-initialize') {
     target = document.getElementById(args.groupID) as HTMLElement;
      if (target) {
        childElems = Array.prototype.slice.call(target.querySelector('.e-rule-list')!.children);
        if (childElems.length && childElems[childElems.length - 1]) {
           group = this.qryBldrObj.getGroup(childElems[childElems.length - 1] as HTMLElement);
           // To update the group condition user interface
           args.condition = group.condition as string;
        }
      }
    }
  }

  
  // To update the condition to connect the groups
  grpConditionChange(args: any): void {
    let ruleModel: RuleModel = this.qryBldrObj.getGroup(closest(args.event.target, ".e-group-container").previousSibling as HTMLElement);
    ruleModel.condition = args.value;
  }
}

app.module.ts

import { RadioButtonModule } from '@syncfusion/ej2-angular-buttons';
@NgModule({
   imports: [
    RadioButtonModule
   ]
})

app.component.css

.e-query-builder .e-group-container:first-child > .e-group-header,
.e-rule-list .e-group-container:first-child .e-group-header{
    display: none;
}

Customize the user interface of a rule container

The rule container is default rendered with field, operator, and value controls. However, in this case, we also need to render radio buttons for connecting conditions and buttons to add/delete conditions and groups using the ruleTemplate property. These customizations can be handled in the actionBegin event.

We utilized single templates for all the columns, so template mapping can be performed programmatically using the dataBound event.

In the following code example, we use the ruleTemplate property of a query builder to render the required components for creating filters, which includes the creation of connectors via radio buttons.

app.component.html

<ejs-querybuilder id="querybuilder" (actionBegin)="actionBegin($event)" (dataBound)="dataBound()">
  …
  <ng-template #ruleTemplate let-data>
    <div>
      <div *ngIf="data.rule.custom.isRule===true" class="e-rules">
        <div class="e-rule-header">
          <ejs-radiobutton id="{{data.ruleID}}_rulerb1" class="e-and-condition" name="{{data.ruleID}}_andor" label="AND" value="and" [checked]="data.group.condition == 'and'" (change)="ruleConditionChange($event)"></ejs-radiobutton>
          <ejs-radiobutton id="{{data.ruleID}}_rulerb2" class="e-or-condition" name="{{data.ruleID}}_andor" label="OR" value="or" [checked]="data.group.condition == 'or'" (change)="ruleConditionChange($event)"></ejs-radiobutton>
        </div>
      </div>
      <div class="e-rule e-rule-template">
        <div class="e-rule-filter">
          <ejs-dropdownlist [dataSource]="data.columns" id="{{data.ruleID}}_filter" (change)="fieldChange($event)" [fields]="fields" [value]="data.rule.field">
          </ejs-dropdownlist>
        </div>
        <div class="e-rule-operator e-operator">
          <ejs-dropdownlist id="{{data.ruleID}}_operator" (change)="operatorChange($event)" [fields]="data.operatorFields" [dataSource]="data.operators" [value]="data.rule.operator">
          </ejs-dropdownlist>
        </div>
        <div *ngIf="data.rule.type ==='number'" class="e-rule-value e-value e-custom-value">
          <ejs-numerictextbox [value]="data.rule.value" format="####" (change)="valueChange($event)"></ejs-numerictextbox>
        </div>
        <div *ngIf="data.rule.type ==='string'" class="e-rule-value e-value e-custom-value">
          <ejs-textbox [value]="data.rule.value" id = "{{data.ruleID}}_valuekey0" (change)="valueChange($event)">
          </ejs-textbox>
        </div>
        <button *ngIf="data.rule.custom.isGroup!==true" class="e-removerule e-rule-delete e-css e-btn e-small e-round" (click)="removeRule($event)">
          <span class="e-btn-icon e-icons e-delete-icon"></span>
        </button>
      </div>
      <div class="e-group-btn">
        <input *ngIf="data.rule.custom.isGroup===true" id="{{data.ruleID}}_addGroup" type="button" value="Add Group" class="e-flat e-btn e-small" (click)="addGroup()" />
        <input *ngIf="data.rule.custom.isGroup===true" id="{{data.ruleID}}_addRule" type="button" value="Add Rule" class="e-flat e-btn e-small" (click)="addRule($event)" />
        <input *ngIf="data.rule.custom.isGroup===true" id="{{data.ruleID}}_removeGroup" type="button" value="Remove Group" class="e-flat e-btn e-small" (click)="removeGroup($event)" />
      </div>
    </div>
  </ng-template>
</ejs-querybuilder>

app.component.ts

The components created are updated in the actionBegin event, which triggers while rendering templates when rules are inserted. We bind the change event for all the components to update the rule model when their values change.

export class AppComponent {
  @ViewChild('ruleTemplate')
  public ruleTemplate!: TemplateRef<any>;
  public fields: Object = { text: 'label', value: 'field' };
  public operatorFields: Object = { text: 'text', value: 'value' };
  actionBegin(args: any): void {
    // Header Template to render the group container
    …
    // Header Template related codes ended

    // Rule Template to render the rule container
    if (args.requestType === 'template-initialize') {
      args.columns = this.qryBldrObj.columns;
      args.rule.operator = 'equal';
      const group: RuleModel = this.qryBldrObj.getGroup(args.ruleID.split("_")[1]);
      const grpId: string = args.ruleID.split("_")[0] + '_' + args.ruleID.split("_")[1];
      let condition: string = '';
      let ruleElem: HTMLElement = document.getElementById(args.ruleID) as HTMLElement;
      if (ruleElem && ruleElem.previousSibling) {
        const rule: RuleModel = this.qryBldrObj.getRule(ruleElem.previousSibling as HTMLElement);
        if (rule && rule.condition) {
          condition = rule.condition;
        }
      }
      args.group = {condition: condition, not: group.not, groupID: grpId };
      // To handle the Add Rule/ Add Group/ Delete Group option
      if (isNullOrUndefined(args.rule.custom)) {
        if (condition != '') {
          args.rule.custom = { isRule : true };
        } else {
          args.rule.custom = { isGroup: true };
        }
      }
      if (args.rule.type === '') {
        args.rule.type = 'string';
      }
    }
  }
  dataBound(): void {
    this.updateRuleTemplate(this.qryBldrObj.columns);
  }
  // To update a single template to all the fields
  updateRuleTemplate(columns: ColumnsModel[]): void {
    for (let i: number = 0; i < columns.length; i++ ) {
      if (columns[i].columns) {
          this.updateRuleTemplate(columns[i].columns as ColumnsModel[]);
      } else {
          columns[i].ruleTemplate = this.ruleTemplate as any;
      }
    }
  }
}

app.module.ts

import { NumericTextBoxModule, TextBoxModule } from '@syncfusion/ej2-angular-inputs';
import { DropDownListModule } from '@syncfusion/ej2-angular-dropdowns'; 
@NgModule({
   imports: [
    NumericTextBoxModule, TextBoxModule, DropDownListModule
   ]
})

The CSS changes were required to create a user interface similar to the one depicted above.

.e-rule-header,
.e-rule-template {
    padding: 12px 0px 0px 12px;
}
.e-radio-wrapper {
    padding-left: 10px;
}
.e-group-btn {
    padding: 0px 0px 12px 12px
}
.e-query-builder .e-rule-list > .e-rule-container::before,
.e-query-builder .e-rule-list > .e-rule-container::after,
.e-query-builder .e-rule-list .e-group-container::before,
.e-query-builder .e-rule-list .e-group-container::after {
    border: none;
}
.e-query-builder .e-group-body,
.e-query-builder .e-rule-list {
    padding: 0;
}
.e-query-builder .e-group-header {
    margin-left: 40%;
    height: 32px;
    width: 130px;
}
.e-query-builder .e-group-header .e-btn {
    padding-right: 20px;
}

Updating the Rule Model: Changing Field, Operator, and Values Controls

Refer to the below code example to bind the events to the components which are rendered as templates to update the rule model when the components change.

app.component.ts

// To update the field
fieldChange(e: any): void {
  this.qryBldrObj.notifyChange(e.value, e.element, 'field');
}
// To update the operator
operatorChange(e: any): void {
  this.qryBldrObj.getRule(e.event.target).operator = e.value;
}
// To update the value
valueChange(e: any): void {
  if (e.isInteracted) {
    this.qryBldrObj.notifyChange(e.value, e.event.target, 'value');
  }
}
//To update the connectors for the rule
ruleConditionChange(args: any): void{
  let ruleModel: RuleModel = this.qryBldrObj.getRule(closest(args.event.target, ".e-rule-container").previousSibling as HTMLElement);
  ruleModel.condition = args.value;
}

Refer to the below code example to insert/delete rules and groups using the buttons created using ruleTemplate and headerTemplate.

// To add the rule to the query builder
addRule(args: any): void {
  let target: HTMLElement; let ruleList: Array<HTMLElement>;
  let ruleModel: RuleModel; let grpId: string;
  // Get the group container to get the previous rule
  target = closest(args.target, '.e-group-container') as HTMLElement;
  ruleList = Array.prototype.slice.call(target.querySelector('.e-rule-list')?.children);
  // Get the previous rule
  ruleModel = this.qryBldrObj.getRule(ruleList[ruleList.length - 1]);
  // To update the condition in the previous rule to connect rules
  ruleModel.condition = "and";
  grpId = closest(args.target, '.e-group-container').id.split('_')[1];
  // Create a rule to insert
  let rule: any = {label: ruleModel.label, field: ruleModel.field, operator: "equal", type: ruleModel.type, custom: { isGroup: false, isRule: true }};
  // To insert a new rule
  this.qryBldrObj.addRules([rule], grpId);
}

// To add the group to the query builder
addGroup(): void {
  let target: HTMLElement; let ruleList: Array<HTMLElement>;
  let ruleModel: RuleModel;
  // Get the group container to get the previous group
  target = document.getElementById(this.qryBldrObj.element.id + '_group0') as HTMLElement;
  ruleList = Array.prototype.slice.call(target.querySelector('.e-rule-list')?.children);
  // Get the previous group
  ruleModel = this.qryBldrObj.getGroup(ruleList[ruleList.length - 1]);
  // To update the condition in the previous group to connect groups
  ruleModel.condition = "and";
  let column: ColumnsModel = this.qryBldrObj.columns[0];
  // Create a rule to insert it as a group.
  let rule: any = { label: column.label, field: column.field, operator: "equal", type: column.type, custom: {isGroup: true, isRule: false }};
  // To insert a new rule
  this.qryBldrObj.addGroups([{not: false, rules: [rule]}], 'group0');
}

// To remove the rule from the query builder
removeRule(args: any): void {
  let ruleElem: HTMLElement = closest(args.target.offsetParent, '.e-rule-container') as HTMLElement;
  let idColl: string[] = ruleElem.id.split('_');
  this.qryBldrObj.deleteRules([idColl[1] + '_' + idColl[2]]);
}
// To remove the group from the query builder
removeGroup(args: any): void {
  this.qryBldrObj.deleteGroup(closest(args.target.offsetParent, '.e-group-container'));
}

GitHub References

For more details, refer to the Advanced Query Building Techniques in Angular: Queries with different Connectors GitHub demo.

Conclusion 

Thanks for reading! In this blog, we’ve explored how to add a query or condition with different connectors in the same group using Syncfusion Angular Query Builder. We appreciate your feedback, which you can leave in the comments section below.

If you’re an existing customer, you can download the latest version of Essential Studio from the License and Downloads page. If you’re not a Syncfusion customer, we invite you to try our 30-day free trial to explore our available features. 

If you have any questions or need assistance, please don’t hesitate to contact us through our support forumssupport portal, or feedback portal. We’re always here to help!

Related blogs

Read the whole story
alvinashcraft
3 hours ago
reply
West Grove, PA
Share this story
Delete

Improve your code quality with GitHub Copilot in Visual Studio

1 Share

In our previous post, we discussed GitHub Copilot’s Slash Commands, which allow you to trigger specific actions within Visual Studio with simple text-based inputs. Now, let’s explore the /optimize command and its potential to improve code quality in Visual Studio.

Refactoring with /optimize

In a recent exploration by Bruno Capuano, we see the transformative capabilities of GitHub Copilot’s /optimize command. Bruno demonstrates its prowess by refactoring a code snippet, showcasing how simple text-based inputs can yield significant improvements in code structure and performance.

One of the prime examples showcased by Bruno involves the conversion of a traditional for loop utilizing numerical indices into a more readable and intuitive foreach loop. While foreach loops in .NET might seem more verbose, they often offer better readability, a crucial aspect in maintaining code quality and ease of understanding.

Here’s a glimpse of the original for loop snippet:

for (int i = 0; i < chatHistory.Count; i++)
{
    var message = chatHistory[i];
    var msg = new ChatMessage();
    msg.role = message.Role.ToString().ToLower();
    msg.content = message.Content;
    root.messages.Add(msg);
}

To provide context to Copilot, Bruno selects the entire loop. He then initiates the inline chat dialog by typing “Alt-/”.

GitHub Copilot Chat dialog showing selected code with instructions to enhance code quality using the /optimize command in Visual Studio's chat interface

To guide Copilot in refactoring the code, Bruno types a Slash ‘/’, which opens the previously discussed dialog. He chooses the Optimize command from the menu and sends the command to Copilot.

Copilot responds with several optimization suggestions:

  • The ChatMessage instance can be initialized during construction, enhancing efficiency.
  • A foreach loop is utilized.

The refactored code appears as follows:

foreach (var message in chatHistory)
{
    var msg = new ChatMessage
    {
        role = message.Role.ToString().ToLower(),
        content = message.Content
    };
    root.messages.Add(msg);
}

Learn from Copilot: Give it a Try!

The most effective way to comprehend a tool’s functionality is to use it firsthand. I find it fascinating to apply the /optimize command to my production projects. At times, the modifications are minor, affirming the quality of my original code. However, there are instances when Copilot suggests ingenious alterations, often introducing me to new syntaxes.

Validating the output of GitHub Copilot is also crucial to ensure it hasn’t introduced any errors or regressions. Unit tests can serve as a safety net for these changes, just as they do during the refactoring of any piece of code.

Additional Resources

We offer a wealth of resources to further your understanding of GitHub Copilot for Visual Studio. We encourage you to explore this collection, you can watch the full video here and regularly visit this blog for more content.

The post Improve your code quality with GitHub Copilot in Visual Studio appeared first on Visual Studio Blog.

Read the whole story
alvinashcraft
3 hours ago
reply
West Grove, PA
Share this story
Delete

Two Ways To Tune A Slow Query In SQL Server

1 Share

Like All Assumptions


You and Me might feel like the lower back end of a thing if we’re tuning a query that has other problems. Perhaps it’s running on one of those serverless servers with half a hyper-threaded core and 8kb of RAM, as an example.

When I’m working with clients, I often get put into odd situations that limit what I’m allowed to do to fix query performance. Sometimes code comes from an ORM or vendor binaries that can’t be changed, sometimes adding an index on a sizable table on standard edition in the middle of the day is just an impossibility, and of course other times things are just a spectacle du derrière that I’m allowed to do whatever I want. You can probably guess which one I like best.

This post is about the two other ones, where you’re stuck between derrière and ânesse. 

For the duration of reading this, make the wild leap of faith that it takes to embrace the mindset that not everyone who works with SQL Server knows how to write good queries or design good indexes.

I know, I know. Leap with me, friends.

The Query And Execution Plan


Here’s what we’re starting with:

SELECT TOP (10)
    DisplayName =
       (
           SELECT
               u.DisplayName
           FROM dbo.Users AS u
           WHERE u.Id = p.OwnerUserId
       ),
    p.AcceptedAnswerId,
    p.CreationDate,
    p.LastActivityDate,
    p.ParentId,
    p.PostTypeId,
    p.Score,
    p.CommentCount,
    VoteCount =
        (
            SELECT
                COUNT_BIG(*)
            FROM dbo.Votes AS v
            WHERE v.PostId = p.Id
        )
FROM dbo.Posts AS p
ORDER BY
    p.Score DESC;

And resulting plan:

sql server query plan
bas

We can surmise a few things from this plan:

  • If there are good indexes, SQL Server isn’t using them
  • That hash spill is some extra kind of bad news
  • Spools remain a reliable indicator that something is terribly wrong

Okay, so I’m kidding a bit on the last point. Sorta.

The Query Plan Details


You might look at all this work that SQL Server is doing and wonder why: With no good, usable indexes, and such big tables, why in the overly-ambitious heck are we doing all these nested loop joins?

And the answer, my friend, is blowing in the row goal.

The TOP has introduced one here, and it has been applied across the all of the operators along the top of the plan.

The optimizer has placed a bet on it being very easy to locate 10 rows in the Posts table that will match the Users table and the Votes table, but it took about 4x that to actually get them.

sql server query plan
blue = row goal applied
orange = no row goal applied

This all comes from cardinality estimation and costing and all the other good stuff that the optimizer does when you throw a query at it.

The Query Rewrite


One way to show the power of TOPs is to increase and then decrease the row goal. For example, this (on my machine, at this very moment in time, given many local factors) will change the query plan entirely:

SELECT TOP (10)
    p.*
FROM
(
    SELECT TOP (26)
        DisplayName =
           (
               SELECT
                   u.DisplayName
               FROM dbo.Users AS u
               WHERE u.Id = p.OwnerUserId
           ),
        p.AcceptedAnswerId,
        p.CreationDate,
        p.LastActivityDate,
        p.ParentId,
        p.PostTypeId,
        p.Score,
        p.CommentCount,
        VoteCount =
            (
                SELECT
                    COUNT_BIG(*)
                FROM dbo.Votes AS v
                WHERE v.PostId = p.Id
            )
    FROM dbo.Posts AS p
    ORDER BY
        p.Score DESC
) AS p
ORDER BY
    p.Score DESC;

You may need to toggle with the top a bit to see the change on your machine. The resulting plan looks a bit funny. You won’t normally see two TOPs nuzzling up like this.

sql server query plan
scientific

But the end result is an improvement by a full minute and several seconds.

Because the inner TOP has a bigger row goal, the optimizer changes its mind about how much effort it will have to expend to fully satisfy it before clenching things down to satisfy the smaller TOP.

If you’re only allowed quick query rewrites, this can be a good way to get a more appropriate plan for the amount of work required to actually locate rows at runtime, when the optimizer is dreadfully wrong about things.

The Index Rewrite


In this case, just indexing the Votes table is enough to buy us all the performance we need, but in my personal row goal for completeness, I’m going to add in two indexes:

CREATE INDEX 
    v 
ON dbo.Votes 
    (PostId) 
WITH 
    (SORT_IN_TEMPDB = ON, DATA_COMPRESSION = PAGE);

CREATE INDEX 
    p 
ON dbo.Posts 
    (Score DESC, OwnerUserId) 
WITH 
    (SORT_IN_TEMPDB = ON, DATA_COMPRESSION = PAGE);

Going back to the original query, we no longer need to play games with the optimizer and pitting TOPs against each other.

sql server query plan
wisdom teeth

This is obviously much faster, if you’re in the enlightened and enviable position to create them.

Perhaps you are, but maybe not in the exact moment that you need to fix a performance problem.

In those cases, you may need to use rewrites to get temporary performance improvements until you’re able to.

Thanks for reading!

Going Further


If this is the kind of SQL Server stuff you love learning about, you’ll love my training. I’m offering a 75% discount to my blog readers if you click from here. I’m also available for consulting if you just don’t have time for that, and need to solve database performance problems quickly. You can also get a quick, low cost health check with no phone time required.

Read the whole story
alvinashcraft
3 hours ago
reply
West Grove, PA
Share this story
Delete

3D web game dev jam!

1 Share

Two-time React Jammer, Brian Breiholz, joins Jerod & Nick to discuss building 3D games in the browser! We hear of his game jam trials & tribulations, the in-progress game engine he’s building, the dream game he’s been building for a long time & more

Leave us a comment

Changelog++ members save 7 minutes on this episode because they made the ads disappear. Join today!

Sponsors:

  • Speakeasy – Production-ready, Enterprise-resilient, best-in-class SDKs crafted in minutes. Speakeasy takes care of the entire SDK workflow to save you significant time, delivering SDKs to your customers in minutes with just a few clicks! Create your first SDK for free!
  • Clerk – Clerk is a complete suite of embeddable UIs, flexible APIs, and admin dashboards to authenticate and manage your users.
  • Fly.io – The home of Changelog.com — Deploy your apps and databases close to your users. In minutes you can run your Ruby, Go, Node, Deno, Python, or Elixir app (and databases!) all over the world. No ops required. Learn more at fly.io/changelog and check out the speedrun in their docs.

Featuring:

Show Notes:

Something missing or broken? PRs welcome!


Download audio: https://op3.dev/e/https://cdn.changelog.com/uploads/jsparty/323/js-party-323.mp3
Read the whole story
alvinashcraft
3 hours ago
reply
West Grove, PA
Share this story
Delete
Next Page of Stories