

|
Sr. Content Developer at Microsoft, working remotely in PA, TechBash conference organizer, former Microsoft MVP, Husband, Dad and Geek.
|

Pennsylvania, USA

My digital garden has an entire section with copy/paste code snippets and boilerplates.
I use these nearly every day when writing code. It helps me start working faster, and saves me from having to rewrite the same code over-and-over again.
I created web component boilerplate years ago. Since then, my approach to writing web component has changed quite a bit.
I just updated the boilerplate, adding everything I’ve learned from working on Kelp UI. Today, I wanted to explain how it works.
Let’s dig in!
Instantiate in the connectedCallback() method
I used to instantiate my web components (run all of the code to set them up) inside the constructor().
But when working with Kelp, I learned that this can throw errors, especially if you try to move or replace components with JS after they’ve instantiated.
I moved all of that code to the connectedCallback() method, which runs when the web component is connected to the DOM, and it fixed the issue.
/**
 * Initialize on connect
 */
connectedCallback() {
	// Startup code...
}
I also learned that you don’t need a constructor() at all if you do this, so I removed that method entirely from my boilerplate. There’s no need for it.
Waiting for DOM Ready
Web component JS gets loaded all sorts of different ways, and the DOM might yet be ready when the JS runs.
I’ve started checking the document.readyState first. If it’s not loading, I’ll instantiate immediately. If its still loading, I’ll set a one-time event listener for the DOMContentLoaded event and run my instantiations then.
To make that easier, I include an init() method that runs the actual instantiation code.
/**
 * Initialize on connect
 * Checks for DOM status first, ensuring code doesn't run before required
 * elements exist in the DOM.
 */
connectedCallback() {
	if (document.readyState !== 'loading') {
		this.init();
		return;
	}
	document.addEventListener('DOMContentLoaded', () => this.init(), {
		once: true,
	});
}
Private instance properties
With Kelp, I’ve started using private instance methods and properties a lot more.
For methods, you can just slap a hashtag (#) in front of the name. For instance properties, you need to declare them at the start of the class.
I’ve been using JSDoc to define types for these as well.
customElements.define(
	'my-library',
	class extends HTMLElement {
		// Declare private instance properties
		/** @type HTMLButtonElement | null */ #btn;
		/** @type string */ #greeting;
		/** @type HTMLElement */ #message;

	// ...
});
The handleEvent() method
I make heavy use of the handleEvent() method for handling event listeners with my web components.
It makes it really easy to access instance properties and methods (this) inside the handlers. It also means that if you component gets removed and attached back to the DOM a few times, the callback method still only runs once without you needing to do any removal/cleanup.
connectedCallback() {
	// ...

	// Attach event listeners
	this.#btn.addEventListener('click', this);
}

/**
 * Handle events for the web component
 * @param  {Event} event
 */
handleEvent(event) {
	if (event.type === 'click') {
		this.#onClick(event);
	}
}
No event cleanup
I use to remove every event I attached in the connectedCallback() method in the disconnectedCallback().
But the browser will automatically garbage collect events attached to the custom element and any of its child elements when its removed from the DOM when you use the handleEvent() method.
Now, the only ones I remove are events attached to elements outside the custom element, because they’re not automatically cleaned up.
connectedCallback() {
	// ...

	// Attach event listeners
	document.addEventListener('input', this);
}

// Cleanup global event listeners on disconnect
disconnectedCallback() {
	document.removeEventListener('input', this);
}
As a bonus for using handleEvent(), this is really easy to do because the handler is always this. No more caching callback methods for cleanup purposes.
No shadow DOM
It’s an anti-pattern that makes everything about using web components worse. Death to the shadow DOM!
Like this? A Lean Web Club membership is the best way to support my work and help me create more free content.
Pennsylvania, USA
Learn how to turn data into interactive C# .NET diagrams without manual layout headaches. See more from ComponentOne today. Continue reading
Pennsylvania, USA
If you have a WordPress site, it’s important to make sure that your file permissions are set correctly. The wrong settings can break parts of your site, stop you from uploading files, or even open it up to attackers.
In this guide, we’ll walk you through what file permissions are, which settings you should use, how to apply them, and how to fix related errors. You don’t need to be a developer to follow along, but if you are, you’ll still find value in the technical examples.
What are file permissions?
File permissions are rules set on your server that control who can read, write, or run your website’s files and folders. These rules help keep your website secure and working properly.
Each file or folder has three types of users:
- Owner: Usually the user who installed or manages the site
- Group: Other users in the same group on the server
- Public: Everyone else
Each user type can be given three types of access:
- Read: Can view the contents
- Write: Can change the contents
- Execute: Can run the file, or open the folder
File permissions are represented by three-digit numbers. For example, 755 means:
- Owner has read (4), write (2), and execute permissions (1), which total to 7
- Group has read (4) and execute (1), which come to 5
- Public also has read (4) and execute (1) permissions, which total to 5
The wp-content directory, which contains your WordPress themes, plugins, uploads, and other files should always have its permissions set to 755. This means that only the owner has full access to these important files.
Default WordPress permission settings
By default, WordPress sets secure permissions to protect your website. Directories (or folders) like wp-content are set to 755. This means they need execute permission to be opened.
Meanwhile, files are assigned 644 permissions. This means that the owner can read (4) and write (2) the files, and the group and public can only read (4) the files. So, all the files within the wp-content directory (plugins, themes, etc) will have 644 permissions.
The .htaccess file, which controls the configuration of your server, is typically set to 644 as well.
The wp-config.php file has stricter file permissions: 600 or 640. This file contains essential database connection details and security keys, so access is typically limited to the owner.
If permissions are too loose (like 777), anyone can do anything with your files, which poses a huge security risk. At the same time, if permissions are too strict, you’ll have very little control over your site.
Quick file permission cheat sheet
| Item | Recommended Permission |
| All folders | 755 |
| All files | 644 |
| wp-config.php | 600 or 640 |
| .htaccess | 644 |
| wp-content/uploads | 755 |
How to check your current file permissions
Now, let’s look at how to check your file permissions to make sure that your website is secure.
To do this, you’ll need access to your site’s hosting account. Here, log into the cPanel and open the File Manager.
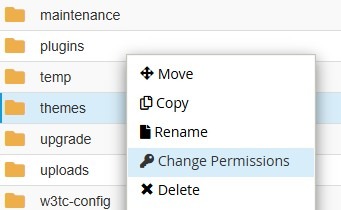
Now, go to your site’s root directory, which is typically named public_html. Right-click on any file or folder, and select Change Permissions.
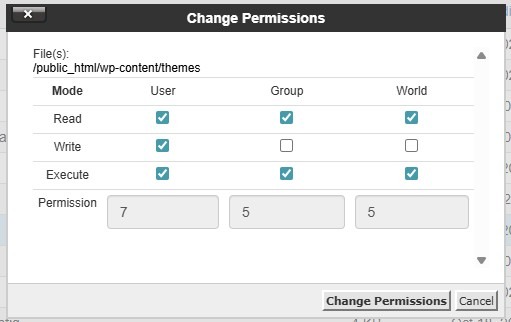
A window will open, where you can view and change permissions.
Alternatively, you can use a file transfer protocol (FTP) client like FileZilla to connect to your site’s backend. You’ll need your FTP credentials, including host (server IP or hostname), username, password, and port number. You can find this information in your hosting account.
To check file permissions via FTP, you just need to follow the same steps.
You can also use a terminal or SSH client to connect to your server (if your host allows it). Open your terminal and connect to your server via SSH:
ssh username@your-server-ipReplace username with your server’s user account (often root or a specific user) and your-server-ip with your server’s IP address or domain.
Now, navigate to your WordPress directory and use the following command to view file permissions:
ls -lIf you want to view all permissions within the WordPress directory, use this command instead:
ls -lRIf something doesn’t look right, don’t worry — you can change the permissions.
How to fix permissions (step-by-step)
Before you make changes to your permissions, you’ll want to back up your website. This way, if you make a mistake or something goes wrong, you’ll be able to restore your files and folders.
Let’s look at two main ways to edit permissions in WordPress.
If you have SSH access
Connect to your server via SSH and navigate to your WordPress folder with the following command:
cd /path/to/wordpressTo set all folders to 755, use this command:
find . -type d -exec chmod 755 {} \;To set all files to 644, use the following:
find . -type f -exec chmod 644 {} \;To lock down wp-config.php, enter the following:
chmod 600 wp-config.phpIf your server needs the group to have access, use 640 instead.
If you’re using an FTP client or the File Manager
Access the WordPress directory as shown earlier, then right-click on the folder and choose Change Permissions.
Enter 755, tick the box to apply to directories only, and save your changes. Now, do the same again with 644, this time for files only.
You may also want to change file permissions for wp-config.php to 600 or 640.
What about ownership?
Permissions work hand in hand with ownership. Each file has a user and a group assigned. If your web server (like Apache or Nginx) doesn’t “own” the files, it can’t write to them.
In SSH, run the command ls -l. You’ll see the owner and group names in the third and fourth columns.
If you have root access, you can also fix ownership by running the following command:
chown -R www-data:www-data /path/to/wordpressReplace www-data with your server’s web user. On some hosts, this might be Apache, nginx, or your account username.
If you don’t have root access, contact your hosting provider and ask them to fix ownership for you.
Common errors caused by wrong permissions (and how to fix them)
Wrong permissions can trigger errors on your website. Let’s look at some common issues and how to fix them.
403 Forbidden errors
This error usually means the server can’t access a file or folder. To fix it, make sure that folders are set to 755 and files 644.
Also, wp-config.php should not be publicly accessible. Permissions for this file should be 600 or 640.
“Unable to create directory” or “Could not write file”
This is a common problem when uploading media or installing plugins. To troubleshoot it, check that the wp-content/uploads folder is 755 and make sure the web server owns the folder.
Also, avoid using 777 for the upload folder unless absolutely necessary. These permissions allow anyone to access the uploads folder.
Plugin or theme update failures
These happen when WordPress can’t write to the file system. Apply the correct permissions (755 for folders and 644 for files) and make sure ownership is correct. Files should be owned by the web server user (e.g. www-data on Ubuntu/Debian, apache on CentOS).
If prompted for FTP credentials, add the following code to the wp-config.php file:
define('FS_METHOD', 'direct');Use this only if you trust your host’s setup. Remove the line if problems occur.
Blank screen or 500 error
A white screen often means a PHP error or wrong file permissions. Once again, make sure that you have the correct file permissions and ownership. A recent update may have affected these permissions.
If you have access, you can check your server error logs to identify the cause. You also have the option to enable debugging in wp-config.php. Just add the following lines of code:
define('WP_DEBUG', true);

define('WP_DEBUG_LOG', true);

define('WP_DEBUG_DISPLAY', false);
Then, check the wp-content/debug.log file.
There might also be an issue with the .htaccess file. So, rename it and reload the site. If it works, simply generate a new .htaccess file by going to your WordPress dashboard and clicking on Settings → Permalinks → Save Changes.
Best practices to keep your WordPress site secure
There are many things you can do to protect your website. Firstly, you’ll want to make sure that no files and folders on your site are set to 777, as this would allow anyone (including hackers) to make changes to them.
As mentioned earlier, it’s also important to back up your site before making changes to your permissions. This way, you won’t lose any content or data if something goes wrong.
Keeping your plugins, themes, and core files up to date is also essential for site security. Outdated software can cause compatibility issues that affect your site’s performance, while also making it easier for malicious users to access your files and folders.
Another best practice is to use a security plugin to monitor changes on your website. With regular scans, you can catch permission issues early and rectify them in a timely manner.
Final steps to confirm your file permissions are correct
Now that you know how to check and edit file permissions, here’s how to ensure that they are correct. Once you’ve made your changes:
- Try uploading an image to see if it works.
- Update a plugin.
- Browse your site to make sure nothing is broken.
If anything still seems off, ask your host to check ownership settings.
Add a layer of protection with a security plugin
Setting the correct file permissions is a good starting point. But if you’re serious about keeping your site safe, go one step further.
You still need protection from malware, unexpected file changes, spam, and failed backups.
That’s where Jetpack Security comes in. This is a complete protection bundle for WordPress sites. It includes three powerful tools that work together to keep your site healthy and secure:
- VaultPress Backup: This automatically backs up your site in real time. So, if a bad plugin update or file issue occurs, you can restore everything with just a few clicks.
- Jetpack Scan: It monitors your site for malware, suspicious code, and unauthorized changes. It also lets you fix most issues with one click, directly from your WordPress dashboard.
- Akismet: It filters spam comments and form submissions before they reach your site, saving you time and helping your site load faster.
These tools work quietly in the background. You don’t need to log into multiple services or learn how to use complicated settings. Everything stays inside your WordPress dashboard. You get alerts when something looks wrong, and you have options to take action right away.
Combining the right file permissions with active scanning, backups, and spam protection gives you full control over your site’s safety. With Jetpack Security, you’re not just reacting to problems; you’re staying ahead of them. Get started today!


Pennsylvania, USA
Since the 2025.3 release, we’ve published several rapid-response updates (2025.3.0.1–2025.3.0.4) for ReSharper and Rider to address the most urgent issues as quickly as possible. The 2025.3.1 update brings all of those fixes together and includes additional improvements that required more time to implement.
For Rider, it also delivers the data-sharing functionality we announced earlier this year, now refined based on the feedback we’ve received, along with Next Edit Suggestions – a significant step forward in how JetBrains AI supports your everyday coding by anticipating follow-up changes and keeping your code consistent as you work.
Let’s take a look at these updates.
Rider 2025.3.1
Next edit suggestions (NES) come to JetBrains Rider
The 2025.3.1 update to Rider introduces the long awaited new feature from JetBrains AI Assistant – next edit suggestions (NES). Next edit suggestions offer intelligent recommendations for edits across your entire file – not just the next line of code.
Next edit suggestions work a lot like code completion – they appear as you type. But while completion focuses on your next token or line, NES reacts to the meaning of your edit, analyzing the change you just made and proposing follow-up updates elsewhere in your file. It also has more trigger points than completion, making it appear earlier and more frequently when it detects an opportunity to help.
In .NET projects, it might look like this: as you begin shaping a LINQ expression, NES picks up on the intent behind your edits and prepares related updates that may be needed in the rest of the method. It doesn’t replace code completion, but works alongside it, stepping in only when the changes you’ve made start to matter to the logic.
You will see NES suggestions highlighted in light purple. If they’re near your cursor, they appear instantly. If the suggestions touch other parts of the file, you’ll get a prompt to review and apply them.
In this example from an Unreal Engine gameplay code, as you start typing a new if condition inside TakeDamage(), NES immediately picks up on the intent behind the change, namely that you’re adding new death-related logic after the character’s health has been reduced.
How to enable the feature
To start using the feature, update JetBrains AI Assistant to the latest version and check the Enable next edit suggestions box in the settings (Settings | Tools | AI Assistant). You will also have the option to enable IDE-powered Code Insight actions.
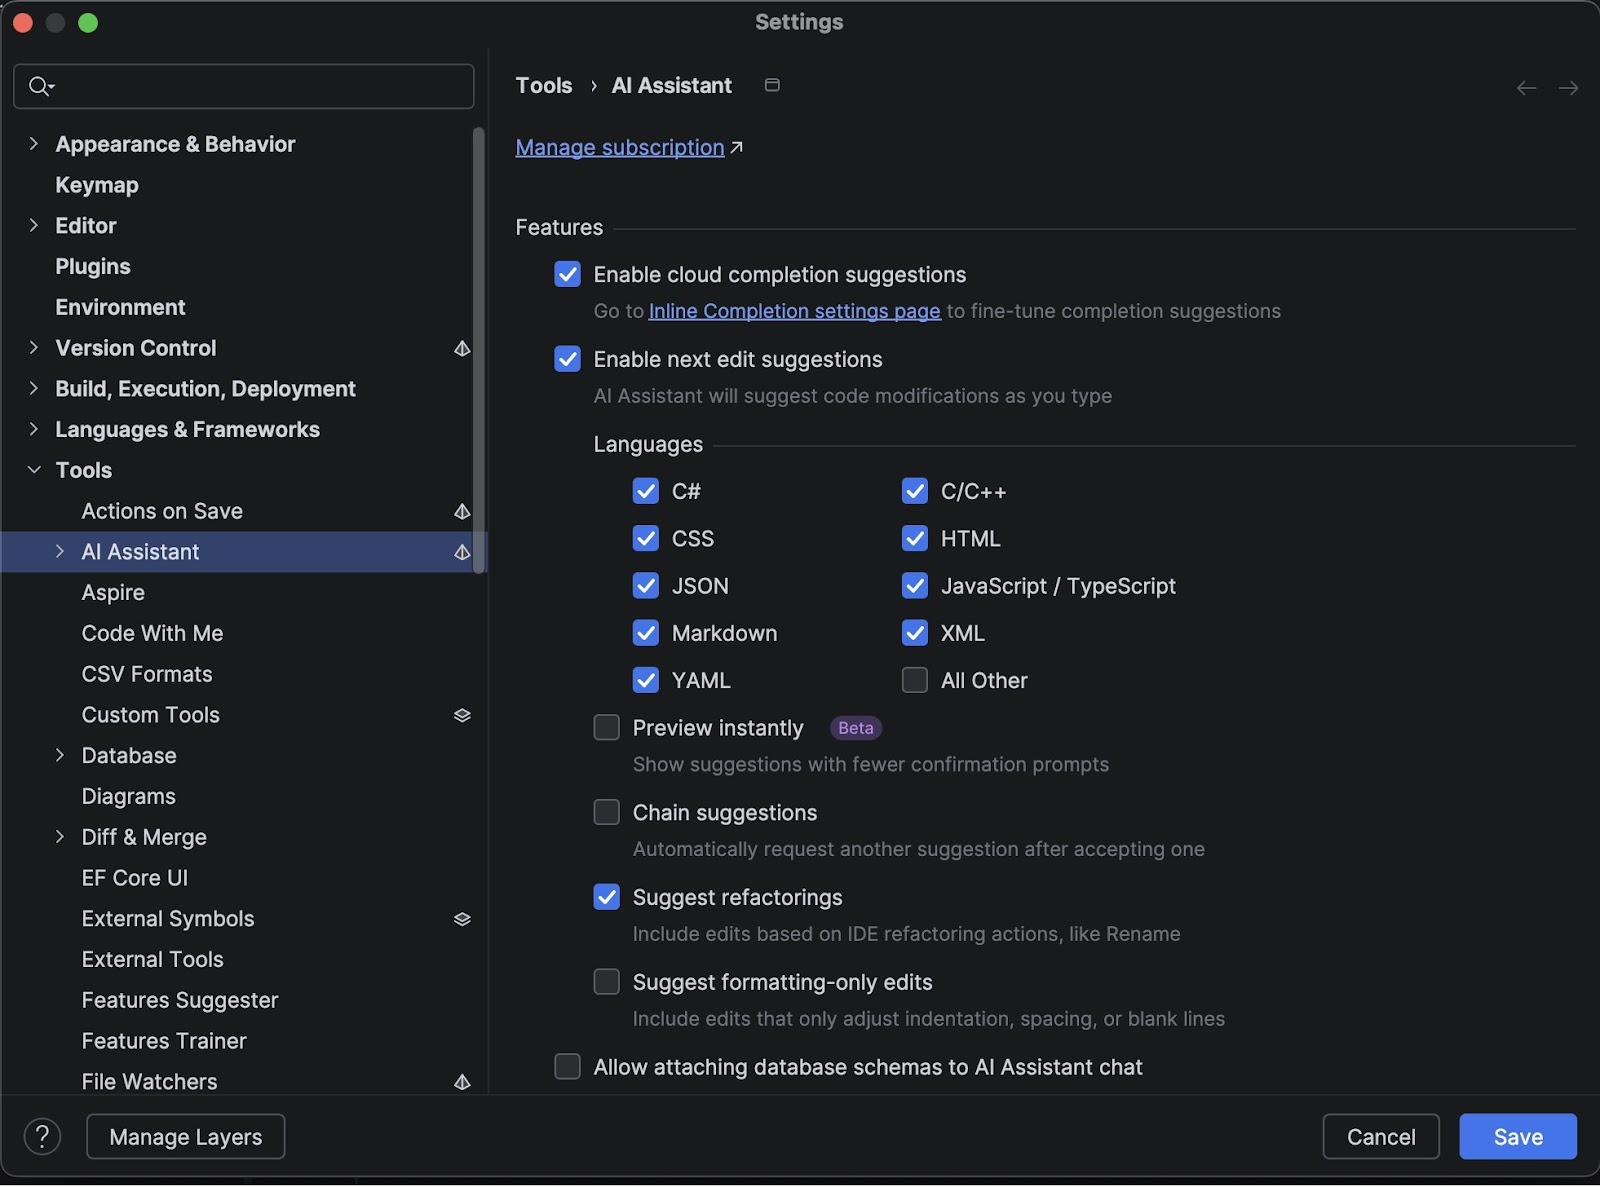
The new feature is available as part of all AI Pro and AI Ultimate plans – with unlimited usage and zero impact on your cloud quota.
We’d love to hear what you think! You can share feedback directly inside the IDE – a prompt will appear after you begin using the feature. You’re also welcome to leave your thoughts in the comment section below this blog post.
You can find the documentation on this feature here.
Data sharing for better AI in JetBrains IDEs
With this update, we’re delivering the data-sharing functionality we previewed earlier. Our goal remains the same: to improve the quality and reliability of the AI features in our IDEs by learning from real-world usage, while ensuring that sharing data is always a choice and never a requirement.
Nothing changes unless you explicitly agree to participate. Organizations continue to control data-sharing at the admin level, and individual users can adjust their preferences at any time. For non-commercial users, detailed data sharing is enabled by default, but no information is collected until after you see the in-IDE notice and you may disable it immediately. All shared data is processed responsibly and protected under strict safeguards.
You can find the most detailed information on our data collection and usage here.
Notable fixes
- Normal operation of the Suggested Plugins dialog has been restored. [IJPL-207992]
- MCP-related tool calls now return correct data for project dependencies, modules, and problems instead of empty or generic results. [RIDER-128984]
- The Show in Find Results shortcut now works correctly when viewing implementing methods. [RIDER-116221]
- RiderLink now compiles successfully with Unreal Engine 5.7 on Linux using v26 / clang-201.8.[RIDER-133226]
For the complete list of issues resolved, please see our issue tracker.
ReSharper 2025.3.1
These are the most notable fixes included in this update:
- dotTrace Viewer no longer fails to open snapshots [DTRC-31858]
- The Submit Feedback dialog now shows all expected categories and options again, instead of limiting reports to performance issues only. [RSRP-502160]
- The Code Cleanup window now renders correctly in Out-of-Process mode. [RSRP-502174]
- AI Assistant now stays activated after restarting Visual Studio. [RSRP-501759]
- Icons in the Options dialog now correctly follow the selected color scheme instead of appearing flat or uncolored. [RSRP-502170]
- Resolved a TypeLoadException when running
InspectCodewithMicrosoft.CodeAnalysis.CodeStyle.Fixes4.14.0, restoring full analyzer execution. [RSRP-502233]
For the full list of resolved issues included in this build, please refer to our issue tracker.
Resolved vulnerabilities
A couple of security vulnerabilities – [CVE-2025-64456] and [CVE-2025-64457] – have been resolved.
These vulnerabilities have been resolved in all Rider, ReSharper, and the .NET tools updates starting with 2024.3.9, including versions 2025.1.8, 2025.2.5, and the latest 2025.3.1.
You can download the latest builds from our website (Rider, ReSharper) or via the Toolbox App. You can also update Rider as a snap.
This is our last update of the year, and we want to close with a simple message: thank you. From the .NET team at JetBrains, we wish you a happy, warm, and safe holiday season. We’ll see you in the new year!
Pennsylvania, USA
My colleague Annie loves clipping videos from her favorite creators. You know that feeling when you catch a great moment and turn it into a perfect short? That's her jam. But she kept running into this frustrating problem: by the time she saw a new video and got around to clipping it, everyone else had already done it. She was always late to the party.
When she told me about this, I thought, "What if we could automatically clip videos the moment they're published?" That way, she'd have her clips ready to post while the content is still fresh.
So I put my experience with integration tools to work and built something for her—and for anyone else who has this same problem. And you know what? I'm pretty excited to share it with you.
What I Created
I put together an open-source n8n templates that automatically clips YouTube videos using AI. Here's how it works:
- It watches for new videos from your favorite YouTube channel
- Sends the video to Reka's AI to create clips automatically
- Checks when the clips are ready and sends you an email with the download link
The whole thing runs on n8n (it's a free automation platform), and it uses Reka's Clips API to do the AI magic. Best part? It's completely free to use and set up.
How It Actually Works
I built this using two n8n workflows that work together:
Workflow 1: Submit Reel Creation

This one's the watcher. It monitors a YouTube channel's RSS feed, and the moment a new video drops, it springs into action:
- Grabs the video URL
- Sends it to Reka's API with instructions like "Create an engaging short video highlighting the best moments"
- Gets back a job ID so we can track the progress
- Saves everything to a n8n data table
The cool thing is you can customize how the clips are made. Want vertical videos for TikTok? Done. Need subtitles? Got it. You can set the clip length anywhere from 0 to 30 seconds. It's all in the JSON configuration.
{
  "video_urls": ["{{ $json.link }}"],
  "prompt": "Create an engaging short video highlighting the best moments",
  "generation_config": {
    "template": "moments",
    "num_generations": 1,
    "min_duration_seconds": 0,
    "max_duration_seconds": 30
  },
  "rendering_config": {
    "subtitles": true,
    "aspect_ratio": "9:16"
  }
}
Workflow 2: Check Reel Status

This one's the patient checker. Since AI takes time to analyze a video and create clips (could be several minutes depending on the video length), we need to check in periodically:
- Looks at all the pending jobs in our data table
- Asks Reka's API "Hey, is this one done yet?"
- When a clip is ready, sends you an email with the download link
- Marks the job as complete so we don't check it again
I set mine to check every 15-30 minutes. No need to spam the API—good things take time! 😉
Setting It Up (It's Easier Than You Think)
When I was helping Annie set this up (you can watch the full walkthrough below), we got it working in just a few minutes. Here's what you need to do:
Step 1: Create Your Data Table
In n8n, create a new data table. Here's a pro tip I learned the hard way: don't name it "videos"—use something like "clip_jobs" or "reel_records" instead. Trust me on this one; it'll save you some headaches.
Your table needs four columns (all strings):
video_title- The name of the videovideo_url- The YouTube URLjob_id- The ID Reka gives us to track the clipjob_status- Where we are in the process (queued, processing, completed, etc.)
Step 2: Import the Workflows
Download the two JSON files from the GitHub repo and import them into n8n. They'll show up with some errors at first—that's totally normal! We need to configure them.
Step 3: Configure "Submit Reel Creation"
-
RSS Feed Trigger: Replace my YouTube channel ID with the one you want to monitor. You can find any channel's ID in their channel URL.
-
API Key: Head to platform.reka.ai and grab your free API key. Pop it into the Bearer Auth field. Give it a memorable name like "Reka API key" so you know what it is later.
-
Clip Settings: This is where you tell the AI what kind of clips you want. The default settings create one vertical video (9:16 aspect ratio) up to 30 seconds long with subtitles. But you can change anything:
- The prompt ("Create an engaging short video highlighting the best moments")
- Duration limits
- Aspect ratio (square, vertical, horizontal—your choice)
- Whether to include subtitles
-
Data Table: Connect it to that table you created in Step 1.
Step 4: Configure "Check Reel Status"
-
Trigger: Start with the manual trigger while you're testing. Once everything works, switch it to a schedule trigger (I recommend every 15-30 minutes).
-
API Key: Same deal as before—add your Reka API key.
-
Email: Update the email node with your email address. You can customize the subject and body if you want, but the default works great.
-
Data Table: Make sure all the data table nodes point to your table from Step 1.
Watching It Work
When Annie and I tested it live, that moment when the first clip job came through with a "queued" status? That was exciting. Then checking back and seeing "completed"? Even better. And when that email arrived with the download link? Perfect.
The clips Reka AI creates are actually really good. It analyzes the entire video, finds the best key moments (or what ever your prompt asks), adds subtitles, and packages it all up in a format ready for social media.
Wrap Up
This tool works great whether you're a clipper enthusiast or a content creator looking to generate clips for your own channel. Once you set it up, it just runs. New video drops at 3 AM? Your clip is already processing. You wake up to a download link in your inbox.
It's open source and free to use. Take it, customize it, make it your own. And if you come up with improvements or have ideas, I'd love to hear about them. Share your updates on GitHub or join the conversation in the Reka Community Discord.
Watch the Full Setup
I recorded the entire setup process with Annie (she was testing it for the first time). You can see every step, every click, and yes, even the little mistakes we made along the way. That's real learning right there.
Get Started
Ready to try it? Here's everything you need:
🔗 n8n template/ Github: https://link.reka.ai/n8n-clip
🔗 Reka API key: https://link.reka.ai/free (renewable & free)
~frank
Pennsylvania, USA
Next Page of Stories