Sr. Content Developer at Microsoft, working remotely in PA, TechBash conference organizer, former Microsoft MVP, Husband, Dad and Geek.
146366 stories
·
33 followers

Citigroup Mandates AI Training For 175,000 Employees To Help Them 'Reinvent Themselves'

1 Share
Citigroup has rolled out mandatory AI training for all 175,000 of its employees across 80 locations worldwide, a sweeping initiative that CEO Jane Fraser describes as helping workers "reinvent themselves" before the technology permanently alters what they do for a living. The $205 billion bank sent out an internal memo last year requiring staffers to learn prompting skills specifically. Fraser told the Washington Post at Davos that AI "will change the nature of what people do every day" and "will take some jobs away." The adaptive training platform lets experts complete the course in under 10 minutes while beginners need about 30 minutes. Citi reported last year that employees had entered more than 6.5 million prompts into its built-in AI tools, and Q4 2025 data shows a 70% adoption rate for the bank's proprietary AI tools.

Read more of this story at Slashdot.

Read the whole story
alvinashcraft
17 minutes ago
reply
Pennsylvania, USA
Share this story
Delete

How to Add Meta Tags in WordPress to Boost SEO Results

1 Share

Meta tags play a critical role in search engine optimization (SEO), providing search engines with essential information about a page’s content.

You can add meta tags to WordPress manually or with plugins. This guide explores both methods, and shares some best practices to maximize SEO impact.

What are meta tags and why are they important?

Meta tags are snippets of HTML code that provide metadata about a webpage. Search engines and social media platforms use them to understand and display content appropriately. Some of the most important meta tags include:

  • Title Tag: Defines the page title shown in search results
  • Meta Description: Provides a brief summary of the page content
  • Meta Robots: Direct search engines on how to index the page
  • Open Graph Tags: Optimize content for social media platforms
  • Canonical Tag: Prevents duplicate content issues by specifying the preferred URL

Each of these meta tags contributes to improved search engine rankings and a better user experience.

How to add meta tags manually in WordPress

Those who prefer a hands-on approach, you can manually add meta tags to WordPress with code. Note that you should always make changes using a child theme and have a full backup of your site on hand before editing your site code.

For Classic themes: Edit the header.php file

If you’re using a Classic theme, you can use the header.php file to add meta tags to your site. Simply follow these instructions:

  1. Access your WordPress dashboard.
  2. Navigate to AppearanceTheme File Editor.
  3. Locate and open the header.php file.
  4. Add meta tags within the <head> section. Example:
<meta name="description" content="Your page description here">
<meta name="robots" content="index, follow">
  1. Save changes.
editing the header.php file in WordPress

For Classic or Block themes: Use the functions.php to add meta tags dynamically

Instead of editing the header file directly, you can add meta tags by modifying the functions.php file.

  1. Using your host’s file editor or SFTP software, open the functions.php file. This is found inside of your child theme folder. 
  2. Insert the following code snippet:
function add_meta_tags() {
    echo '<meta name="description" content="' . get_the_excerpt() . '" />';
}
add_action('wp_head', 'add_meta_tags');
  1. Save the changes.

This method dynamically generates meta descriptions based on post excerpts.

How to add meta tags using plugins

SEO plugins greatly simplify the process of adding meta tags, provide additional functionality, and make sure that you’re implementing tags correctly. The top plugins for this purpose are Jetpack, Yoast SEO, and Rank Math.

Using Jetpack to add meta tags

Jetpack is a powerful WordPress plugin with tools for SEO, security, performance, growth, and more. Here’s how to use it to add meta tags to your WordPress site:

  1. Install and activate Jetpack from Plugins → Add New.
  2. Navigate to JetpackSettingsTraffic.
  3. Enable the SEO Tools feature.
SEO settings in Jetpack

Once you’ve enabled this feature:

  1. When editing a post or page, click the Jetpack icon at the top right of the block editor.
  2. There, add your custom title tag and meta description for the content.
  3. Click the blue Save button.
adding an SEO description to a page

Jetpack also automatically adds structured meta tags, including Open Graph data, optimizing content for search engines and social media platforms.

Using Yoast SEO to add meta tags

Yoast SEO is an SEO plugin that includes advanced tools for optimizing your WordPress site. To add meta tags with Yoast on a global level:

  1. Install and activate Yoast SEO from Plugins → Add New.
  2. Go to Yoast SEOSettings.
  3. Find the Content types section.
  4. Select the content type you want to edit (Posts, Pages, Products, etc.) and edit the default settings for meta tags. 
Yoast SEO post meta data settings

To edit an individual piece of content:

  1. Open the post or page in the block editor.
  2. Scroll down to the bottom to find the Yoast SEO box.
  3. There, you can edit the meta description, SEO title, slug, and more. 
  4. Once you’re done, save the post or page.
adding a meta description using Yoast SEO

Yoast SEO also includes meta robots settings, Open Graph tags, structured data support, and more.

Using Rank Math to add meta tags

Rank Math is similar to Yoast SEO, providing advanced SEO features and AI-based suggestions for meta descriptions. Here’s how to configure default meta tag settings with Rank Math:

  1. Install and activate Rank Math from Plugins → Add New.
  2. Complete the setup wizard.
  3. Navigate to Rank Math SEOTitles & Meta.
  4. Configure meta title and description templates.
  5. Click Save Changes.
adding SEO data using RankMath

To edit meta tags on an individual page/post basis:

  1. Open your page or post in the block editor.
  2. Click the Rank Math button at the top right (it will show your current SEO score). 
  3. Make any edits you’d like.
  4. Click Save.
setting a focus keyword with RankMath

Best practices for optimizing meta tags

To maximize SEO impact, follow these best practices when adding meta tags:

  • Write compelling meta descriptions: Keep them under 160 characters and include primary keywords.
  • Optimize title tags: Ensure that they’re under 60 characters and feature your main keyword at the beginning, if possible.
  • Use the meta robots tag wisely: Set noindex for pages that should not appear in search results (e.g., admin pages, thank you pages).
  • Implement the Open Graph protocol: Enhance how content appears on social media platforms.
  • Avoid duplicate meta tags: Use canonical tags to prevent indexing of duplicate content.

Monitoring and testing meta tag effectiveness

After implementing meta tags, track their impact using SEO tools like:

How to maximize SEO with meta tags and AI content

Adding and optimizing meta tags in WordPress is a critical part of SEO, enhancing search visibility and user engagement.

To further improve your SEO strategy, consider integrating Jetpack AI Assistant into your content creation workflow. This AI-powered tool, seamlessly embedded within the WordPress editor, offers a suite of features designed to streamline and elevate your content efforts.

Efficient meta tag generation

Crafting precise and compelling meta tags is essential for SEO success. Jetpack AI Assistant simplifies this process by:

  • Creating meta descriptions: It can analyze your content and generate concise, compelling meta descriptions.
  • Optimizing title tags: It can suggest impactful titles that resonate with both search engines and readers.

Content enhancement for SEO

Beyond meta tags, Jetpack AI Assistant contributes to overall SEO by:

  • Adjusting tone: It modifies your content tone to align with your brand voice and audience preferences.
  • Correcting grammar and spelling: It ensures error-free content that maintains professionalism.

These features collectively enhance content quality, making it more appealing to both readers and search engines.

Seamless integration and usability

Jetpack AI Assistant integrates directly into the WordPress block editor, offering:

  • A user-friendly interface: Accessible tools within your existing workflow
  • Prompt-based content generation: The ability to create content, lists, and tables based on your prompts
  • Multilingual support: Content translation to reach a broader audience.

This seamless integration ensures that enhancing your SEO strategy with AI capabilities is both intuitive and efficient. Learn more about Jetpack AI Assistant here: https://jetpack.com/ai/


Read the whole story
alvinashcraft
17 minutes ago
reply
Pennsylvania, USA
Share this story
Delete

Security Software False Positives

1 Share

Software developers and end-users are often interested in understanding how to resolve incorrect detections from their antivirus/security software, including Microsoft Defender.

Such False Positives (FPs) can disrupt your use of your device by incorrectly blocking innocuous files or processes. However, you should take extreme care before concluding that a given detection is a false positive — attackers work hard to make their malicious files seem legitimate, and your security software is built by experts who work hard to flag only malicious files.

How Do False Positives Occur?

Every security product must perform the difficult task of maximizing true positives (protecting the user/device) while minimizing false negatives (protecting productivity/data). The resulting ratio is called security efficacy.

False-positives can occur for numerous reasons, but most are a result of security software observing what it deems to be suspicious content or behavior on the part of a file or process. Virtually all modern security software consists of a set of signatures and heuristics that attempt to detect indications of malice based on threat intelligence data collected and refined by threat researchers (both humans and automated agents). In some cases, the threat intelligence is scoped too broadly and incorrectly implicates harmless files along with harmful ones.

To correct this, the threat intelligence from your security vendor must be adjusted to narrow the detection so that it applies only to truly malicious files.

Sidenote: Is it really a block?

In some cases a security feature might block a file not as malicious but merely as uncommon; for example, SmartScreen Application Reputation can interrupt download or starting of an app if the app isn’t recognized:

In such cases, users may choose to ignore the risk and continue if they have good reason to believe that the file is malicious. Over time, files should build reputation (especially when signed, see below) and these warnings should subside for legitimate files.

False Positives for End-Users

Before submitting feedback, it’s probably worthwhile to first confirm what security product is triggering a block. In some cases, blocks that look like they may be coming from your security software might actually reflect intentional blocks from your network security administrator. For example, users of Microsoft Defender for Endpoint should review this handy step-by-step guide.

To get a broader security ecosystem view of whether a given file is malicious, you can check it at VirusTotal, a free service which will scan files against most of the world’s antivirus engines and which allows end-users to vote on the safety of a given file.

When a security vendor realizes a false positive has occurred, they will typically issue a signature update; while this typically happens entirely automatically, you might want to try updating your signatures just to ensure they’re current.

False positives (and false negatives) for Microsoft Defender Antivirus can be submitted to the Defender Security Intelligence Portal; these submissions will be evaluated by Microsoft Threat researchers and detections will be created or removed as appropriate. Other vendors typically offer similar feedback websites.

In most cases, users may override incorrect detections (if they are very sure they are false positives) using the Windows Security App to “Allow” the file or create an exclusion for its location.

Avoiding False Positives for Software Vendors

If you build software, your best bet for avoiding incorrect detections is to ensure that your code’s good reputation is readily identifiable for each of your products’ files.

To that end, make sure that you follow Best Practices for code-signing, ensuring that every signable file has a valid signature from a certificate trusted by the Microsoft Trusted Root Program (e.g. Digicert, Azure Trusted Signing).

If your files are incorrectly blocked by Microsoft Defender, you can submit a report to the Defender Security Intelligence Portal.

-Eric


Read the whole story
alvinashcraft
18 minutes ago
reply
Pennsylvania, USA
Share this story
Delete

Microsoft Hero: How Community Sparked a Global Movement

1 Share
By guest blogger Saeid Dahl.

Introduction

There comes a moment when numbers stop being just metrics and start telling a story. After more than 160 live sessions over the past two years, thousands of hours of shared learning, and a global audience that has grown to over 7,000 members and subscribers, we felt compelled to pause and reflect. During many of these sessions, speakers consistently highlighted the importance of Microsoft Learn and the Microsoft Heroes ecosystem, not as platforms, but as enablers of growth. Built with love by leaders who are MVPs, MCTs, Microsoft Learn Experts, and Microsoft Student Ambassadors, what began as a free space, and one committed to remain free forever, has evolved into a global movement driven by purpose, passion, and belief in people.

Our Story

Microsoft Heroes began two years ago, born from the heart of Microsoft Learn and shaped by a simple but powerful belief: learning should inspire people, not just inform them. From the very beginning, we envisioned more than a traditional knowledge-sharing community. We wanted to create a space where stories, experiences, and shared journeys could spark confidence, curiosity, and growth in everyone who joined.

That belief resonated deeply. Speakers, experts, students, and passionate learners began to gather, not because they were asked to, but because they felt connected to the purpose. What started as a small, open initiative grew organically into a global movement, now followed by more than 7,000 community members worldwide. Week after week, without interruption, we hosted live sessions and welcomed voices from different cultures, backgrounds, and time zones. By embracing diversity and intentionally covering multiple regions, we ensured that no one was excluded and that learning truly belonged to everyone.

Over time, Microsoft Heroes became more than a platform. It became a family. A place where people celebrate each other’s achievements, amplify one another’s voices, and grow together. In the past year alone, 266 speakers expressed their desire to stand on the Microsoft Heroes stage, driven purely by passion. We proudly hosted 83 of them, each bringing unique perspectives and real-world experiences to our global audience.

Behind every session lies an intense yet rewarding journey. Planning monthly calendars, reviewing submissions, coordinating across time zones, promoting content, and hosting live sessions requires dedication and trust. None of this would be possible without a deeply committed team working together, not for recognition, but out of love for the community.

This spirit lives on through Microsoft NexGen Heroes, a program created for students and led by Microsoft Student Ambassador leaders. It exists to empower young voices and nurture the next generation of Microsoft community leaders, because every movement grows stronger when it invests in its future.

Impact and Insights

Throughout this journey, we learned that the most powerful form of learning is only possible when it is driven by passion. Real growth happens when people genuinely care, when they share their energy, support one another, and invest time in mentorship. This belief became the heartbeat of Microsoft Heroes.

Microsoft Heroes was never designed solely for professionals already deep into their careers. Through workshops and structured learning sessions, we intentionally supported those who were just beginning their journey, ensuring they had access to guidance, resources, and encouragement from day one. As a result, the impact extended far beyond attendance numbers.

We witnessed speakers earn titles such as Microsoft MVP and Microsoft Certified Trainer, with one or more of their community contributions rooted in Microsoft Heroes. Even within our leadership team, the ripple effect became visible, three new MVPs emerged after joining the community, and several Microsoft Student Ambassadors progressed to Gold status.

The greatest lesson we learned is that a community becomes powerful when energy flows freely, when people lift each other up without expectation. It is this shared passion and collective belief that continues to move Microsoft Heroes forward.

Call to Action 

Communities like Microsoft Heroes remind us that growth is never a solo journey. Whether you are a student taking your first steps, a professional deep into your career, or a leader looking to give back, there is always a place for you to contribute, learn, and inspire. Share what you know. Mentor someone who needs guidance. Step onto the stage when the moment feels right. When we invest in each other, we create environments where everyone can rise.

Resources

Meet the MVPs involved in Microsoft Hero.

Microsoft Heros 

Learn more about Microsoft Hero and how to get involved.

Read the whole story
alvinashcraft
18 minutes ago
reply
Pennsylvania, USA
Share this story
Delete

RTL Tool - Remove Right-to-left characters from filenames for Windows

1 Share


Malware writers can trick you in 2 ways into thinking your file is a "PDF looking" file using the Right-to-Left embedded characters. 


Firstly, maliciously constructed “.exe” can be built to display an PDF icon, so it looks like PDF default reader will open this file. If the filename is really long then, you can't see the extension (see image below). 

2ndly and may not be so obvious, malicious PDF filename is constructed as with a right-to-left override character is such a way that the file ends ".pdf" extension, but really is an ".exe".  


So in example below, the 2nd file looks like a ".txt" file, but is really a ".docx" file (the 1st file). The 1st file has been cleansed of the RTL Unicode character, and ends in ".docx". 

The PDF file is actually an ".exe" file, but looks like it will open with default PDF reader. 


Download RTLExample.7z ( it includes the above files with PDF ".exe" example. The files contain no viruses or malware. The PDF is safe ".exe", and just opens this page in Chrome). The "PDF" is safe ".exe", and just opens this page in Chrome. But GDrive marks these examples "Sorry, this file is infected with a virus", which good because they are detecting the RTL character and exe. But it a false positive, since there is no virus in the files. You can create you own examples by inserting the RTL character into the filename, see this video https://youtu.be/n2kV3Q2eTCY). 


Here's the same files as viewed from the command (cmd.exe) line. The box character represents the RTL character.


Note: Detection of malicious file is never done by a filename alone, so a good antivirus will flag the contents of this file, for known signatures. BUT you can remove the annoying RTL character with the free tool below! 

How is RTLO being abused by malware writers?

In apps that support Unicode like Window Explorer, the right-to-left override malware method uses  a RTL Unicode character, that will reverse the order of the characters that follow it. It's used mainly for Middle Eastern/Asian languages that you read right-to-left.

RTLO can be used to spoof fake extensions. To do this we need a hidden RTL Unicode character in the file name.

What is “Right-to-Left Override” RTLO?
The RTLO method is used to hide the true type of a file, so it might trick you into open text file (.txt) which really is a Word file (.docx) with malicious malware. More recently this file could hide a .wav file. Audio files such .wav file are being embedded with malware, is on the forefront of malware maliciousness. Read about that on my post here.
The method exploits a feature built into Windows Explorer. Since Microsoft Windows does a great job of supporting different languages from around the world, some of those languages that are written from right-to-left (RTL). 
Let’s say you want to use a right-to-left written language, like Hebrew or Arabic, on a site combined with a left-to-right written language like English or French. In this case, you would want bidirectional script support.
Bidirectional script support is the capability of a computer system to correctly display bi-directional text. In HTML we can use Unicode right-to-left marks and left-to-right marks to override the HTML bidirectional algorithm when it produces undesirable results:
left-to-right mark: ‎ (U+200E) Unicode character
right-to-left mark: ‏ (U+200F) Unicode character
How do you fix files that have the RTLO or other bad characters ? 

Here's a tool I built to clean up Right-to-Left Mark (and many others) and Unicode Control Characters from your files. It's super fast, small and written in native C++.

Updated Thu 21-Apr-22 - new build, fixed many recursive issues


Download
 touchRTL.7z (you need https://www.7-zip.org/ to unpack). For personal use only. Will open this page on each run. Copy into c:\windows to use from cmd.exe.


License : 

touchRTL.7z personal use only, for commercial use buy touchLTRPRO. Contact as validated today available for license request. 

touchRTLPRO.7z, has flags to remove Unicode spaces and punctuations (math symbols, currency, open closing braces, and accent marks).  

Just run this command and it will recursively rename filenames to remove those characters under the specified directory name. If directory name, contains spaces you need quotes.


touchRTL -v -R -l -y "directory name"

where


Usage: touchRTL [-aclmpRuvxy] [-r REFFILE | -d DATETIME] PATH...

UNIX touch mimic, updates files access, modification and creation times of file(s) in PATH to the current time,
If PATH argument does not exist, creates corresponding new empty file or directory (using -y), unless -c or --n
Supports directory recursion and time stamping!
Supports Right-to-Left (RTL) character removal for files.
PATH argument can represent a filename(s) or directory. Double quote if it contains spaces. eg "c:\as is.txt"

  -a, --access-time        change only the file access time
  -c, --no-create          do not create any new files - If the file exists, touch will update the access time,
  -l, --RTL                remove Unicode control & format characters (esp. infamous right-to-left) from filena
  -m, --modif-time         change only the file modification time
  -p, --pause-exit         pause on exit (non-GNU extra)
  -R, --recursive          recursively touch files in specified directory and all subdirectories (non-GNU extra
  -u, --unicntrl           remove Unicode control characters only - https://www.fileformat.info/info/unicode/ca
  -v, --verbose            output the result of every file processed (non-GNU extra)
  -x, --creation-time      change only the file creation time (non-GNU extra)
  -y, --directory          specify directory, instead of default file
  -r, --reference REFFILE  use this file's times instead of current time
  -s, --spaces (PRO edtn)  remove Unicode spaces from filename
  -!, --puncs  (PRO edtn)  remove Unicode punctuations & symbols (math & modifiers) from filename

  -d, --date DATETIME      use YYYY-MM-DDThh:mm:ss[.ms] instead of current time (non-GNU, does not parse string
                           accepted "2033-04-01T07:07:07", "2033-04-01 07:07:07"

  -h, --help               Display this help and exit.

      --version            Display version information and license information.

For personal use only. Commercial license required for business use and removes page open. See --version for al
Copyright © 2019-2022 M. Pahulje <metadataconsult@gmail.com> - https://http://metadataconsulting.blogspot.com/
Read the whole story
alvinashcraft
18 minutes ago
reply
Pennsylvania, USA
Share this story
Delete

Getting Started with the Blazor Diagram Component

1 Share

Visualizing workflows, hierarchy or other figures is easy with the Blazor Diagram component. Learn how customize it for your app.

Creating diagrams in web applications becomes necessary for those that need to display hierarchical information or workflows. Therefore, it is essential that in the Blazor components ecosystem there are reliable solutions that allow creating them quickly, while also offering flexibility to customize them according to the tasks to be performed.

In this post, I will tell you about the new Progress Telerk UI for Blazor Diagram component, which allows you to create diagrams in a simple way.

Creating Your First Figure with the Diagram Component

The first step to be able to create diagrams in your application is to configure your project to work with the Telerik components, according to the Blazor components installation guides.

Once the project has been configured, you should use the tag TelerikDiagram, which will be the main container where the diagram will be rendered, and where you can configure parameters such as Height, Width, Zoom, ZoomRate, MinZoom and MaxZoom. An example of its usage is the following:

<TelerikDiagram Height="500px" Zoom="0.8">
</TelerikDiagram>

When you run the application, you will see the canvas when you click on it:

Telerik Blazor Diagram component, activated when the user clicks on it

Once we have our main container, let’s see how to add figures to it.

Adding Shapes to the Diagram Component for Blazor

To add shapes in Blazor, you should know some of the Shapes parameters:

  • Id: To identify the shapes and be able to relate them
  • Type: Indicates the shape type
  • Width and Height: Specify the size in pixels, with the default value being 100.
  • X and Y: Allow placing a shape at an exact position.
  • Path: Allows specifying a custom shape

To add Shapes to the diagram you must define the collection of shapes through the tag DiagramShapes, adding to the collection a set of elements DiagramShape, specifying the characteristics of each shape.

Since in our current example we have not defined a Diagram layout (which we will see later), we can use the parameters X and Y to define some positions, as shown below:

<TelerikDiagram Height="500px" Zoom="0.8">
    <DiagramShapes>
        <DiagramShape Id="shape1"
                      Type="@DiagramShapeType.Circle"
                      X="10" Y="10" />
        <DiagramShape Id="shape2"
                      Type="@DiagramShapeType.Process"
                      X="100" Y="100" />
        <DiagramShape Id="shape3"
                      Type="@DiagramShapeType.Document"
                      X="200" Y="200" />
        <DiagramShape Id="shape4"
                      Type="@DiagramShapeType.Display"
                      X="300" Y="300" />
        <DiagramShape Id="shape5"
                      Type="@DiagramShapeType.Merge"
                      X="400" Y="400" />
    </DiagramShapes>
</TelerikDiagram>

In the previous code, you could see that DiagramShapeType is an enumeration with all the available shape types, which at the time of writing this article has 28 shapes available, including shapes of Image and Text. The previous code gives us the following rendering:

The Blazor Diagram component showcasing different shapes

In the figure above, you can see that the shapes are displayed at the specified positions, and we can also move them as we wish.

Creating Connections Between Shapes

A feature that diagram-type controls should undoubtedly have is connections between shapes. Although users can create these connections automatically, it is also possible to create them from code. For this, the tag DiagramConnections must be declared, which is a list that we must fill with tags of the type DiagramConnection, each of which can have the following parameters:

  • FromId and ToId: These are the identifiers that will relate the connection
  • Type: Determines the type of connection (either DiagramConnectionType.Cascading or DiagramConnectionType.Polyline)
  • Cap: Determines the type of cap that will appear on the figure (options: DiagramConnectionsEndCapType.ArrowEnd, DiagramConnectionsEndCapType.FilledCircle or DiagramConnectionsEndCapType.None)

You can see an example of creating these relationships in the following example:

<TelerikDiagram Height="500px" Zoom="0.8">
    ...
    <DiagramConnections>
        <DiagramConnection
            FromId="shape1"
            ToId="shape2"
            Type="DiagramConnectionType.Cascading" />
        <DiagramConnection
            FromId="shape2"
            ToId="shape3"
            Type="DiagramConnectionType.Polyline" />
        <DiagramConnection
            FromId="shape3"
            ToId="shape4"
            Type="DiagramConnectionType.Cascading" />
        <DiagramConnection
            FromId="shape4"
            ToId="shape5"
            Type="DiagramConnectionType.Polyline" />
    </DiagramConnections>
</TelerikDiagram>

In the previous code you can see how I mixed the connection types, resulting in the following execution:

Blazor Diagram component displaying predefined connections

In addition to the previous parameters, it is also possible to define a Cap through the tags DiagramConnectionStartCap and DiagramConnectionEndCap, as well as a Selection Handle through the tag DiagramConnectionSelection. Below you can see an example of its configuration:

<TelerikDiagram Height="500px" Zoom="0.8">
    ...

    <DiagramConnections>
        <DiagramConnection FromId="shape1"
                           ToId="shape5"
                           Type="DiagramConnectionType.Cascading">
            <DiagramConnectionEndCap Type="@DiagramConnectionsEndCapType.ArrowStart" />
            <DiagramConnectionStartCap Type="@DiagramConnectionsStartCapType.FilledCircle" />
        </DiagramConnection>
        <DiagramConnection FromId="shape3"
                           ToId="shape4"
                           Type="DiagramConnectionType.Polyline">
            <DiagramConnectionSelection>
                <DiagramConnectionSelectionHandles Height="16" Width="16">
                    <DiagramConnectionSelectionHandlesFill Color="lime" />
                    <DiagramConnectionSelectionHandlesStroke Color="green" />
                </DiagramConnectionSelectionHandles>
            </DiagramConnectionSelection>
        </DiagramConnection>
    </DiagramConnections>
</TelerikDiagram>

Running the application gives us the following result:

Diagram component demonstrating the use of Caps and Selection Handles in relationships between shapes

In the previous image, you can notice the use of Cap on the line that goes from the circle shape to the triangle shape, while the Selection Handle is active when the relationship between the shapes Document and Display is selected.

Setting a Layout in the Diagram

Once we know the elements we can use in the Diagram component, it’s time to talk about the predefined Layouts you can use so you don’t have to manually arrange the shapes. There are three main Layouts:

  • Tree Layout: Allows distributing the shapes in a hierarchical form
  • Layered Layout: Distributes the shapes focusing on a horizontal or vertical flow, minimizing distance between shapes, connection lengths and crossings between shapes
  • Force Layout: Enables a distribution where it seems each shape is connected by invisible springs that push or pull the shapes until they reach an equilibrium position. Note that each run with this configuration will produce a different distribution every time

To use one of these layouts, you must use the tag DiagramLayout specifying the type, and it is also recommended to remove the use of the parameters X and Y as shown below:

<TelerikDiagram Height="500px" Zoom="0.8">

    <DiagramLayout Type="@DiagramLayoutType.Tree"  />

    <DiagramShapes>
        <DiagramShape Id="shape1"/>
        <DiagramShape Id="shape2"/>
        <DiagramShape Id="shape3"/>
        <DiagramShape Id="shape4"/>
        <DiagramShape Id="shape5" />
        <DiagramShape Id="shape6" />
    </DiagramShapes>

    <DiagramConnections>
        <DiagramConnection FromId="shape1" ToId="shape2" />
        <DiagramConnection FromId="shape1" ToId="shape3" />
        <DiagramConnection FromId="shape3" ToId="shape4" />
        <DiagramConnection FromId="shape4" ToId="shape5" />
        <DiagramConnection FromId="shape2" ToId="shape6" />
    </DiagramConnections>

</TelerikDiagram>

Aside from the main type for the layout, it is also possible, in the case of the Tree and Layered modes, to specify a Subtype.

For the Tree mode you can use the following values: Down, Left, MindMapHorizontal, MindMapVertical, Radial, Right, TipOver and Up.

For the Layered mode you can use the following values: Down, Left, Right and Up. An example of assigning the Subtype can be seen below:

<DiagramLayout Type="@DiagramLayoutType.Layered"  Subtype="DiagramLayoutSubtype.Up"/>

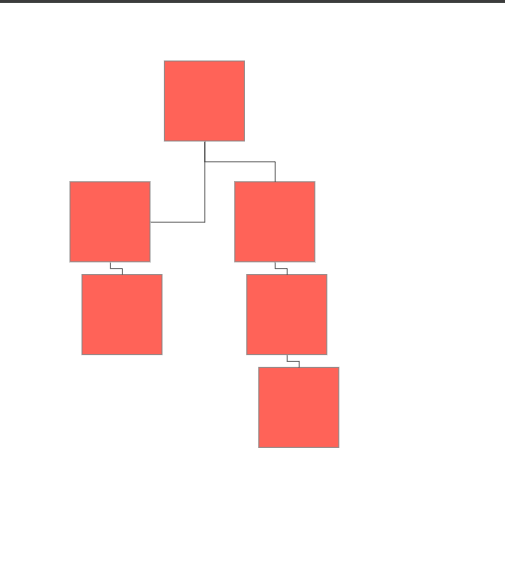
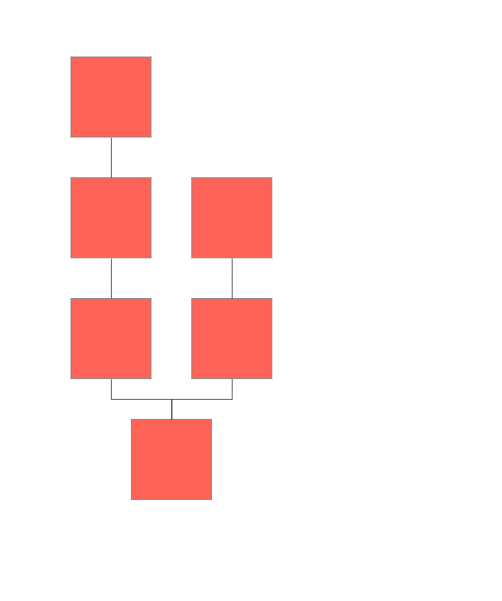
In the following images I show an example of each layout type being rendered:

Tree Layout Sample

Tree Layout example in the Diagram component

Layered Layout Sample

Layered Layout example in the Diagram component

Force Layout Sample

Force Layout example in the Diagram component

Adding Text to Diagram Elements

Another thing you’ll likely want to do when working with diagrams is use text in your diagrams. Let’s start by adding text to shapes. We can do this using the tag DiagramShapeContent, assigning the parameter Text, as shown below:

<DiagramShape Id="shape1">
    <DiagramShapeContent Text="Shape with text" />
</DiagramShape>

The above will add text inside the shape to display it. We also have the shape Text, which has no border or background and occupies minimal space, and we must also use a DiagramShapeContent to define the text:

<DiagramShape Id="shape2" Type="DiagramShapeType.Text">
    <DiagramShapeContent Text="Text Node" Color="black" />
</DiagramShape>

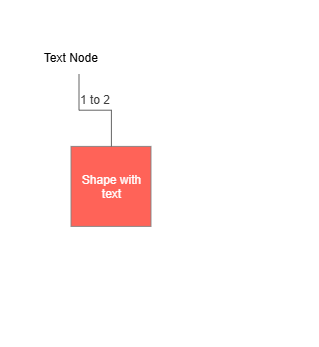
In addition to text on shapes, it’s also possible to add text on connections through the tag DiagramConnectionContent:

<DiagramConnection FromId="shape1" ToId="shape2">
    <DiagramConnectionContent Text="1 to 2" />
</DiagramConnection>

The result of the previous examples gives us the following output:

Diagram component rendering text on shapes and connections

These customization options are undoubtedly very useful when creating diagram-based applications.

Conclusion

Throughout this article you discovered the Diagram component for Telerik Blazor, which you have seen offers many customization options and flexibility to adapt it to your needs.

In this article, I covered the main features of the component, but you also have advanced customization options such as the definition of shapes and connections in JSON, adding styles for shapes and connections, as well as more complex customization through the use of Visual Function.

I invite you to try the component and explore its full potential in your own Blazor-based applications. Telerik UI for Blazor comes with a free 30-day trial.

Try Now

Read the whole story
alvinashcraft
19 minutes ago
reply
Pennsylvania, USA
Share this story
Delete
Next Page of Stories