A USB flash drive is one of those small essentials you reach for from time to time to back up data or transfer files between your Raspberry Pi and substitute computers. For basics like these, it’s tempting to reach for the cheapest thing on Amazon or whatever you find in your local supermarket, but you can easily end up with a device that has sluggish read and write speeds, fragile casing, or – worst of all – far less storage capacity than it claims. Better to go with something you can rely on: introducing the Raspberry Pi Flash Drive, a compact high-capacity USB 3.0 USB‑A device with fast data transfer and an all‑aluminium enclosure. It’s available now at $30 for 128GB, or $55 for 256GB.
We’ve brought our usual exacting standards and attention to detail to our new accessory. It can sustain a write speed of 75MB/s (128GB variant) or 150MB/s (256GB variant), and our thorough testing has made sure it can handle the demands of real life when it comes to sudden disconnection and power failure. Its ergonomic all-aluminium enclosure is easy to grasp and almost impossible to break, although you’ll manage it if, like jdb of this parish, you go at it with a blowtorch. It has an attachment hole so you can keep it on a keyring or similar. The Raspberry Pi logo is etched with classy understatement onto its upper surface.
Fast and robust
Like many high-density NAND flash storage devices, the Raspberry Pi Flash Drive employs a small reservation of pseudo-SLC cache to improve performance under burst-y write workloads. In the background, any writes that were allocated in pSLC are streamed out to the higher-density, but slower, QLC flash. There are significant advantages to doing this: for short periods, the sequential write speed can be almost as fast as USB 3.0 will go.
This cache does, however, make benchmarking challenging. For this reason, the USB 3.0 performance figures we quote are sustained figures, where writes are measured when the cache is forced to do write‑through due to the volume of writes already committed, and reads are measured with the cache empty.
It goes without saying that whatever internal storage arrangement is used, it must be robust against surprise removal or power failure. We verified that our new flash drive meets this requirement over tens of thousands of random power cycles while running intermittently intensive I/O workloads.
Bonus features
In addition to being fast, we made sure that these drives support SSD-style SMART health reporting to help you to manage the device lifespan, as well as supporting TRIM operations. They will also autonomously enter low-power USB 3.0 states when idle.
More handy essentials from Raspberry Pi
Our new flash drive joins a growing range of rigorously specified and robustly tested Raspberry Pi accessories designed to make your day-to-day computing life as friction-free as possible. Raspberry Pi SD Cards and Raspberry Pi SSDs offer you a choice of storage solutions; the four-way Raspberry Pi USB 3 Hub provides an excellent alternative to unsatisfactory price/quality compromises elsewhere; and the Raspberry Pi Bumper is exactly what you need to protect the base and edges of your Raspberry Pi 5, without obstructing access to anything else.
The new Raspberry Pi Flash Drive gives you compact, portable storage with reliable performance for both 128GB and 256GB capacity options. Grab one from a Raspberry Pi Approved Reseller today.
1153. This week, we look at the high-stakes world of Scrabble tournaments with John Chew, head of the North American Scrabble Players Association. We look at the strict etiquette of the tile bag, why professional players count tiles, and how the official word list is managed for competitive play.
The Web Machine Learning Working Group invites implementations of an updated Candidate Recommendation Snapshot of Web Neural Network (WebNN) API. This document describes a dedicated low-level API for neural network inference hardware acceleration. Changes made to this specification since its previous major publication are detailed in the Changes section.
Comments are welcome via Github issues by 22 March 2026.
In my post yesterday about shifting from "why" to "what" questions, I explored how this simple change can transform leadership conversations. Today, I want to focus on one specific question that came up in a related Coaching for Leaders podcast episode with Elizabeth Lotardo:
What have you already tried?
What makes this question so powerful?
When someone comes to you with a problem and you ask, "What have you already tried?" you're sending several key messages simultaneously:
You expect initiative. You're not surprised that they've already taken action—you assume it. This presumption of capability builds confidence.
Experimentation is valued. By asking what they've tried, not what they've done, you're acknowledging that not everything works on the first attempt. And that's okay.
Their attempts matter. Even if their experiments didn't solve the problem, the learning from those attempts is valuable information worth discussing.
The psychological safety connection
This question creates psychological safety in a way few others can. It tells your team member:
"I don't expect you to have all the answers before you start. I expect you to try, learn, and iterate."
Contrast this with common alternatives:
"Have you tried X?" (implies they should have thought of your solution)
"What do you think you should do?" (puts pressure on them to have the right answer)
"Why didn't this work?" (focuses on failure rather than learning)
"What have you already tried?" honors their agency while opening space for collaborative problem-solving.
The immediate impact
Here's what I've noticed when I consistently ask this question:
People come to me earlier in their problem-solving process, not just when they're stuck. They're not afraid to share their failed experiments because they know those attempts are part of the conversation, not evidence of incompetence.
The conversation naturally shifts from me solving their problem to us building on what they've learned. I might say, "Interesting that approach X didn't work—what did that tell you?" or "You've tried A and B—what feels like the next logical experiment?"
Asking this question consistently helps you (re)shape your organizational culture.
Your homework
So, when someone brings you a challenge, resist the urge to immediately offer solutions or ask what they think they should do. Instead, try: "What have you already tried?"
Then listen. Really listen to what they've learned. Build from there.
You might be surprised at how much problem-solving has already happened—and how much permission this simple question gives your team to keep experimenting.
## 1 Architectural Foundations of Modern Webhook Systems
Webhook systems look simple from the outside—“send an HTTP POST when something changes.” In practice, that mental model breaks down quickly once you introduce retries, failures, and real production traffic. A webhook system is not just an HTTP call; it is a distributed delivery mechanism with durability, ordering, and trust requirements. If the architecture does not reflect that, problems surface early and are hard to fix later.
This section lays out the core architectural decisions that make webhook delivery predictable, observable, and safe in an ASP.NET Core environment.
### 1.1 Beyond the HTTP POST: Why simple implementations fail at scale
The most common first implementation sends an HTTP POST directly from a controller or domain service when an event occurs. That approach works for demos and low-volume internal tools. It fails as soon as traffic increases or subscribers become unreliable.
The first issue is tight coupling. When webhook delivery happens inline with the request that triggered it, the producer’s performance is now dependent on the subscriber’s availability. A slow or failing endpoint directly slows down your API. Retrying inline makes this worse by blocking threads and increasing request latency.
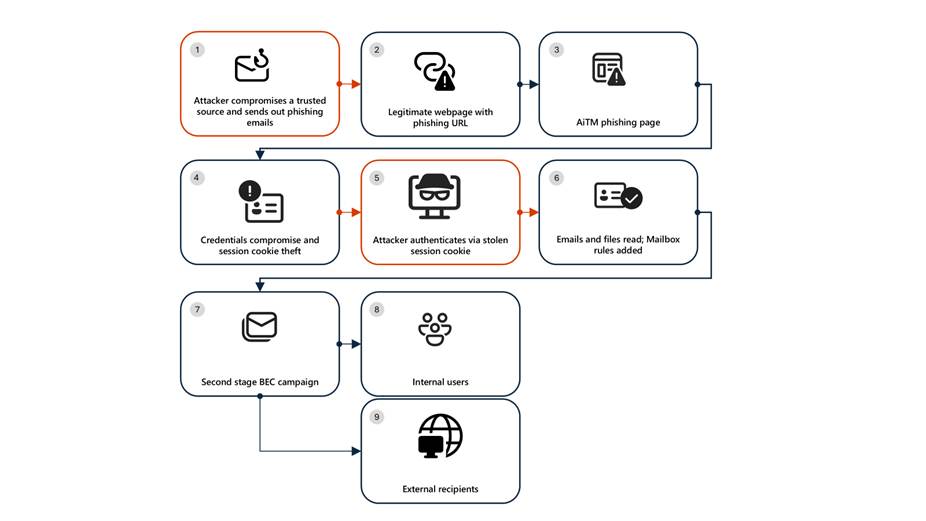
Microsoft Defender Researchers uncovered a multi‑stage adversary‑in‑the‑middle (AiTM) phishing and business email compromise (BEC) campaign targeting multiple organizations in the energy sector, resulting in the compromise of various user accounts. The campaign abused SharePoint file‑sharing services to deliver phishing payloads and relied on inbox rule creation to maintain persistence and evade user awareness. The attack transitioned into a series of AiTM attacks and follow-on BEC activity spanning multiple organizations.
Following the initial compromise, the attackers leveraged trusted internal identities from the target to conduct large‑scale intra‑organizational and external phishing, significantly expanding the scope of the campaign. Defender detections surfaced the activity to all affected organizations.
This attack demonstrates the operational complexity of AiTM campaigns and the need for remediation beyond standard identity compromise responses. Password resets alone are insufficient. Impacted organizations in the energy sector must additionally revoke active session cookies and remove attacker-created inbox rules used to evade detection.
Attack chain: AiTM phishing attack
Stage 1: Initial access via trusted vendor compromise
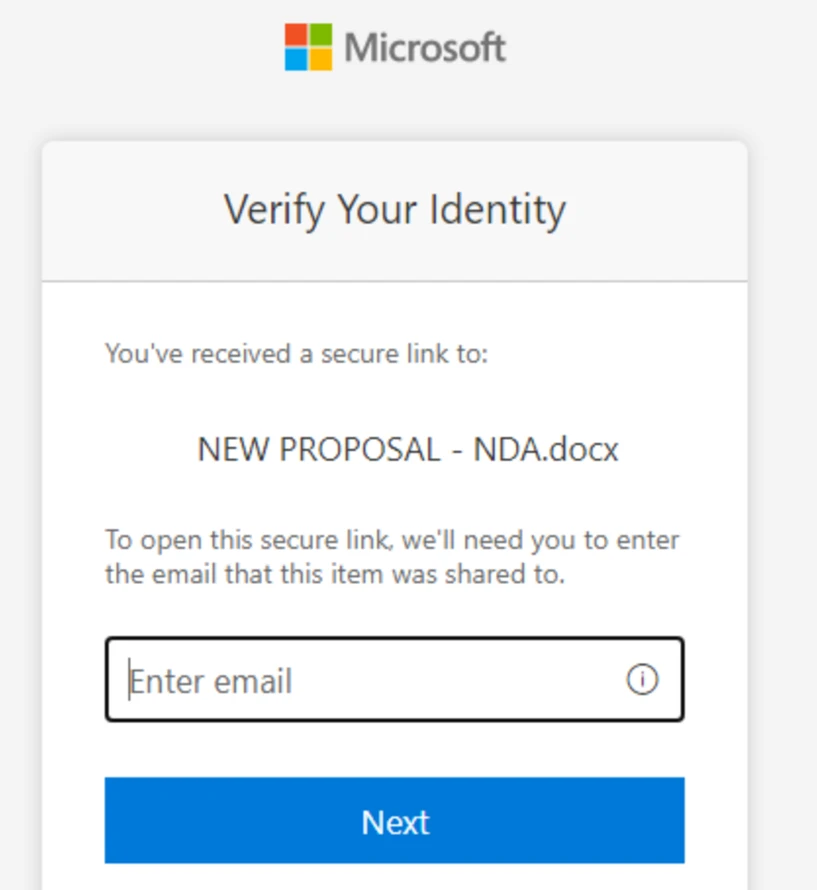
Analysis of the initial access vector indicates that the campaign leveraged a phishing email sent from an email address belonging to a trusted organization, likely compromised before the operation began. The lure employed a SharePoint URL requiring user authentication and used subject‑line mimicry consistent with legitimate SharePoint document‑sharing workflows to increase credibility.
Threat actors continue to leverage trusted cloud collaboration platforms particularly Microsoft SharePoint and OneDrive due to their ubiquity in enterprise environments. These services offer built‑in legitimacy, flexible file‑hosting capabilities, and authentication flows that adversaries can repurpose to obscure malicious intent. This widespread familiarity enables attackers to deliver phishing links and hosted payloads that frequently evade traditional email‑centric detection mechanisms.
Stage 2: Malicious URL clicks
Threat actors often abuse legitimate services and brands to avoid detection. In this scenario, we observed that the attacker leveraged the SharePoint service for the phishing campaign. While threat actors may attempt to abuse widely trusted platforms, Microsoft continuously invests in safeguards, detections, and abuse prevention to limit misuse of our services and to rapidly detect and disrupt malicious activity
Stage 3: AiTM attack
Access to the URL redirected users to a credential prompt, but visibility into the attack flow did not extend beyond the landing page.
Stage 4: Inbox rule creation
The attacker later signed in with another IP address and created an Inbox rule with parameters to delete all incoming emails on the user’s mailbox and marked all the emails as read.
Stage 5: Phishing campaign
Followed by Inbox rule creation, the attacker initiated a large-scale phishing campaign involving more than 600 emails with another phishing URL. The emails were sent to the compromised user’s contacts, both within and outside of the organization, as well as distribution lists. The recipients were identified based on the recent email threads in the compromised user’s inbox.
Stage 6: BEC tactics
The attacker then monitored the victim user’s mailbox for undelivered and out of office emails and deleted them from the Archive folder. The attacker read the emails from the recipients who raised questions regarding the authenticity of the phishing email and responded, possibly to falsely confirm that the email is legitimate. The emails and responses were then deleted from the mailbox. These techniques are common in any BEC attacks and are intended to keep the victim unaware of the attacker’s operations, thus helping in persistence.
Stage 7: Accounts compromise
The recipients of the phishing emails from within the organization who clicked on the malicious URL were also targeted by another AiTM attack. Microsoft Defender Experts identified all compromised users based on the landing IP and the sign-in IP patterns.
Mitigation and protection guidance
Microsoft Defender XDR detects suspicious activities related to AiTM phishing attacks and their follow-on activities, such as sign-in attempts on multiple accounts and creation of malicious rules on compromised accounts. To further protect themselves from similar attacks, organizations should also consider complementing MFA with conditional access policies, where sign-in requests are evaluated using additional identity-driven signals like user or group membership, IP location information, and device status, among others.
Defender Experts also initiated rapid response with Microsoft Defender XDR to contain the attack including:
Automatically disrupting the AiTM attack on behalf of the impacted users based on the signals observed in the campaign.
Initiating zero-hour auto purge (ZAP) in Microsoft Defender XDR to find and take automated actions on the emails that are a part of the phishing campaign.
Defender Experts further worked with customers to remediate compromised identities through the following recommendations:
Revoking the MFA setting changes made by the attacker on the compromised user’s accounts.
Deleting suspicious rules created on the compromised accounts.
Mitigating AiTM phishing attacks
The general remediation measure for any identity compromise is to reset the password for the compromised user. However, in AiTM attacks, since the sign-in session is compromised, password reset is not an effective solution. Additionally, even if the compromised user’s password is reset and sessions are revoked, the attacker can set up persistence methods to sign-in in a controlled manner by tampering with MFA. For instance, the attacker can add a new MFA policy to sign in with a one-time password (OTP) sent to attacker’s registered mobile number. With these persistence mechanisms in place, the attacker can have control over the victim’s account despite conventional remediation measures.
While AiTM phishing attempts to circumvent MFA, implementation of MFA still remains an essential pillar in identity security and highly effective at stopping a wide variety of threats. MFA is the reason that threat actors developed the AiTM session cookie theft technique in the first place. Organizations are advised to work with their identity provider to ensure security controls like MFA are in place. Microsoft customers can implement MFA through various methods, such as using the Microsoft Authenticator, FIDO2 security keys, and certificate-based authentication.
Defenders can also complement MFA with the following solutions and best practices to further protect their organizations from such attacks:
Use security defaults as a baseline set of policies to improve identity security posture. For more granular control, enable conditional access policies, especially risk-based access policies. Conditional access policies evaluate sign-in requests using additional identity-driven signals like user or group membership, IP location information, and device status, among others, and are enforced for suspicious sign-ins. Organizations can protect themselves from attacks that leverage stolen credentials by enabling policies such as compliant devices, trusted IP address requirements, or risk-based policies with proper access control.
Continuously monitor suspicious or anomalous activities. Hunt for sign-in attempts with suspicious characteristics (for example, location, ISP, user agent, and use of anonymizer services).
Detections
Because AiTM phishing attacks are complex threats, they require solutions that leverage signals from multiple sources. Microsoft Defender XDR uses its cross-domain visibility to detect malicious activities related to AiTM, such as session cookie theft and attempts to use stolen cookies for signing in.
Using Microsoft Defender for Cloud Apps connectors, Microsoft Defender XDR raises AiTM-related alerts in multiple scenarios. For Microsoft Entra ID customers using Microsoft Edge, attempts by attackers to replay session cookies to access cloud applications are detected by Defender for Cloud Apps connectors for Microsoft 365 and Azure. In such scenarios, Microsoft Defender XDR raises the following alert:
Stolen session cookie was used
In addition, signals from these Defender for Cloud Apps connectors, combined with data from the Defender for Endpoint network protection capabilities, also triggers the following Microsoft Defender XDR alert on Microsoft Entra ID. environments:
Possible AiTM phishing attempt
A specific Defender for Cloud Apps connector for Okta, together with Defender for Endpoint, also helps detect AiTM attacks on Okta accounts using the following alert:
Possible AiTM phishing attempt in Okta
Other detections that show potentially related activity are the following:
Microsoft Defender for Office 365
Email messages containing malicious file removed after delivery
Email messages from a campaign removed after delivery
A potentially malicious URL click was detected
A user clicked through to a potentially malicious URL
Suspicious email sending patterns detected
Microsoft Defender for Cloud Apps
Suspicious inbox manipulation rule
Impossible travel activity
Activity from infrequent country
Suspicious email deletion activity
Microsoft Entra ID Protection
Anomalous Token
Unfamiliar sign-in properties
Unfamiliar sign-in properties for session cookies
Microsoft Defender XDR
BEC-related credential harvesting attack
Suspicious phishing emails sent by BEC-related user
Indicators of Compromise
Network Indicators
178.130.46.8 – Attacker infrastructure
193.36.221.10 – Attacker infrastructure
Recommended actions
Microsoft recommends the following mitigations to reduce the impact of this threat:
Enable Conditional Access policies in Microsoft Entra, especially risk-based access policies. Conditional access policies evaluate sign-in requests using additional identity-driven signals like user or group membership, IP address location information, and device status, among others, are enforced for suspicious sign-ins. Organizations can protect themselves from attacks that leverage stolen credentials by enabling policies such as compliant devices, Azure trusted IP address requirements, or risk-based policies with proper access control. If you are still evaluating Conditional Access, use security defaults as an initial baseline set of policies to improve identity security posture.
Leverage Microsoft Edge automatically identify and block malicious websites, including those used in this phishing campaign, and Microsoft Defender for Office 365 to detect and block malicious emails, links, and files. Monitor suspicious or anomalous activities in Microsoft Entra ID Protection. Investigate sign-in attempts with suspicious characteristics (such as the location, ISP, user agent, and use of anonymizer services). Educate users about the risks of secure file sharing and emails from trusted vendors.
Hunting queries – Microsoft XDR
AHQ#1 – Phishing Campaign:
EmailEvents
| where Subject has “NEW PROPOSAL – NDA”
AHQ#2 – Sign-in activity from the suspicious IP Addresses
AADSignInEventsBeta
| where Timestamp >= ago(7d)
| where IPAddress startswith “178.130.46.” or IPAddress startswith “193.36.221.”
Microsoft Sentinel
Microsoft Sentinel customers can use the following analytic templates to find BEC related activities similar to those described in this post:
In addition to the analytic templates listed above, Microsoft Sentinel customers can use the following hunting content to perform Hunts for BEC related activities: