Sr. Content Developer at Microsoft, working remotely in PA, TechBash conference organizer, former Microsoft MVP, Husband, Dad and Geek.
151452 stories
·
33 followers

Microsoft wants you to use Windows 11 File Explorer for viewing Android phone’s photos, not Phone Link app. No iPhone support for now

1 Share

Microsoft has finally confirmed what Windows Latest reported several weeks ago: Windows 11’s Phone Link’s Photos section will stop working in the coming days if it hasn’t already, and you’ll need to use File Explorer to view pictures and other media stored on your Android phone. Sadly, you still cannot connect an iPhone to view its Gallery.

Mobile device in File Explorer sidebar

File Explorer’s Android integration is not exactly new because Windows Latest spotted it almost a year ago, but it has barely improved over the past several months. In fact, you might still run into frequent sync problems, where File Explorer is always stuck at “syncing,” and if it does sync, your photos will not be arranged in the same way as the Phone Link app.

Syncing in File Explorer for Android Gallery

If you don’t see your mobile device in the left sidebar of File Explorer, make sure it’s toggled on in Settings > Bluetooth & Devices > Mobile devices > Manage mobile devices.

Show mobile device in File Explorer toggle

However, the poor File Explorer and Android connection wasn’t exactly an issue because you had the Phone Link app, which gives near-instant access to the Photos app on your Android. At the same time, you could still use File Explorer for advanced stuff, such as accessing a particular media folder for viewing photos or even videos.

Sadly, Microsoft no longer wants to maintain ‘syncing’ of media across two places – Phone Link and File Explorer. Windows Latest recently found that the “Photos” section in the Phone Link app is being shut down, and Microsoft wants you to use File Explorer instead.

In an update to its support document spotted by Windows Latest, Microsoft has now confirmed “Photos feature moved from Phone Link to File Explorer.

Photos is moving to File Explorer

While it says the Photos feature has already been moved from Phone Link to File Explorer, I still have it in the Phone Link app. Given the past trends, I would not be surprised if the Phone Link’s photos feature disappears out of the blue moon on a random day, so you should get used to File Explorer integration if you have not already.

With this change, Microsoft says it’s improving “consistency,” which was a “long-requested feature.”

Why is Microsoft moving the Photos section in the Phone Link app to File Explorer?

Microsoft says it’s moving the Photos feature from the Phone Link app to File Explorer as part of its efforts to “provide a better and more consistent experience” and unlock support for all users, which is probably the only interesting support coming from Microsoft.

Unlike the Phone Link app, which is not supposed to work with all Android phones, File Explorer’s integration does not have a specific requirement. Microsoft also says it’ll offer “improved capabilities,” but I beg to differ. Phone Link app’s Photos section has a couple of advantages that I prefer over File Explorer.

Android storage for media in File Explorer

Microsoft Phone Link’s Photos section does two things better. First, it is more reliable, as images show up almost instantly. If they do not sync, you can tap the Refresh button. The sync usually completes in less than a minute, unlike File Explorer, which can take several minutes.

Second, Phone Link’s Photos section shows all your photos in one place. This includes screenshots, camera roll, WhatsApp, and even Telegram images. More importantly, your new photos automatically appear at the top of the list, and you don’t have to hunt for them.

Android gallery in File Explorer

File Explorer also has access to these folders and even to most other folders on your phone that the Phone Link app does not. However, images are inside individual folders, and the experience feels similar to connecting a phone to a PC using a USB cable. That means you cannot instantly find recent photos saved on your mobile unless you know the folder name.

While the Phone Link app keeps all photos in one simple view, File Explorer makes things more complicated and breaks the simplicity of the older integration.

What do you think? Let me know in the comments below.

The post Microsoft wants you to use Windows 11 File Explorer for viewing Android phone’s photos, not Phone Link app. No iPhone support for now appeared first on Windows Latest

Read the whole story
alvinashcraft
24 minutes ago
reply
Pennsylvania, USA
Share this story
Delete

123: Ford’s $19B Electric Truck Retreat: What It Means For EVs In The US

1 Share
In this episode:
· Ford kills its full-size electric trucks, developing an eREV replacement
· Kyle drives the new Mercedes CLA
· Europe ending its 2035 ban on ICE 
· Much much more


Download audio: https://dts.podtrac.com/redirect.mp3/audioboom.com/posts/8821990.mp3?modified=1766210765&sid=5141110&source=rss
Read the whole story
alvinashcraft
25 minutes ago
reply
Pennsylvania, USA
Share this story
Delete

IoT Coffee Talk: Episode 292 - "6th Annual Christmas Special" (The Lump of Coal of Invention)

1 Share
From: Iot Coffee Talk
Duration: 59:19
Views: 956

Welcome to IoT Coffee Talk, where hype comes to die a terrible death. We have a fireside chat about all things #IoT over a cup of coffee or two with some of the industry's leading business minds, thought leaders and technologists in a totally unscripted, organic format.

This week Rob, Alistair, Dimitri, Marc, Pete, and Leonard jump on Web3 to host a discussion about:

🎶 🎙️ BAD KARAOKE! 🎸 🥁 Merry Christmas to You" an IoT Coffee Talk original composition
🐣 Wishing the world a Happy Christmas and a Merry New Year!
🐣 IoT legend, Alistair Fulton, finally joins IoT Coffee Talk live!
🐣 Do IoT and tech startups have the wrong attitude?
🐣 Alistair reminds us off the massive Gap of the Ugly that is a telco's tech portfolio.
🐣 Is MCP the magic that will eliminate all systems integration and APIs in the universe?
🐣 The money game - the Gap of the Ugly. Where Bill Pugh lives and breathes.
🐣 Why is old stuff so scalable, resilient, and performant?
🐣 The art of screwing things up and getting things wrong - by Alistair Fulton
🐣 The root of bad tech policy.
🐣 The threat of a Chinese tech leapfrog!
🐣 The data dung problem that is fueled by AI slop.
🐣 Is Harvard the new Hollywood Blvd for the GenAI Jay Walk?
🐣 Should "Classic Interpretation of Idiocracy" become required coursework in college?

It's a great episode. Grab an extraordinarily expensive latte at your local coffee shop and check out the whole thing. You will get all you need to survive another week in the world of IoT and greater tech!

Tune in! Like! Share! Comment and share your thoughts on IoT Coffee Talk, the greatest weekly assembly of Onalytica and CBT tech and IoT influencers on the planet!!

If you are interested in sponsoring an episode, please contact Stephanie Atkinson at Elevate Communities. Just make a minimally required donation to www.elevatecommunities.org and you can jump on and hang with the gang and amplify your brand on one of the top IoT/Tech podcasts in the known metaverse!!!

Take IoT Coffee Talk on the road with you on your favorite podcast platform. Go to IoT Coffee Talk on Buzzsprout, like, subscribe, and share: https://lnkd.in/gyuhNZ62

Read the whole story
alvinashcraft
25 minutes ago
reply
Pennsylvania, USA
Share this story
Delete

Tech Talk: Improving Window Resize Behavior

1 Share

We're launching a new blog post series where we share glimpses into our work on Electron. If you find this work interesting, please consider contributing!


Recently, I worked on improving Electron and Chromium's window resize behavior.

The bug

We were seeing an issue on Windows where old frames would become visible while resizing a window:

Animated GIF showing the issue where old frames would be shown while resizing windows

What made this bug particularly interesting?

  1. It was challenging.
  2. It was deep in a large codebase.
  3. As you'll see later, there were two different bugs under the hood.

Fixing the bug

With a bug like this, the first challenge is figuring out where to start looking.

Electron builds upon Chromium, the open source version of Google Chrome. When compiling Electron, Electron's source code is added into the Chromium source tree as a subdirectory. Electron then relies on Chromium's code to provide most of the functionality of a modern browser.

Chromium has about 36 million lines of code. Electron is a large project, too. That is a lot of code that could be causing this issue.

Narrowing down the root cause

I did a lot of experimentation.

First, I noticed that the issue occurred in Google Chrome, too:

Screenshot of Google Chrome also showing the resize issue

This suggested that the issue was likely in Chromium, not in Electron.

Additionally, the issue was not visible on macOS. That suggested that it was in Windows-specific source code.

The crucial lead

I tried a lot of different command line flags and configuration options.

I noticed that app.disableHardwareAcceleration() fixed the issue. Without hardware acceleration, the issue was gone.

Here is some context: Chromium supports various different graphics APIs for showing pixels on screen (OpenGL, Vulkan, Metal, and more). On Windows, it uses different graphics APIs than on macOS or Linux. Even on Windows, Chromium can work with multiple different graphics backends.

Which graphics backend Chromium uses depends on the user's hardware. For example, some graphics backends require the computer to have a GPU.

I tried various graphics backends and noticed that the following flags fixed the issue:

  • --use-angle=warp
  • --use-angle=vulkan
  • --use-gl=desktop
  • --use-gl=egl
  • --use-gl=osmesa
  • --use-gl=swiftshader

The following flags reproduced the issue:

  • --use-angle=d3d11 (this is currently the default on Windows)
  • --use-angle=gl (falls back to Direct3D 11 on Windows, see chrome://gpu/)

None of the working flags were good enough to be used as the default in Electron apps on Windows. They were either too slow or lacked broad driver support.

However, these workarounds pointed me into the right direction. They showed that the issue was in a code path that was only used with the ANGLE Direct3D 11 backend.

Direct3D is a Windows API for hardware-accelerated graphics.

ANGLE is a library that translates OpenGL calls into calls to the native graphics API of the given operating system, here Direct3D. ANGLE allows Chromium developers to write OpenGL calls on all platforms. ANGLE then translates them into Direct3D, Vulkan, or Metal API calls, depending on which graphics API is used.

Locating the relevant Chromium component

Chromium references Direct3D in tens of thousands of places. It wasn't realistic to go through all of them.

By chance, I stumbled across a few helpful debugging flags in the Chromium source code:

  • --ui-show-paint-rects
  • --ui-show-property-changed-rects
  • --ui-show-surface-damage-rects
  • --ui-show-composited-layer-borders
  • --tint-composited-content
  • --tint-composited-content-modulate
  • (And more)

They highlight areas of the browser window that were redrawn or updated by different parts of the Chromium graphics stack.

That allowed me to see which part of the graphics stack was producing which output.

In particular, the combination of --tint-composited-content and --tint-composited-content-modulate was really helpful. The former adds a tint to the output of the compositor. The latter changes the tint color on every frame.

Screenshot of Chromium with the --tint-composited-content flag

In the screenshot, the cyan-tinted frame was the last frame that was being drawn.

The jank to the right of that frame was not tinted cyan. It was tinted in different colors that were still there from previous frames. This indicated that the jank was not coming from the compositor. The compositor was sending the right output.

The compositor is part of Chromium's graphics stack. The following is very simplified, but for the purpose of this blog post you can imagine it like this:

  1. The compositor cc produces a CompositorFrame, which contains draw instructions.
  2. cc sends that CompositorFrame to the display compositor viz.
  3. viz then draws the frame and shows it on screen.

Tinting each CompositorFrame showed that the compositor produced the right output. So the issue had to be in the display compositor viz.

Locating the relevant viz code

From there, I started searching for mentions of Direct3D in the viz source code.

Note: From here on, the post will get a bit more technical and reference source code symbols.

I found that on the ANGLE Direct3D 11 backend, Chromium uses the Windows DirectComposition API for drawing the window contents.

Chromium's DirectComposition OutputSurface differs from most other output surfaces in Chromium. It has the capability supports_viewporter (source link 1, source link 2).

An output surface is a bitmap that can be drawn to, often backed by a GPU texture.

Without supports_viewporter, whenever the window size changes, Chromium will create a new output surface matching the new window size. Then it will draw on that surface and show it.

supports_viewporter tries to reduce these costly surface allocations. With supports_viewporter, Chromium will not allocate a new surface on every resize. Instead, it will allocate a surface that is too large for what we need to draw. Then it will only paint to and show a certain sub-rectangle (the "viewport") of that surface on screen. The other parts of the surface are not supposed to be shown on screen.

This is supposed to make resizing more efficient because all Chromium needs to do is pad the surface to the proper width and height instead of allocating a new surface on every resize. This surface resize logic lives in direct_renderer.cc.

Here's what that looks like:
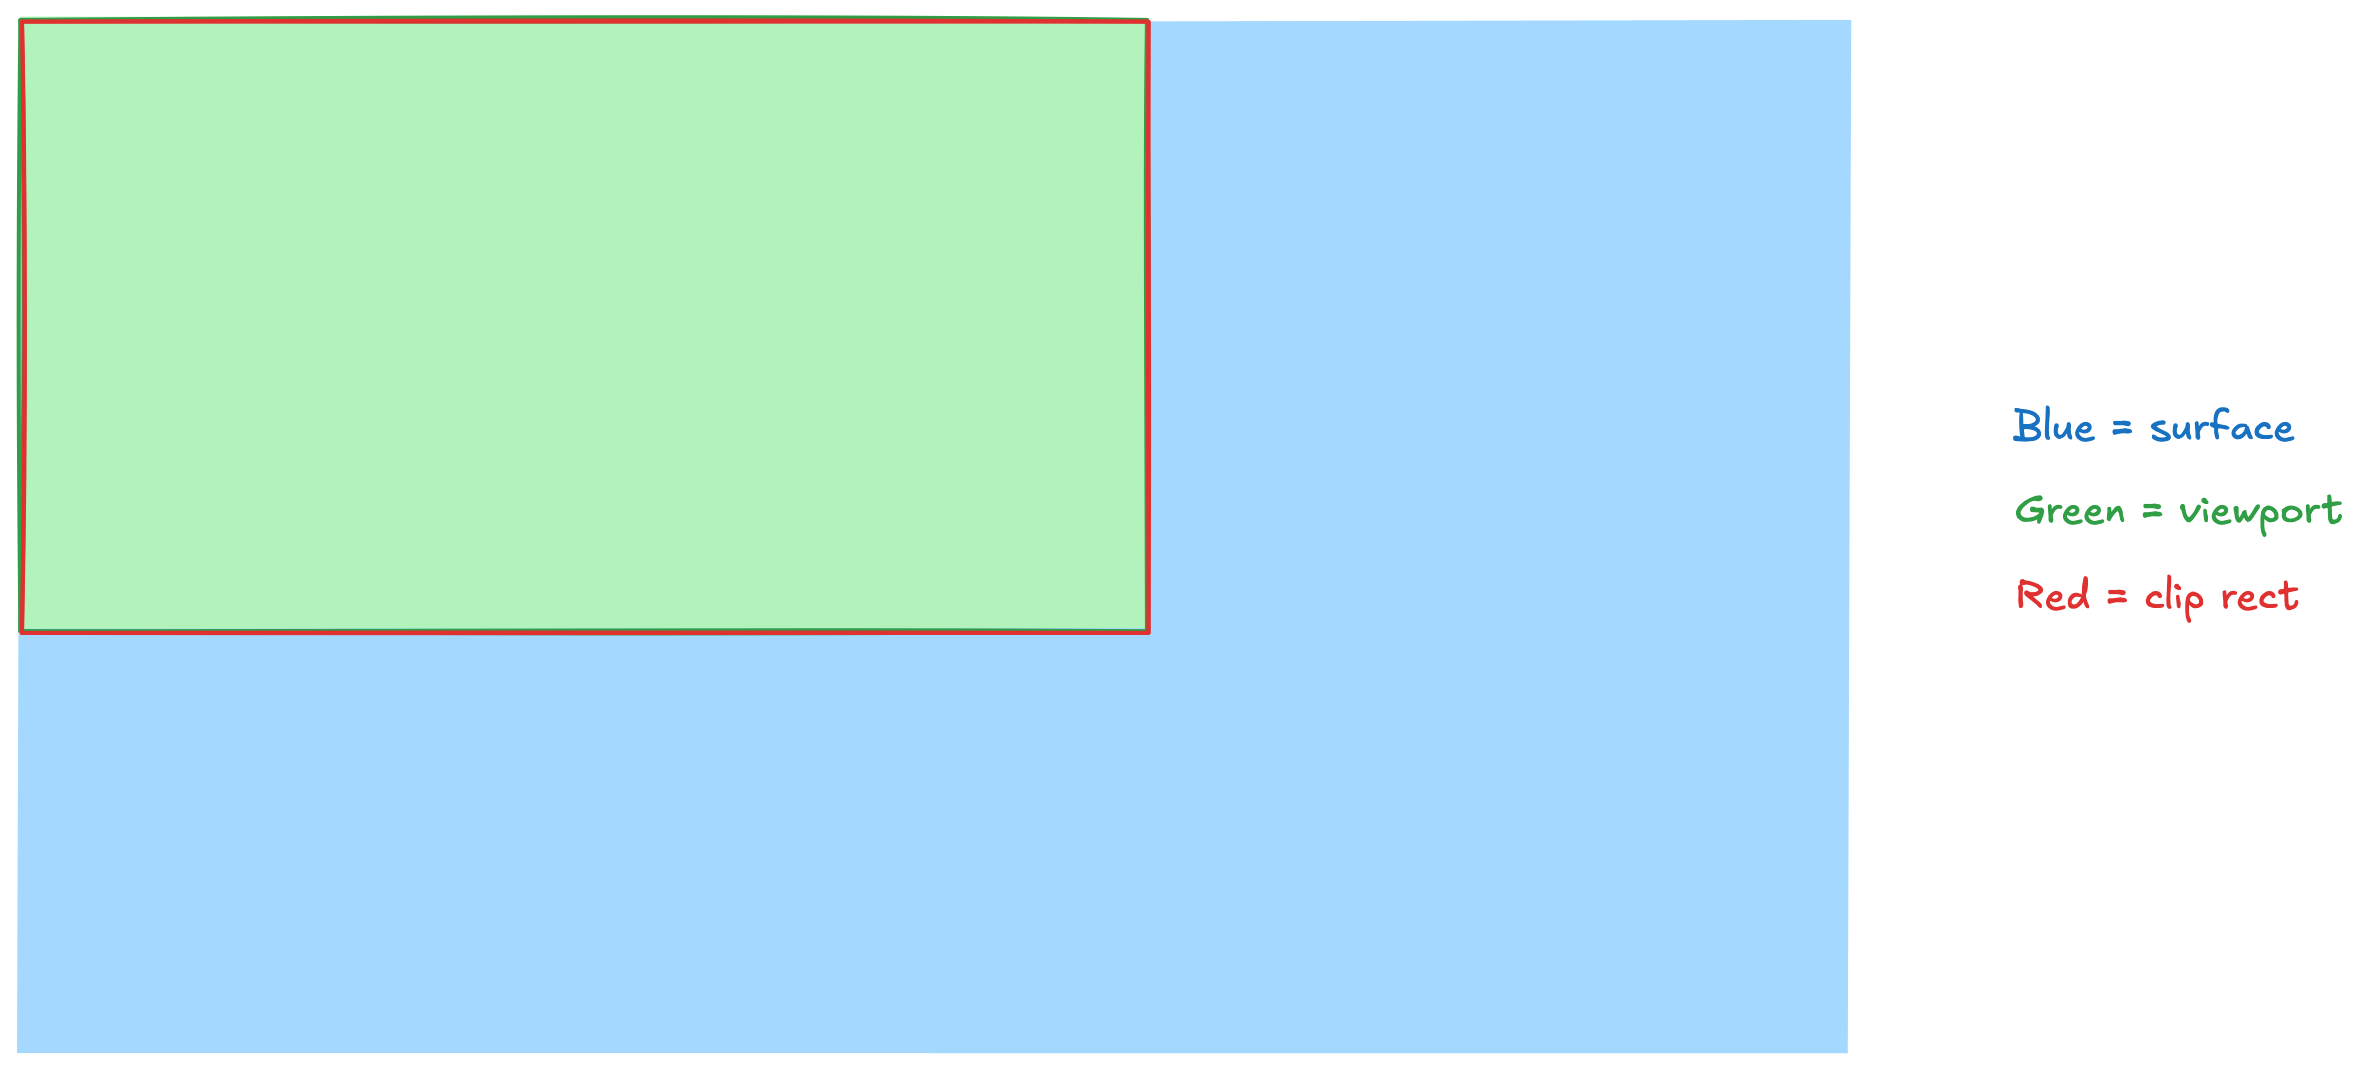
Visualization showing the surface, viewport, and clip rect

Let me explain:

  • The blue rectangle is our surface.
  • The green area is our viewport, i.e., the area of the surface that is supposed to be visible and that we actively draw to.
  • The red rectangle is our clip rect(angle), i.e., the part of the surface that is actually being shown on screen.

As a performance optimization, only the viewport (the green area) is repainted when we get a new frame. The rest is left unchanged. This is important. We only ever repaint the green viewport. We don't update the areas outside of the viewport.

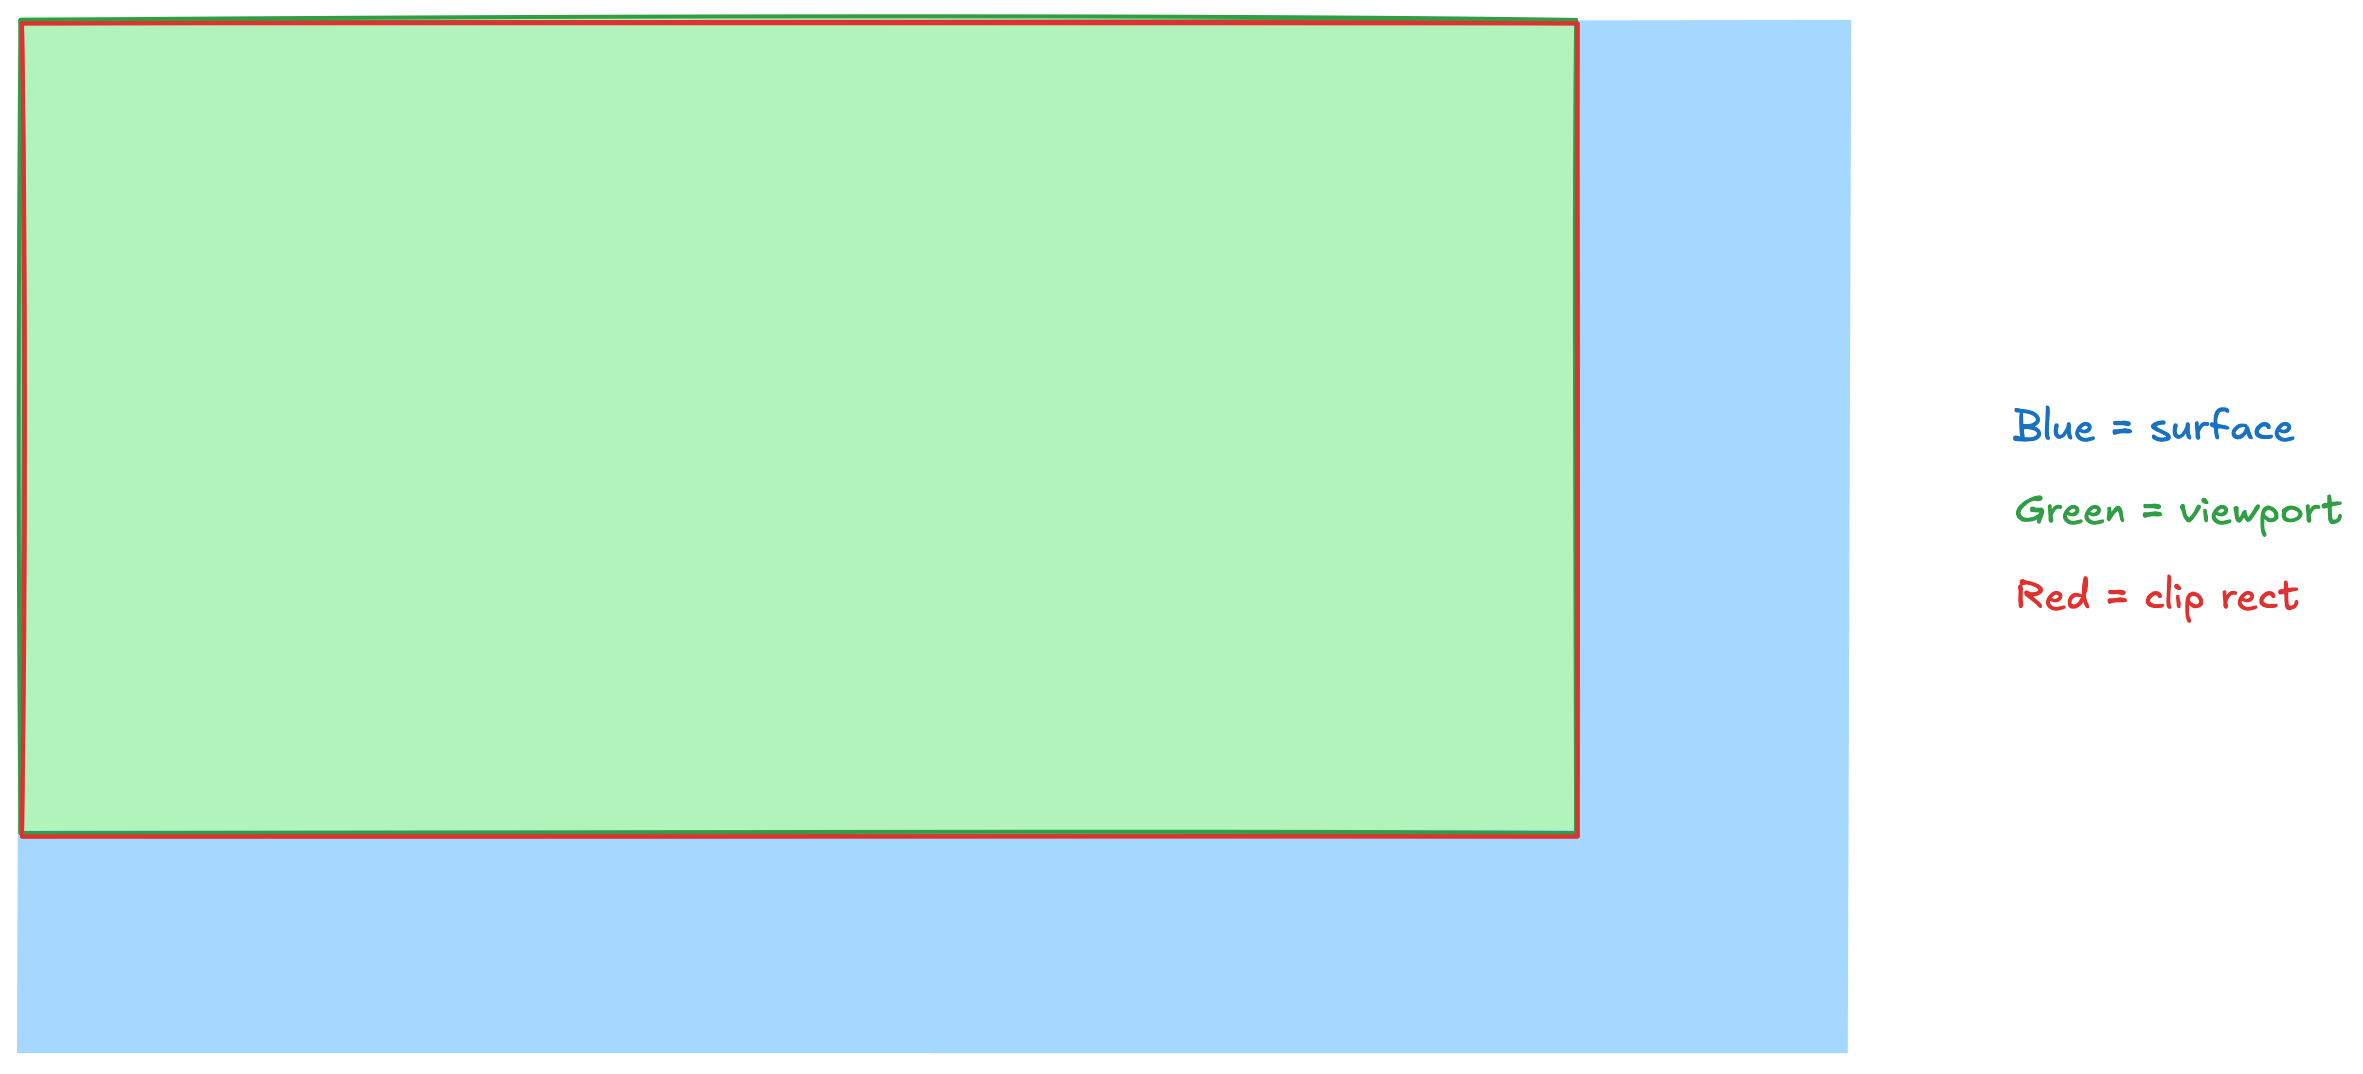
When we resize the window, what's supposed to happen is that in an atomic transaction (= at the exact same time) we repaint the viewport (= the area that's supposed to be visible on screen) and then update the clip rect to clip the surface to the new viewport size.

After the resize, it should look like this:

Visualization with updated viewport and clip rect

And that's where we get to the first of our two bugs.

First bug

Sometimes these operations can get out of sync. For example, the clip rect might get updated before the viewport is repainted. Then we get a result like this:

Visualization where the clip rect was updated before the viewport

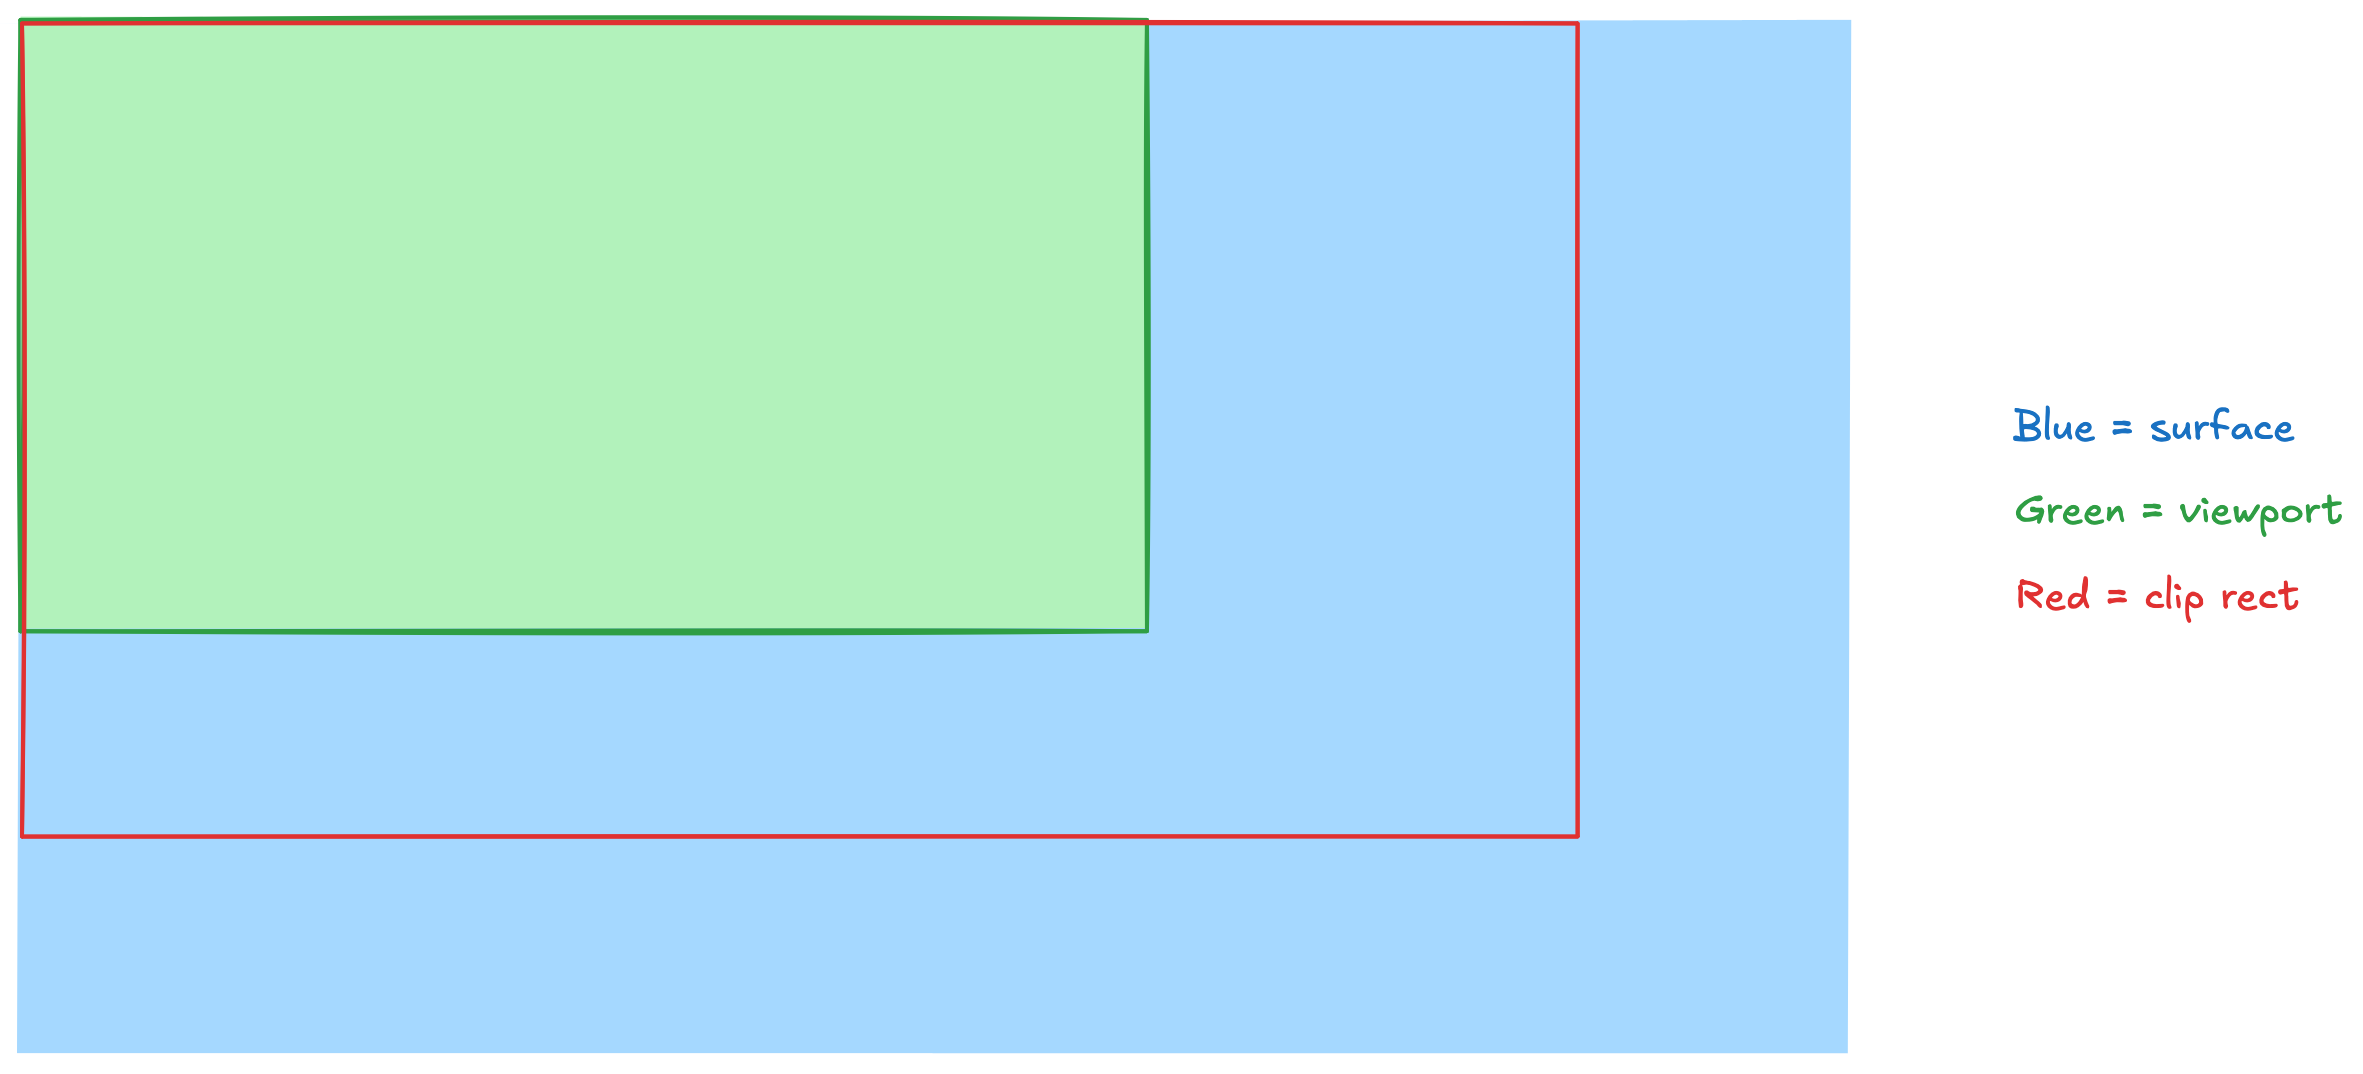
We still show the old frame in the green viewport. But the clip rect has become larger and we show areas of the surface that we haven't repainted yet.

On the first resize of a window, these areas would be black. On the second resize, those areas would be filled with old pixel values. They would show whatever we had previously painted in those areas.

Similarly, in a certain edge case while making the window smaller, we would sometimes repaint the viewport before we would update the clip rect.

Visualization where the viewport was repainted before the clip rect was updated

Then parts of the clip rect would still show the previous frame because the new frame was smaller and we did not repaint any areas beyond the new viewport.

Now why do these operations not happen in sync?

We use two different Windows APIs here:

Here's what's important to understand: both functions return synchronously on the CPU. However, they schedule tasks that run asynchronously on the GPU at a later time. Windows and its services (such as DWM) decide when these tasks will run and in which order. So they take effect asynchronously, and not always within the same frame.

Unfortunately, Windows provides no way for us to synchronize those operations. So I had to find other approaches to fix this.

There were two options that I evaluated with the Chromium maintainers:

  1. While resizing, paint all previously drawn areas outside of the viewport transparent. This makes those areas invisible. It fixes the artifacts.
  2. While resizing, switch from an IDXGISwapChain1 to a DirectComposition surface which synchronizes updates with IDCompositionDevice::Commit. This also fixes the artifacts.

We went with the first option because it leads to faster resizes than the second option.

I landed a patch in Chromium that implemented that first solution.

I also submitted two other patches in preparation for the main patch:

  1. The first one fixed a bug in existing code that would make CI fail in combination with the main patch. It also made launching Electron apps and Chrome a tiny bit faster.
  2. The second one was split off to make code review easier on the main patch.

Second bug

In addition to this first bug, there was a second bug which also led to stale pixels.

Here's what was going on there:

When the user resizes the window, Chromium needs to redraw the contents of the window for the new window size. This takes some time. The new frame isn't ready immediately.

Here's a sequence of frames that demonstrates this:

First frame of the Chromium resize sequence Second frame of the Chromium resize sequence Third frame of the Chromium resize sequence Fourth frame of the Chromium resize sequence Fifth frame of the Chromium resize sequence

At a certain time during the resize, Windows tells us: "The window is 1,000 pixels wide." But the frames that the browser compositor produces are lagging behind. The last frame that we have painted might be 600 pixels wide.

Historically, Chromium used to skip frames where the width of the window did not match the width of the frame that it last painted. It would decide to just not update the window.

However, that would often lead to the window contents not being updated at all until the resize operation was finished.

So in 2015 someone decided: "Why not show these frames? They might not match the window size perfectly, but at least we can show something."

It would lead to gutter, but at that time the gutter was black. So that was better than the previous implementation.

Now, 10 years later with DirectComposition, that gutter was often filled with stale pixels.

Let's look at what was happening there:

Every frame consists of multiple render passes. These render passes represent the various things that should be drawn on screen. From complicated bitmaps to rectangles filled with solid colors.

Every frame has a root render pass, which contains all other render passes and glues them together. (Render passes are arranged in a tree structure and the root render pass is the root of that tree.)

So now during a resize, we'd get to a point where we know the window is 1,000 pixels wide. Accordingly, we'd adjust the viewport of our output surface to also be 1,000 pixels wide. But the frame that we just received is only 600 pixels wide.

The optimization from 2015 would then go and change the width of the root render pass to also be 1,000 pixels. But it wouldn't change what the render passes would actually draw on screen. They'd still only contain instructions to draw a picture that is 600 pixels wide.

Here's what that would look like:

Visualization where the frame is smaller than the viewport

The yellow area is the area in which the render passes of the frame actually drew something. It's 600 pixels wide.

However, our green viewport and our red clip rect are 1,000 pixels wide. That's the area that we show on screen. (After all, the width attribute of the root render pass claimed that it would redraw the full area of 1,000 pixels.)

But because we had no draw instructions for the 400 pixels on the right, those areas didn't get updated.

On the first resize, we'd show black pixels there. (That's the color that we initialize the surface with.)

On subsequent resizes, those areas would show whatever was drawn to them before. We'd see stale pixels.

I landed a fix for this issue in crrev.com/c/7156576.

The fix changes what we do when we receive a frame with a different size than our window. Instead of resizing the frame and adding gutter that contains stale pixels, we resize our viewport and our clip rect.

Visualization where the clip rect and viewport size are adjusted to the frame size

We clip our surface to the size of the frame that we received. We don't show anything beyond the 600 pixels that we have draw instructions for.

Voilà, no more gutter, no more stale pixels!

note

Without supports_viewporter, this would be an expensive operation because it would allocate a new output surface. However, with DirectComposition, we use the "viewporter" feature. So we don't reallocate the surface when we change the viewport size. We just make a different portion of it visible. Thus, it is a cheap operation.

Backporting the patches to Electron

Once the fixes made it into Chromium, we had to pull them into Electron, too.

On the main branch, Electron updates its Chromium version constantly. As a result, the patches were merged into main in a Chromium roll PR.

However, commits that make it into main right now will only be included in an Electron release in about three months. Our existing release and pre-release branches run on older Chromium versions.

Thus, the next step was to backport the patches to Electron 39 and Electron 40.

Electron keeps a list of Chromium patches in the patches/chromium directory. When we backport a Chromium patch, we add it there. When building Electron, these patches are applied to the Chromium source code.

(In general, we try to keep the number of Chromium patches low. Every patch can lead to merge conflicts during Chromium updates. The maintenance burden from patches is real.)

The Electron 39 backport PR was merged pretty quickly. The fix became part of Electron 39.2.6. 🎉

If you resize a window on Electron 39.2.6 or later, you'll see no more stale pixels.

(The patches are also part of Google Chrome Canary. They should be part of a stable Google Chrome release in February 2026.)

Thanks

Big thanks to Plasticity for funding this work!

Thanks to Michael Tang and Vasiliy Telezhnikov from the Chromium team for their help.

Final thoughts

This was the hardest bug I have ever worked on (and I have worked on many hard bugs in 18 years of writing software).

But it was also one of the most fun projects I have ever worked on.

If you found this interesting, please consider contributing to Electron! We love seeing new faces.

Read the whole story
alvinashcraft
25 minutes ago
reply
Pennsylvania, USA
Share this story
Delete

Microsoft Agent Framework: Giving Agents Contextual Memory Using AIContextProvider

1 Share

In earlier blog posts we created a personal trainer agent.  It featured capabilities to process bookings search for and generate high protein recipes by using function tools and custom service classes.

We saw how to implement human develop within the context of a payment scenario.

In this blog post we look at how you can give agents access to memory across conversational threads.

The following is covered:

  • why give your agent memory
  • overview of AI context provider
  • how to persist agent memory
  • how to fetch agent memory
  • creating a function tool to calculate weight loss time
  • serialising agent memory


We also look at events you can subscribe to when working with agent memory. We see how this can be used to give an LLM additional context or to ensure the LLM has all relevant information before processing a prompt.

Code and a demo are included.

Let’s dig in.


~

Why Give Your Agent Memory

When people interact with your agent it can be helpful to persist certain aspects of the conversation.

This might be a person’s name, preferences or core contextual data that you don’t want them to repeat.

Giving you agents memory transforms it from a stateless interaction into a personalise assistant that knows what the person wants to achieve.

Memory can be serialised to a database and reloaded days later, thereby letting a person pickup where they left off -all without having to resupply data they have already shared.  A positive user experience.

Whether you’re building a fitness tracker, project manager, or personal assistant, memory is what turns a simple Q&A system into a stateful system that understands and adapts to each user’s journey.

~

How It Works

To give your agent memory when working with the Microsoft Agent Framework, you do this by using the AIContextProvider class.

This lets you hook into the agent’s lifecycle and maintain state between invocations.

The pattern is straightforward.  You can create custom context providers that remember information about users, persist preferences, or maintain any state your agent needs to function effectively.

The AIContextProvider class gives you two key events:

  • InvokingAsync runs before each agent invocation. This is where you inject context into the request. You can provide additional instructions, tools, or messages that will be merged with the agent’s existing context. If your memory component knows the user’s current weight, you can include that information here so the agent can use it in calculations.


  • InvokedAsync runs after the agent receives a response. This is where you inspect what happened and update your state. In a memory component, this is where you’d extract new information from the conversation to remember for next time.


Use these events to invoke logic before and after your agent invokes the inference service it’s connected to.

~

A Practical Example: Personal Trainer Agent

We can extend our Iron Mind AI personal trainer agent to remembers client details and can calculate weight loss timelines.

Here’s the memory component that tracks the persons name, current weight, and target weight:

  public class ClientDetailsMemory : AIContextProvider
  {   
      private readonly IChatClient _chatClient;
      public ClientDetailsModels UserInfo { get; set; }

      public ClientDetailsMemory(IChatClient chatClient, JsonElement serializedState, JsonSerializerOptions? jsonSerializerOptions = null)
      {
          this._chatClient = chatClient;
          this.UserInfo = serializedState.ValueKind == JsonValueKind.Object ?
              serializedState.Deserialize<ClientDetailsModels>(jsonSerializerOptions)! :
              new ClientDetailsModels();
      }

      public override async ValueTask InvokedAsync(InvokedContext context, CancellationToken cancellationToken = default)
      {
          if ((this.UserInfo.CurrentWeight is null || this.UserInfo.DesiredWeight is null || this.UserInfo.Name is null)
              && context.RequestMessages.Any(x => x.Role == ChatRole.User))
          {
              Console.WriteLine();
              Console.WriteLine();
              Console.ForegroundColor = ConsoleColor.Cyan;
              Console.WriteLine("[INVOKED] Attempting to extract missing user details...");
              Console.WriteLine($"[BEFORE EXTRACTION] Name: '{UserInfo.Name}', Current: '{UserInfo.CurrentWeight}', Desired: '{UserInfo.DesiredWeight}'");
              Console.ResetColor();


              var result = await this._chatClient.GetResponseAsync<ClientDetailsModels>(
                  context.RequestMessages,
                  new ChatOptions()
                  {
                      Instructions = "Extract the user's name, current weight and desired weight from the conversation. " +
                                     "Rules: " +
                                     "1. The FIRST weight mentioned is the current weight. " +
                                     "2. The SECOND weight mentioned is the desired weight. " +
                                     "3. If only one weight is mentioned, it's the current weight. " +
                                     "4. Return empty string or omit the property for values not found. DO NOT return the word 'null'."
                  },
                  cancellationToken: cancellationToken);


              Console.ForegroundColor = ConsoleColor.Magenta;
              Console.WriteLine($"[EXTRACTION RESULT] Name: '{result.Result.Name}', Current: '{result.Result.CurrentWeight}', Desired: '{result.Result.DesiredWeight}'");
              Console.ResetColor();


              // Sanitize: convert "null" string or empty to actual null
              this.UserInfo.CurrentWeight ??= SanitizeValue(result.Result.CurrentWeight);
              this.UserInfo.DesiredWeight ??= SanitizeValue(result.Result.DesiredWeight);
              this.UserInfo.Name ??= SanitizeValue(result.Result.Name);

              Console.ForegroundColor = ConsoleColor.Yellow;
              Console.WriteLine($"[AFTER UPDATE] Name: '{UserInfo.Name}', Current: '{UserInfo.CurrentWeight}', Desired: '{UserInfo.DesiredWeight}'");
              Console.ResetColor();
          }
      }

      private static string? SanitizeValue(string? value)
      {
          if (string.IsNullOrWhiteSpace(value) ||
              value.Equals("null", StringComparison.OrdinalIgnoreCase))
          {
              return null;
          }
          return value.Trim();
      }


      public override ValueTask<AIContext> InvokingAsync(InvokingContext context, CancellationToken cancellationToken = default)
      {
          StringBuilder instructions = new();
          instructions
              .AppendLine(this.UserInfo.CurrentWeight is null ?
                          "Ask the user for their current weight and politely decline to answer any questions until they provide it." :
                          $"The user's current weight is {this.UserInfo.CurrentWeight}.")
              .AppendLine(this.UserInfo.DesiredWeight is null ?
                          "Ask the user for their desired weight and politely decline to answer any questions until they provide it." :
                          $"The user's desired weight is {this.UserInfo.DesiredWeight}.")
              .AppendLine(this.UserInfo.Name is null ?
                          "Ask the user for their name." :
                          $"The user's name is {this.UserInfo.Name}.");

          return new ValueTask<AIContext>(new AIContext
          {
              Instructions = instructions.ToString()
          });
     }

      //Serialization only happens when persistence is needed (e.g., saving to a database or file)
      public override JsonElement Serialize(JsonSerializerOptions? jsonSerializerOptions = null)
      {
          var serialized = JsonSerializer.SerializeToElement(this.UserInfo, jsonSerializerOptions);

          Console.ForegroundColor = ConsoleColor.Magenta;
          Console.WriteLine($"[SERIALIZE CALLED] Returning: {serialized}");
          Console.WriteLine($"[SERIALIZE] Name: '{UserInfo.Name}', Current: '{UserInfo.CurrentWeight}', Desired: '{UserInfo.DesiredWeight}'");
          Console.ResetColor();

          return serialized;
      }
  }


In the above code, several console logs are added to show the invocation of the memory event lifecycle during pre and post LLM inference calls.

The model class is simple:

public class ClientDetailsModels
{
    public string Name { get; set; }
    public string CurrentWeight { get; set; }
    public string DesiredWeight { get; set; }
}


The component uses a separate LLM call to extract structured data from user messages. This structured output approach keeps your memory extraction reliable and type-safe.

~

Adding a Function Tool To Calculate Weight Loss Timeline

The agent also has a function tool that calculates weight loss timelines:

public class PersonalTrainerAgent
{
    [Description("Calculates the time taken to reach target weight")]
    public static DateTime GetTimeToReachWeight([Description("Persons current weight")] int currentKilogram, int targetKilograms)
    {
        const double weeklyWeightLossKg = 0.5;
       
        if (currentKilogram <= targetKilograms)
        {
            throw new ArgumentException("Target weight must be less than current weight.");
        }
      

        int totalWeightToLose = currentKilogram - targetKilograms;
        int weeksNeeded = (int)Math.Ceiling(totalWeightToLose / weeklyWeightLossKg);
       
        return DateTime.Now.AddDays(weeksNeeded * 7);
    }
}


The agent can call this function automatically when users ask about their weight loss timeline.

Our memory component ensures the agent always has access to the user’s current and target weights.  If the user hasn’t already supplied these values, the memory component helps ensure the user supplies them.

~

Wiring It Up

Here’s how you create the agent with memory and tools:

ChatClient chatClient = new OpenAIClient(apiKey)
    .GetChatClient(model);

AIAgent agent = chatClient.CreateAIAgent(new ChatClientAgentOptions()
{
    Name = "IronMind AI",
    ChatOptions = new()
    {
        Instructions = "You are a personal trainer. " +
                      "You can only answer questions related to health, fitness and 5x5 stronglift. " +
                      "Use local function tools",

        Tools = [AIFunctionFactory.Create(PersonalTrainerAgent.GetTimeToReachWeight)]
    },
    AIContextProviderFactory = ctx => new ClientDetailsMemory(
        chatClient.AsIChatClient(),
        ctx.SerializedState,
        ctx.JsonSerializerOptions),
});


The factory gets called every time a thread is created or deserialized. Each thread gets its own memory component instance.

~

Implementing the Chat Loop

Here’s a simple console loop that integrates everything:

private static async Task RunChatLoopWithThreadAsync(AIAgent agent)
     {
         AgentThread agentThread = agent.GetNewThread();

         while (true)
         {
             Console.Write("You: ");
             string? input = Console.ReadLine();
             if (string.IsNullOrWhiteSpace(input) || input.Equals("exit", StringComparison.OrdinalIgnoreCase))
                 break;


             if(input.Equals("save"))
             {
                 // TEST: Explicitly serialize the thread
                 Console.ForegroundColor = ConsoleColor.Cyan;
                 Console.WriteLine("--- Testing Serialization ---");
                 var serializedThread = agentThread.Serialize();
                 Console.WriteLine($"Serialized thread: {serializedThread}");
                 Console.ResetColor();
                 Console.WriteLine();
             }


             UserChatMessage chatMessage = new(input);
             AsyncCollectionResult<StreamingChatCompletionUpdate> completionUpdates =
                 agent.RunStreamingAsync([chatMessage], agentThread);

             Console.ForegroundColor = ConsoleColor.Green;
             Console.Write("IronMind AI: ");

             await foreach (StreamingChatCompletionUpdate completionUpdate in completionUpdates)
             {
                 if (completionUpdate.ContentUpdate.Count > 0)
                 {
                     Console.Write(completionUpdate.ContentUpdate[0].Text);
                 }
             }

             Console.WriteLine();
             Console.ResetColor();
             Console.WriteLine();

             // Access memory after streaming completes
             var memory = agentThread.GetService<ClientDetailsMemory>();

             Console.ForegroundColor = ConsoleColor.Yellow;
             Console.WriteLine("--- Agent Memory Contents ---");
             Console.WriteLine($"Person Name: {memory?.UserInfo?.Name}");
             Console.WriteLine($"Current Weight: {memory?.UserInfo?.CurrentWeight}");
             Console.WriteLine($"Desired Weight: {memory?.UserInfo?.DesiredWeight}");
             Console.WriteLine("-----------------------------");
             Console.ResetColor();
             Console.WriteLine();
         }
     }


You access the memory component via agentThread.GetService<ClientDetailsMemory>().

This lets you inspect or modify the memory state between turns.

~

Persistence

Memory is only useful if it persists. Implement the Serialize method and provide a constructor that accepts a JsonElement:

     //Serialization only happens when persistence is needed (e.g., saving to a database or file)
        public override JsonElement Serialize(JsonSerializerOptions? jsonSerializerOptions = null)
        {
            var serialized = JsonSerializer.SerializeToElement(this.UserInfo, jsonSerializerOptions);

            Console.ForegroundColor = ConsoleColor.Magenta;
            Console.WriteLine($"[SERIALIZE CALLED] Returning: {serialized}");
            Console.WriteLine($"[SERIALIZE] Name: '{UserInfo.Name}', Current: '{UserInfo.CurrentWeight}', Desired: '{UserInfo.DesiredWeight}'");
            Console.ResetColor();

            return serialized;

        }


Our earlier code that captures the input of `save` invokes the above code. i.e.

                if(input.Equals("save"))
                {
                    // Explicitly serialize the thread
                    Console.ForegroundColor = ConsoleColor.Cyan;
                    Console.WriteLine("--- Testing Serialization ---");
                    var serializedThread = agentThread.Serialize();
                    Console.WriteLine($"Serialized thread: {serializedThread}");
                    Console.ResetColor();
                    Console.WriteLine();
                }


When you serialize a thread, the memory state goes with it. When you deserialize that thread later, your memory component comes back with all its state intact.

~

Demo

See a demo of this agent in action here:


Summary

The AIContextProvider pattern gives you a clean way to build stateful agents.

You get lifecycle hooks, serialisation support, and thread isolation out of the box.

Combined with function tools, you can create agents that remember context and take actions based on that context.

The personal trainer example shows how this works in practice.

The agent collects client details within a conversation, that information is used to guide the conversation, and can calculate weight loss timelines using function tools.

In the next blog post, we’ll see how you can use middleware to intercept events within the agentic lifecycle.

~

Enjoy what you’ve read, have questions about this content, or would like to see another topic? Drop me a note below.

You can schedule a call using my Calendly link to discuss consulting and development services.

~

JOIN MY EXCLUSIVE EMAIL LIST
Get the latest content and code from the blog posts!
I respect your privacy. No spam. Ever.
Read the whole story
alvinashcraft
26 minutes ago
reply
Pennsylvania, USA
Share this story
Delete

Programming the Oxocard Connect with Arduino

1 Share
Programming the Oxocard Connect with Arduino

NanoPy is the standard IDE for Oxocard projects. However, thanks to the ESP32 microcontroller at the heart of the Oxocard, programming with C++ via the Arduino IDE is also a viable development option. Here's how to get started...

The post Programming the Oxocard Connect with Arduino appeared first on Make: DIY Projects and Ideas for Makers.

Read the whole story
alvinashcraft
26 minutes ago
reply
Pennsylvania, USA
Share this story
Delete
Next Page of Stories