Sr. Content Developer at Microsoft, working remotely in PA, TechBash conference organizer, former Microsoft MVP, Husband, Dad and Geek.
139133 stories
·
31 followers

Python’s Open Source DNA Powers Anaconda’s New AI Platform

1 Share

Peter Wang can see the parallels between the adoption of open source software by enterprises years ago and what many of these organizations are doing today as they embrace AI. As they did with Windows and other vendor-driven software at the time, companies today want to control their own destiny when it comes to AI and are again turning to open source.

“That’s very much the same thing we saw with open source software, where people said, ‘This is great. I can hack on stuff, but I need to know what the bits are, and I’m enterprise-consuming open source,’” Wang, co-founder and chief AI and innovation officer at Python and R distribution vendor Anaconda, told The New Stack. “There are all sorts of companies and vendors and products they use to manage that. They want the innovation that comes from the open source ecosystem, but they have to do it on their own terms.”

Peter Wang

The Austin, Texas-based company wants to help them do that with the Anaconda AI Platform, a new offering designed to give enterprises all the tools and capabilities they need to build, deploy and secure production-level AI systems in an open source environment.


“It basically builds on the learnings that we’ve had from decades in the open source world at bridging the open source and enterprise needs,” Wang said. “It provides a secure distribution. It’s a trusted platform where people can go and get the models they want. They can have a private model repository where the IT organization or the enterprise itself gets to govern and say these are the models that you can go and use. It’s actually very much what we did for Python. We’ve made it easier to use, we made it consistent, we made it enterprise-ready and we made it secure.”

Open Source AI is on an Upward Trend

The innovation around AI continues at a rapid pace, with a little more than two years separating the introduction of OpenAI’s ChatGPT chatbot, which brought generative AI (GenAI) to the mainstream, and the age of agentic AI and reasoning AI, which brings even more automation and autonomy to the technology.

Anaconda’s platform is designed to give enterprises the tools to adopt these innovations while protecting the proprietary data that these AI models increasingly rely upon. It also comes at a time when companies are turning an eye to open source.

According to a report by global consultancy McKinsey and Co. released last month, more than half of the 700-plus tech leaders and senior developers surveyed said their companies are using open source AI tools — alongside proprietary technologies from such companies as OpenAI, Google and Anthropic — and that organizations that put a high priority on AI are more than 40% more likely to use open source AI models and tools.

In particular, “developers … increasingly view experience with open source AI as an important part of their overall job satisfaction,” the report’s authors wrote. “While open source solutions come with concerns about security and time to value, more than three-quarters of survey respondents expect to increase their use of open source AI in the years ahead.”

Bringing AI In-House

Wang said the Anaconda AI Platform was made for those people. Companies, whether highly established or startups, increasingly are looking at AI in self-hosted or on-premises environments. That comes with a range of challenges. Not only do they need the technology to be easy to use, but it needs to be secure. The AI models that businesses are building rely on proprietary data. Security is critical.

It’s a key difference between the adoption years ago of open source software and, now, open source AI, a still hazily defined but increasingly popular concept.

“The one thing that really jams the enterprise brain around this is that enterprises, even with open source software, generally didn’t consume open source data sets,” Wang said.

AI models are a fusion of data and code, he said, and because of this, they are attractive targets for threat groups running complex, long-term, multistage attacks, often leveraging AI themselves. Security is key, and features within the Anaconda AI Platform — including Unified CLI Authentication and Enterprise Single Sign-On — are designed to address security concerns.

Other features in the platform include the Quick Start Environment, which delivers preconfigured and security-vetted areas aimed at Python, finance and AI and machine learning (ML) development, while error tracking and logging capabilities bring real-time monitoring of workflows, enabling developers to more quickly detect and resolve issues. There are also governance features to ensure compliance with such regulations as the EU’s General Data Protection Regulation (GDPR) and the Health Insurance Portability and Accountability Act (HIPAA) in the United States.

Anaconda Dashboard.

Serving the Underserved

Through the AI platform, Anaconda is looking to do for AI developers what it did for those adopting Python for the first time, Wang said. It wasn’t only about using cool software but understanding that there was a demographic of users — like domain pros and experts with numerical computing — that were underserved and adopting the programming language in a grassroots way.

It took years for IT teams to see this as more than just shadow IT and to understand that a point-and-click business intelligence tool did nothing for those who needed to run quantitative analysis jobs, he said.

“There is still a sort of conceit or arrogance of IT saying, ‘We’re the technology organization,’” he said. “’We have the MLOps and the DevOps and sysadmins. We have the software developers, we have the DBAs, and all of you in the lines of business, leave this to the adults.’”

Python gave those underserved groups the ability to run their own high-end data analytics and ML jobs, empowering end user programming and lines of business. The programming language will do the same for AI. Programmers can just tell large-language models (LLMs) to look at business data in a particular database, write a query to pull the data out and then write Python code to transform the data. But it can also write the wrong code or pull the wrong data.

The Need for Security

That’s where the danger lies, particularly given the large number of end users of the technology. Because it’s so new and innovation is happening so quickly, many times these people can create new technologies and deploy software but have no idea what they’re doing, Wang said.

“So not only is the thing they’re playing with more dangerous, but the sheer number of people that are going to be doing this is way more,” he said. “That’s why with our AI platform, we’re hoping to take the learnings we had from onboarding a set of non-developer programmers in the data science and machine learning world and say, ‘All these other non-developer vibe coders — that’s literally everyone in the business — how do we help some of the adults in the room actually manage their experience, give them working agents with well-defined sandboxes and dev containers and these other kinds of things, a valid set of libraries that the LLM agent is allowed to use?’”

Anaconda ToolBox in Notebooks.

Python’s Not Going Anywhere

Wang also pushed back at the notion that Java is on its way to dethroning Python as the programming language of choice for AI. Simon Ritter, deputy CTO at Java platform developer Azul Systems, told The New Stack earlier this year that Java could cut into Python’s lead within the next 18 months to three years, based on a survey of Java developers.

He noted that increasingly, code is going to be written more by machines than by people. Already, AI companies are touting that. Anthropic lead engineer Boris Cherny said that 80% of the code the company uses is written by its Claude AI model. Microsoft CEO Satya Nadella said that 20–30% of code in the company’s repositories was written by AI.

However, people will still need to look at AI-written code, deploy it and tweak it themselves, Wang said. Given that, it’s going to be more important for languages to be easy to read by as many people as possible than to have particular characteristics for writing and executing them.

“Python is easy to write, easy to learn,” he said. “That’s a great differentiating feature. … It’s pretty concise, even though people make fun of it sometimes as a teaching language: ‘It’s slow, it’s a scripting language, not a real systems language.’ The thing is, if you want to express some numerical ideas, if you want to express data transformations, Python is pretty darn concise compared to doing a bunch of for loops over strings in C++ or Java.”

That will make it a key programming language for AI.

“The conciseness of Python, the adaptability of it, the readability, all of these things I think factor into what will make it the most widely read language, if not the most widely written,” he said. “It’ll also be very widely written, but I think it’ll certainly be the most widely read.”

The post Python’s Open Source DNA Powers Anaconda’s New AI Platform appeared first on The New Stack.

Read the whole story
alvinashcraft
3 hours ago
reply
Pennsylvania, USA
Share this story
Delete

TRAINING: Copilot Chat & Microsoft 365 Copilot Training for End Users & IT Pros

1 Share

The following are resources for customers needing training for the use of Copilot Chat & Microsoft 365 Copilot – for both END USERS & IT PROFESSIONALS.

—————-

BONUS: Learning Pathways for Microsoft 365 Copilot
(A 3-page .PDF that provides guidance around available training aspiring Copilot learners)


Read the whole story
alvinashcraft
3 hours ago
reply
Pennsylvania, USA
Share this story
Delete

PowerShell Copy-Item: Copy Files and Folders

1 Share

This guide will explore how to copy files and directories using the PowerShell Copy-Item cmdlet, cover advanced options (like recursion, filtering, and overwrite rules), and discuss performance considerations. Whether you’re a sysadmin or a developer, learn how to streamline your file operations with practical examples and best practices.

What is the PowerShell Copy-Item cmdlet?

The Copy-Item cmdlet, built into Microsoft Windows, is the command you use to copy files on your local computer using PowerShell. There is no need to install or import any other module—it comes with all versions of Windows.

There are nearly countless switches, parameters, and piping possibilities that you can use to achieve some serious coding tricks and powerful scripts. Being able to copy hundreds or thousands of files and only copy files with a ‘7’ in the filename with ease is a great time saver.

Besides using Copy-Item to copy files, you can also copy Registry entries and environment variables. This post will focus on copying files. Let’s first go through the basic syntax with Copy-Item.

Copy-Item command syntax

The most basic syntax includes a source path and a destination path.

Copy-Item -Path <source> -Destination <destination> [<parameters>]

Let’s use this to copy a file from one location to another.

  • I’ll right-click on the Start button and click on ‘Terminal (Admin)’.

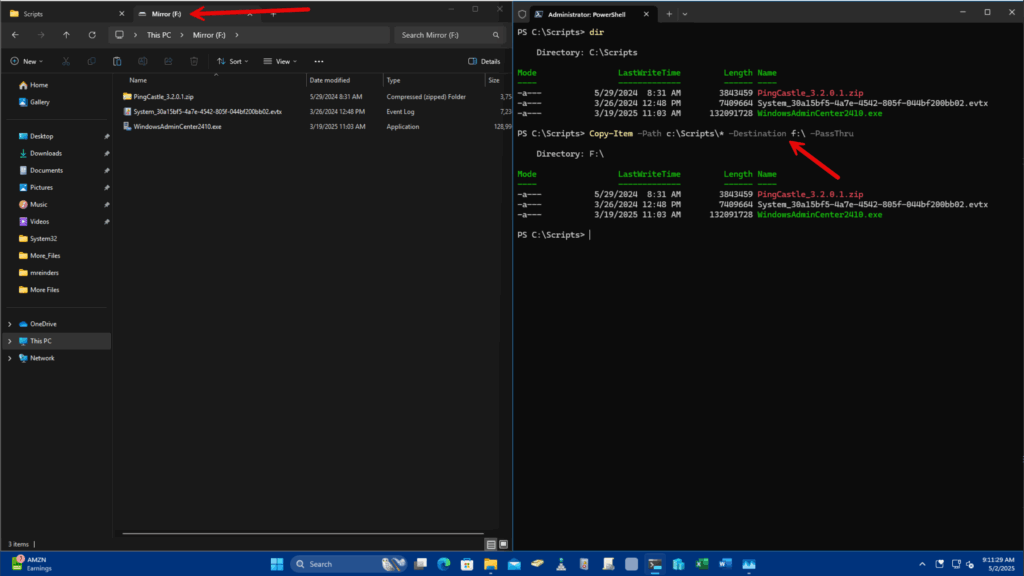
I have a c:\Scripts folder with a few files and an empty F: drive. Let’s copy the Scripts folder and its contents to the F: drive.

Copy-Item -Path C:\Scripts\* -Destination F:\ -Passthru
Using PowerShell Copy-Item to perform a simple copy task
Using PowerShell Copy-Item to perform a simple copy task – Image Credit: Michael Reinders/Petri.com

I used the -Passthru parameter to tell PS to show me the output of copied files. If you don’t use that parameter, there will be NO output, unless there’s an error.

Let’s go into more examples and other parameters in the next section.

Copying files with Copy-Item

There are hundreds of ways to use PowerShell Copy-Item to copy, rename, or even delete files from a source to a destination. Let’s continue learning about more of the common parameters.

Common use cases and examples

By default, PowerShell overwrites files in the destination, again, with no clarification or output. If you attempt to copy a file to a read-only destination file, you will receive an ‘access denied’ of sorts error.

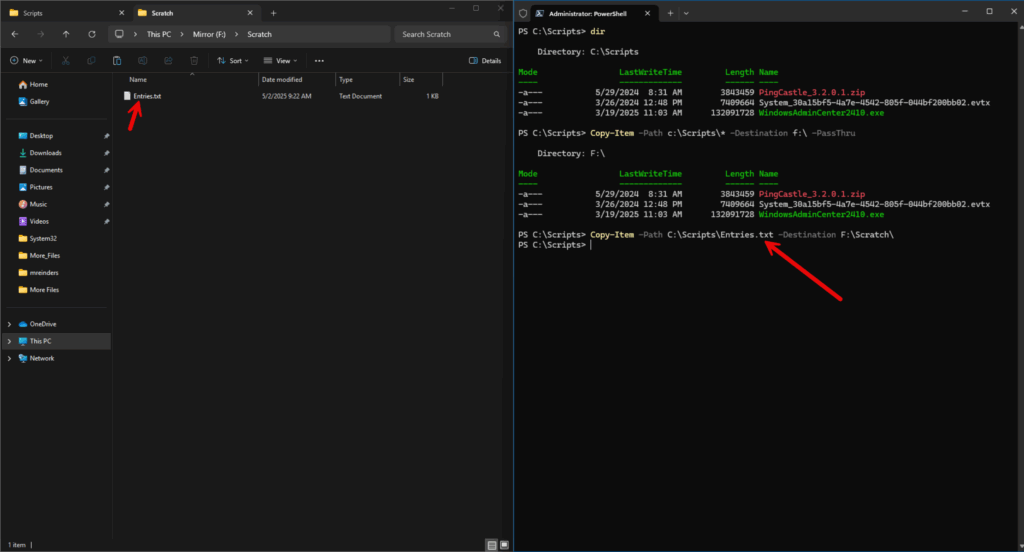
We can copy a single file to a specific destination folder this way.

Copy-Item -Path c:\Scripts\Entries.txt -Destination f:\Scratch
Copying a single file with PowerShell Copy-Item
Copying a single file with Copy-Item – Image Credit: Michael Reinders/Petri.com

As you can see, the file has been copied to the F: drive in the Scratch folder.

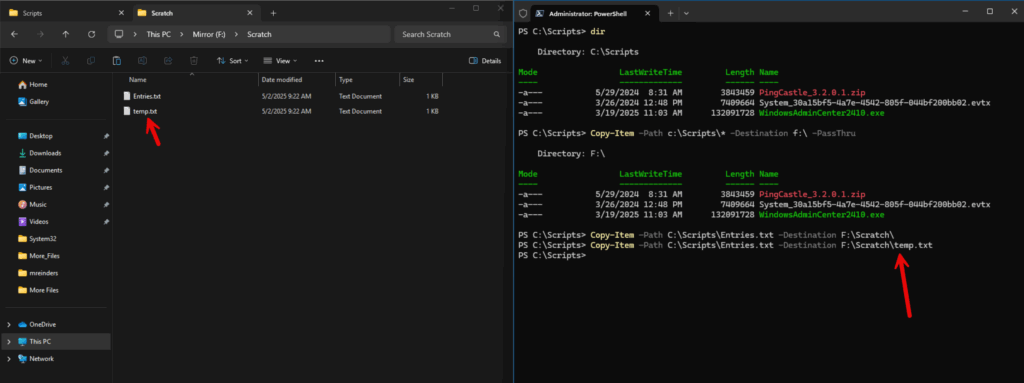
Let’s copy a file again, but rename the file in the destination – in one command. Do it like this.

Copy-Item -Path C:\Scripts\Entries.txt -Destination f:\Scratch\temp.txt
Copying a file and renaming it in the destination
Copying a file and renaming it in the destination – Image Credit: Michael Reinders/Petri.com

There’s essentially another copy of the file. Very handy for a developer that needs plenty of scratch space, as it were, for files in varying formats or versions over time.

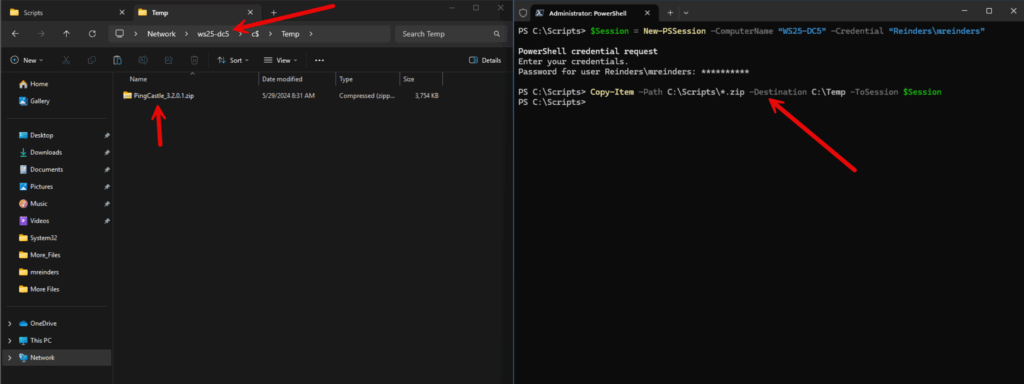
Let’s copy a file to a remote machine or a remote computer. We can achieve this by starting a remote PS session to one of my domain controllers (don’t do this at home). You’ll need appropriate permissions on the remote computer.

$Session = New-PSSession -ComputerName “WS25-DC5” -Credential “Reinders\mreinders”

Copy-Item -Path C:\Scripts\*.zip -Destination C:\Temp -ToSession $Session
Copying files to a remote computer
Copying files to a remote computer – Image Credit: Michael Reinders/Petri.com

This is cool. After entering the password for the specified account, the file is copied.

In case it wasn’t clear, you can also supply a list of filenames separated by commas. PowerShell will copy each file in sequence.

Copy-Item -Path e1.log,e2.log,e5.log,e9.log -Destination C:\ScratchArea

How to copy folders with PowerShell

Now, let’s move on to handling folders and their contents from source to destination. Just a small change in the syntax allows us to copy folders, even creating them in the destination if they don’t exist.

Examples and syntax

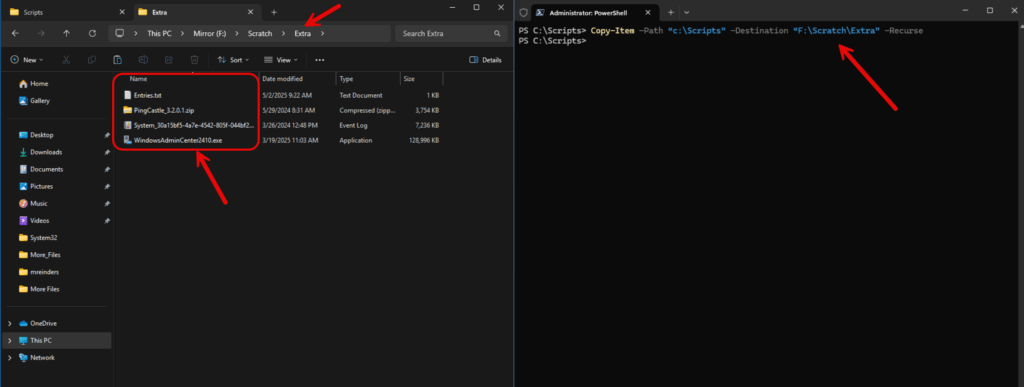
Let’s grab the same Scripts folder and its contents from the C: drive and copy them to the F: drive under the Scratch folder. It should copy the Scratch folder, its files, and all its subfolders. We’ll use the recurse parameter to tell PowerShell to get all subfolders and files under the root ‘Scripts’ folder.

Copy-Item -Path “c:\Scripts” -Destination “F:\Scratch\Extra” -Recurse
Here, we copy files and all contents to the destination, creating the new folder
Here, we copy files and all contents to the destination, creating the new folder – Image Credit: Michael Reinders/Petri.com

And there you go. PowerShell created the ‘Extra’ folder in the ‘Scratch’ folder and copied the same 4 files.

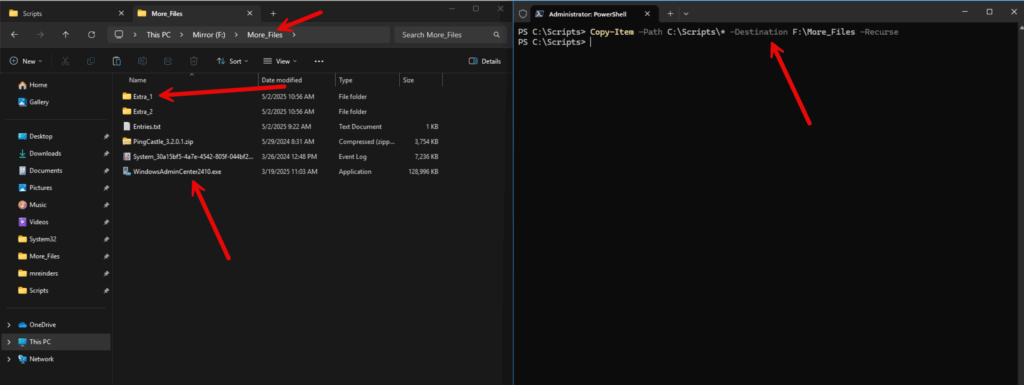
Let’s include one more example where we will copy a folder, its contents, and all recursive subdirectories to the destination.

Copy-Item -Path C:\Scripts\* -Destination F:\More_Files -Recurse
Copying files with subfolders to destination
Copying files with subfolders to destination – Image Credit: Michael Reinders/Petri.com

All the files have been copied, the extra folders were copied, and their contents.

Utilizing the PowerShell progress indicators

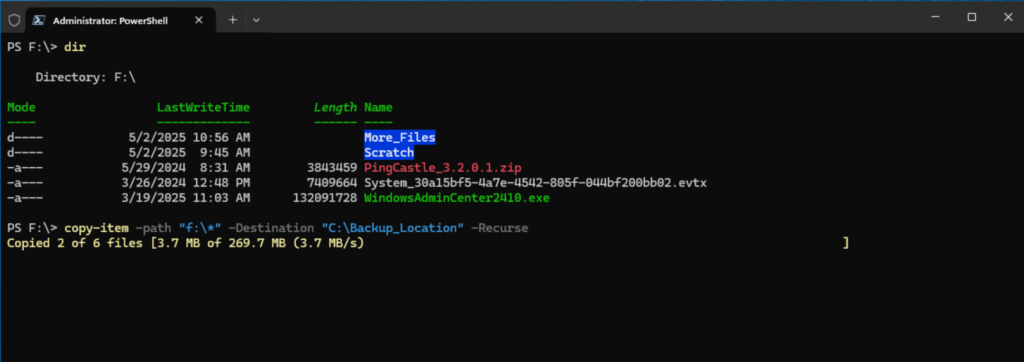
Included in Powershell version 7.4 and newer, progress indicators help to give you a real-time status of how long the copy procedure should take so you can track progress. Let me show you an example while I copy a larger group of folders to a second location.

Copy-Item -Path "F:\*" -Destination "C:\Backup_Location" -Recurse
Progress Indicators show real-time progress of file copy operations in PowerShell v7.4 and above
Progress Indicators show real-time progress of file copy operations in PowerShell v7.4 and above – Image Credit: Michael Reinders/Petri.com

The -ProgressAction parameter lets you disable progress tracking if you want the copy operation to be performed at maximum speed:

Copy-Item -Path "F:\*" -Destination "C:\Backup_Location" -Recurse -ProgressAction SilentlyContinue

Advanced techniques

There are more examples of using PowerShell Copy-Item to make traditionally complex or tedious tasks nice and simple. Let’s explore some of these methods.

Filtering files

Although my example here will be relatively basic, the filtering feature is rather powerful. You could have thousands of very similarly named log files, for example, in a folder. If you only want to copy the files with a specific string, you can use this command thusly.

Copy-Item -Path c:\Logfiles -Filter *ren* -Destination c:\ScratchArea

This will only copy the files that have ‘ren’ somewhere in the filename. Perhaps you need to grep or do a check for specific files when troubleshooting.

You can also use an -Exclude switch to get precise. Say you want to copy all the files that start with the letter ‘e’, but you want to exclude any files that have the number sequence ‘01’. Simple – use something like this.

Copy-Item -Path C:\LogFiles\* -Filter e*.log -Exclude 01.log -Destination C:\ScratchArea

This can assist greatly when honing in on only what you need to troubleshoot an issue or verify that the correct files are all in a single folder for testing or validation.

Using wildcards with Copy-Item

You’ve likely noticed my use of wildcards already in this post. This allows you to copy files with a specific pattern without listing every file in an array separated by commas. You can use the -‘Filter *.txt’ string to include only files that end in .TXT. You can use -Filter 5*.log to only copy files that start with the number ‘5’ and have a .LOG extension.

Here’s another example.

Copy-Item -Path “C:\Reports\Log*” -Destination “C:\Log_Examination”

This will copy all files in the Reports folder that have a filename starting with ‘Log…’.

You could also copy all the files in a folder, but exclude all the .TXT files this way.

Copy-Item -Path “C:\LogFiles\*” -Destination “C:\ScratchArea” -Exclude “*.txt”

Example PowerShell script

Next, I’ll give you an example of a PowerShell script that can check network connectivity before attempting to copy files.

<#

.SYNOPSIS

Copies files to a remote computer with connectivity checks and hash verification.

.DESCRIPTION

This script copies files/directories to a remote computer after verifying network connectivity.

It performs hash checks to ensure file integrity and includes error handling for failed operations.

#>

# Prompt for source and destination paths

$sourcePath = Read-Host "Enter the source path (file or directory)"

$destinationPath = Read-Host "Enter the destination UNC path (e.g., \\RemotePC\C$\Folder)"

# Validate source path

if (-not (Test-Path $sourcePath)) {

    Write-Error "Source path does not exist or is inaccessible"

    exit 1

}

# Validate destination format

if (-not $destinationPath.StartsWith("\\")) {

    Write-Error "Destination must be a UNC path (starting with \\)"

    exit 1

}

# Extract remote computer name from UNC path

$remoteComputer = ($destinationPath -split '\\')[2]

if (-not $remoteComputer) {

    Write-Error "Invalid UNC path format"

    exit 1

}

# Check network connectivity

Write-Host "`nTesting connectivity to $remoteComputer..."

if (-not (Test-Connection -ComputerName $remoteComputer -Count 2 -Quiet)) {

    Write-Error "Remote computer $remoteComputer is not reachable"

    exit 1

}

# Copy operation

try {

    $sourceItem = Get-Item $sourcePath

    Write-Host "`nStarting copy operation..."

    if ($sourceItem -is [System.IO.DirectoryInfo]) {

        # Create destination directory if it doesn't exist

        if (-not (Test-Path $destinationPath)) {

            New-Item -Path $destinationPath -ItemType Directory -Force | Out-Null

        }        

        # Copy directory contents

        Copy-Item -Path "$sourcePath\*" -Destination $destinationPath -Recurse -Force -ErrorAction Stop

    }

    else {

        # Copy single file

        Copy-Item -Path $sourcePath -Destination $destinationPath -Force -ErrorAction Stop

    }    

    Write-Host "Copy completed successfully`n"

}

catch {

    Write-Error "Copy failed: $_"

    exit 1

}

# Hash verification

Write-Host "Starting hash verification..."

$allHashesMatch = $true

$totalFiles = 0

$verifiedFiles = 0

try {

    if ($sourceItem -is [System.IO.DirectoryInfo]) {

        $sourceFiles = Get-ChildItem -Path $sourcePath -Recurse -File

    }

    else {

        $sourceFiles = @($sourceItem)

    }

    $totalFiles = $sourceFiles.Count

    foreach ($file in $sourceFiles) {

        # Calculate relative path

        $sourceRoot = $sourceItem.FullName.TrimEnd('\')

        $relativePath = $file.FullName.Substring($sourceRoot.Length + 1)

        $destFile = Join-Path -Path $destinationPath -ChildPath $relativePath

        # Verify destination file exists

        if (-not (Test-Path $destFile)) {

            Write-Error "Destination file missing: $destFile"

            $allHashesMatch = $false

            continue

        }

        # Calculate hashes

        try {

            $sourceHash = Get-FileHash -Path $file.FullName -Algorithm SHA256 -ErrorAction Stop

            $destHash = Get-FileHash -Path $destFile -Algorithm SHA256 -ErrorAction Stop

        }

        catch {

            Write-Error "Hash calculation failed for $($file.Name): $_"

            $allHashesMatch = $false

            continue

        }

        # Compare hashes

        if ($sourceHash.Hash -ne $destHash.Hash) {

            Write-Error "Hash mismatch: $($file.Name)"

            $allHashesMatch = $false

        }

        else {

            $verifiedFiles++

            Write-Host "Verified: $($file.FullName)"

        }

    }

}

catch {

    Write-Error "Verification failed: $_"

    exit 1

}

# Final results

Write-Host "`nVerification complete:"

Write-Host "Total files checked: $totalFiles"

Write-Host "Successfully verified: $verifiedFiles"

if ($allHashesMatch) {

    Write-Host "`nSUCCESS: All files copied and verified successfully" -ForegroundColor Green

}

else {

    Write-Error "`nWARNING: Some files failed verification. See above for details."

    exit 1

}
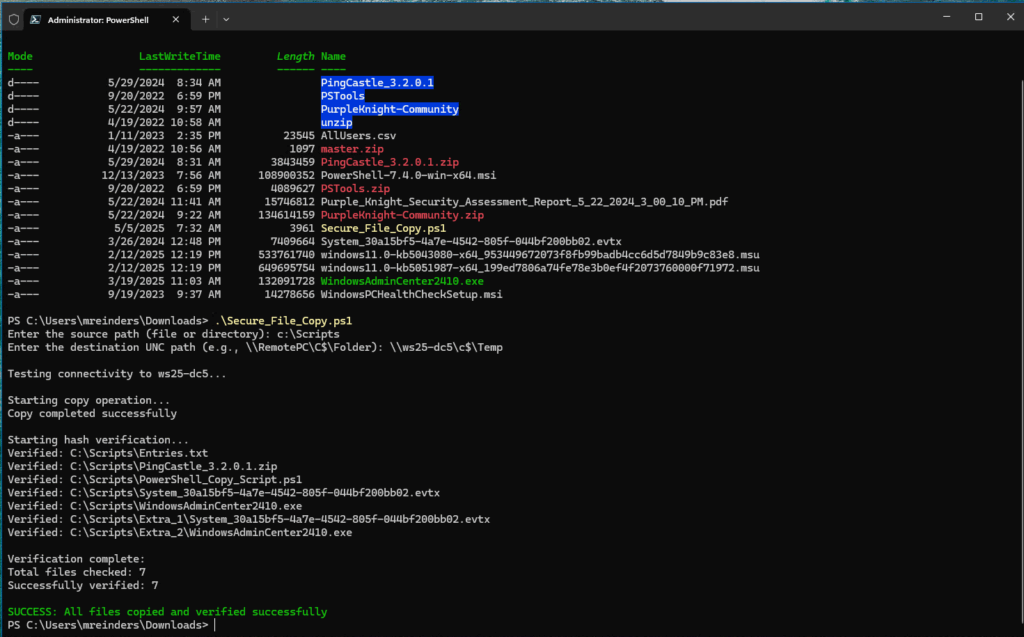
The output from running the PowerShell script checking the network before copying files
The output from running the PowerShell script checking the network before copying files – Image Credit: Michael Reinders/Petri.com

As you can see in the output, the script first checked network connectivity to the remote machine (WS25-DC5), then copied the files, and finally ran hash calculations to confirm the validity of the files in the destination folder. The script also contains a good deal of error handling and syntax checks to confirm if the user is intending to copy a single file, or many.

Plus, the script will create the folder in the destination if it’s not already there. Robust scripts like this mean you can be assured your scripts will handle more of your complex needs.

Best practices with PowerShell Copy-Item

Let me list some of the common parameters you can use with Copy-Item.

  1. -Path: Specifies the source file or folder to copy.
  2. -Destination: Defines the target location where the item will be copied.
  3. -Recurse: Copies all subdirectories and their contents.
  4. -Force: Overwrites existing files or folders without confirmation.
  5. -Filter: Limits the items copied by a specific condition (e.g., "*.txt" to copy only text files).
  6. -Include: Specifies certain file types or names to include in the copy (e.g., *.log, *.csv).
  7. -Exclude: Defines items to exclude from the copy operation (e.g., "*.tmp" to skip temporary files).
  8. -Container: Determines whether to copy the folder itself or just its contents ($true keeps the container, $false copies only contents).
  9. -PassThru: Returns details about copied items, useful for further processing.
  10. -Confirm: Prompts for confirmation before executing the command.
  11. -WhatIf: Simulates the command without actually performing the action.
  12. -ErrorAction: Defines how errors are handled (e.g., Stop, Continue, SilentlyContinue).
  13. -Verbose: Displays detailed output of the copy operation.

The -WhatIf parameter is rather helpful. Let’s try an example.

Copy-Item -Path “C:\Scripts” -Destination “F:\More_Files” -WhatIf
Seeing what would happen if running a command using -WhatIf
Seeing what would happen if running a command using -WhatIf – Image Credit: Michael Reinders/Petri.com

This will give you final confirmation on what action the command ‘would’ perform if you omitted the parameter. A sanity check, per se.

You can also use the ‘-Confirm’ parameter to prompt you before executing the command.

Copy-Item -Path “C:\Scripts” -Destination “F:\More_Files” -Confirm
Using the '-Confirm' parameter to prompt before performing operations
Using the ‘-Confirm’ parameter to prompt before performing operations – Image Credit: Michael Reinders/Petri.com

Now you’ll have a safety net when working through these commands and your syntax before overwriting thousands of files in the destination path!

Frequently asked questions

How do you copy a file without extension in PowerShell?

To copy a file without an extension in PowerShell, you can use the Copy-Item cmdlet with a wildcard filter or specify the exact file name if known:

Copy-Item "C:\source\file" -Destination "C:\destination\file"

If you’re targeting all files without extensions in a folder:

Get-ChildItem "C:\source" | Where-Object { -not $_.Extension } | ForEach-Object {
    Copy-Item $_.FullName -Destination "C:\destination\"
}

This command lists all files without an extension and copies them to the destination folder.

How to copy a file from local to remote server using PowerShell?

To copy a file from a local system to a remote server, you can use PowerShell Remoting (Invoke-Command and Copy-Item) or a file share path. Here’s an example using PowerShell Remoting:

Copy-Item -Path "C:\local\file.txt" -Destination "\\remoteserver\C$\target\path" -Credential (Get-Credential)

Alternatively, if remoting is enabled:

Invoke-Command -ComputerName remoteserver -ScriptBlock {
    Copy-Item -Path "C:\temp\file.txt" -Destination "D:\data"
} -Credential (Get-Credential)

Note: Ensure administrative privileges and remote access are correctly configured.

How do I copy all files in a folder and subfolders in PowerShell?

Use the -Recurse parameter with Copy-Item to copy all files and folders, including subfolders:

Copy-Item -Path "C:\source\*" -Destination "C:\destination" -Recurse

This will maintain the directory structure and copy everything within the source directory.

How do you copy the folder structure of a folder and paste it in a new folder?

To replicate the folder structure without copying the files, you can use Get-ChildItem and New-Item:

$source = "C:\source"
$destination = "C:\destination"

Get-ChildItem -Path $source -Recurse -Directory | ForEach-Object {
    $dest = $_.FullName.Replace($source, $destination)
    New-Item -ItemType Directory -Path $dest -Force
}

This copies the full directory tree, excluding the files.

How to copy multiple files from one folder to another using PowerShell?

You can use Copy-Item with wildcards or filter specific files:

Example 1: Copy all .txt files

Copy-Item "C:\source\*.txt" -Destination "C:\destination"

Example 2: Copy files listed in an array

$files = @("file1.txt", "file2.docx", "file3.jpg")
foreach ($file in $files) {
    Copy-Item "C:\source\$file" -Destination "C:\destination"
}

This is useful for selectively copying specific files.

The post PowerShell Copy-Item: Copy Files and Folders appeared first on Petri IT Knowledgebase.

Read the whole story
alvinashcraft
3 hours ago
reply
Pennsylvania, USA
Share this story
Delete

Advanced Installer 22.7

1 Share
Advanced Installer 22.7 was released on May 13th, 2025
Read the whole story
alvinashcraft
3 hours ago
reply
Pennsylvania, USA
Share this story
Delete

Stronger Together: MVPs Reviving Local Tech User Groups with Global Support

1 Share

As Microsoft MVPs, our recognition is not just a reflection of technical excellence — it also highlights our commitment to empowering the broader community. One of the most effective ways to extend this impact is by actively leading or participating in local technology user groups.

What Makes User Groups Special?

User groups are not just casual meetups or social gatherings. They are vibrant, collaborative communities where individuals with shared technical interests come together to exchange knowledge, support one another, and develop both professionally and personally. What sets them apart is the emphasis on two-way communication. Rather than being passive content consumers, members are encouraged to engage, ask questions, and share their own experiences and insights.

Rebuilding Connections After the Pandemic

The global pandemic dramatically shifted how we connect, learn, and collaborate. During that time, virtual meetings and online learning became the norm. While remote platforms helped maintain knowledge sharing, many people began to miss the depth of connection and spontaneity that comes with in-person interactions.

Now, as the world reopens, we are seeing a renewed appreciation for community gatherings. A 2023 survey by Eventbrite found that 80% of respondents believe attending in-person events is essential for personal growth and networking, and 67% said they feel more engaged and focused during physical meetups compared to virtual sessions. For technical communities in particular, the ability to whiteboard, brainstorm, and connect face-to-face offers a level of collaboration that can be difficult to replicate online.

User groups are the perfect venue to reignite these real-world connections, blending the flexibility of hybrid learning with the energy of physical gatherings. They provide a space for shared experiences — debugging code together, building prototypes, or simply learning side by side — that builds trust, engagement, and lasting professional relationships.

Why Should You Get Involved?

Participating in a user group is one of the best ways to stay current with Microsoft technologies. By engaging with peers in these communities, you can continuously learn new tools, frameworks, and best practices. Involvement also presents career development opportunities, whether through speaking engagements, networking, or collaborations that emerge from these relationships. For many, user groups become a supportive space to solve technical challenges, explore new ideas, and spark innovation. Most importantly, they allow you to give back — by helping others grow while growing yourself.

How Microsoft Is Supporting User Groups

To empower MVPs and other community leaders, Microsoft has

launched new initiatives that provide both content and logistical support. One exciting development is a global venue access pilot running from April 1 to June 15, 2025. During this time, MVPs can request access to Microsoft office venues around the world to host user group events tied to themes such as the Season of Agents and Season of AI. This initiative makes it easier than ever to host impactful in-person gatherings in professional settings. Details and the request form are available at https://aka.ms/MVPVenuePilot.

In addition to venue support, Microsoft offers a range of ready-to-use educational content to help you bring value to your user group. This includes curated learning paths from the Season of AI, toolkits from the Global AI Bootcamp, and resources for organizing hands-on workshops, guest speaker sessions, and hackathons. These materials are designed to make it easy for you to deliver high-quality content without starting from scratch. You can find more information through the MVP Program Hub at https://aka.ms/MicrosoftVenues.

Join These Global User Group Networks

If you are starting or already running a user group, you can amplify your impact by joining one of Microsoft’s supported community networks:

Azure Tech Groups is a Meetup

Pro network that connects Azure-focused user groups around the world. By joining, your group gains visibility, access to global promotional support, and resources for organizing in-person or hybrid events. It also helps you plug into a global community of Azure enthusiasts and leaders.

Global AI Community is a worldwide initiative focused on bringing AI enthusiasts, developers, and experts together through local events, workshops, and hackathons. Through programs like the Global AI Bootcamp and Season of AI, your group can access content, speakers, and support to run impactful sessions around Microsoft AI technologies.

These programs are ideal platforms for MVPs to connect their local communities with global movements, while taking advantage of proven resources, logistics support, and curated content.

What Makes a Great User Group?

Successful user groups thrive on interaction, consistency, and inclusivity. They are not lecture halls or fan pages, but living communities where members actively share and learn together. A strong user group welcomes participants at all skill levels and ensures that a variety of voices and perspectives are represented. Effective leadership is essential — but leadership in this context means creating space for others to shine, not just being the most knowledgeable person in the room.

Your Next Step: Start or Join a Group

If you are already involved in a user group, consider taking the next step by mentoring others, organizing a session, or helping to plan events. If you’re not yet engaged, now is an ideal time to start a new group or bring fresh energy to an existing one. Microsoft’s support — from venues to content to global networks — makes it easier than ever to create meaningful, high-impact community experiences.

As MVPs, we have the opportunity to lead by example. By helping to grow local user groups, we strengthen the global Microsoft ecosystem — one connection, one conversation, and one community at a time.


Read the whole story
alvinashcraft
3 hours ago
reply
Pennsylvania, USA
Share this story
Delete

MSSQL Extension for VS Code: New UI Goes GA and GitHub Copilot Enters Preview

1 Share

The SQL development experience is taking a major leap forward with the MSSQL Extension for VS Code.

The MSSQL extension is evolving to meet the needs of modern developers, bringing powerful, intelligent, and intuitive capabilities directly into your daily workflow. With this release, we’re announcing the general availability of the enhanced UI and the public preview of GitHub Copilot integration. Together, these updates streamline how developers connect to databases, write queries, and manage schema objects—whether you’re working locally with SQL Server 2025 or in the cloud with Azure SQL or SQL Database in Fabric.

As part of our broader effort, this release continues to transform SQL development in VS Code. While the new Schema Designer debuts alongside these updates, we’ll cover it separately in an upcoming post.

A modern SQL development experience, now generally available

The enhanced UI in the MSSQL extension—first introduced in preview and made default in v1.30—is now officially generally available. Over the past several months, these experiences have been refined based on community feedback to deliver a faster, more intuitive way to work with SQL in Visual Studio Code.

What’s included in the GA release:

  • Connection Dialog: Quickly connect to local or cloud databases using parameters, connection strings, or Azure browsing. Easily access saved and recent connections.
  • Object Explorer: Navigate complex database hierarchies with advanced filtering by object type, name, and schema.
  • Table Designer: Visually build or update tables, define relationships and constraints, and publish schema changes with a T-SQL preview.
  • Query Results Pane: Export, sort, and inspect query results in-grid or in a new tab. Includes Estimated and Actual Execution Plan buttons for performance analysis.
  • Query Plan Visualizer: Explore query execution plans with zoom, metrics, and node-level insights to help you identify and resolve performance bottlenecks.

As of this release, these features no longer require preview settings or feature flags. In other words, if you’re already using the extension, the new UI is available immediately upon update.

GitHub Copilot is now integrated with the MSSQL extension (Preview)

In parallel with the UI GA release, GitHub Copilot integrates with the MSSQL extension for Visual Studio Code. This integration brings AI-assisted development into your SQL workflows. Available as a Public Preview, this integration helps developers write, understand, and optimize SQL code faster—whether you’re working with raw T-SQL or modern ORMs. Since it’s available as a Public Preview, you can start using it right away.

Importantly, we have designed this experience specifically with developers in mind—especially those who work code-first or may not have deep T-SQL expertise. GitHub Copilot adapts to your database schema and open files to offer contextual suggestions and explanations.

What you can do with GitHub Copilot:

  • Chat with mssql​: Ask natural language questions to generate queries, explain logic, scaffold tables, or debug stored procedures—all grounded in your connected database.
  • Inline Suggestions: Get real-time completions while writing SQL or ORM code, including Sequelize, Prisma, SQLAlchemy, and Entity Framework.
  • Schema Design and Exploration: Create, update, and reverse-engineer schemas using conversational or code-based prompts.
  • Query Optimization: Receive AI-driven suggestions to refactor slow queries, improve indexing, and analyze execution plans.
  • Understand Business Logic: Let GitHub Copilot explain stored procedures, views, and functions—ideal for onboarding or working with legacy code.
  • Security Analyzer: Identify vulnerable patterns like SQL injection and get safer alternatives in context.
  • Mock and Test Data Generation: Automatically generate sample data based on your schema for prototyping and testing.

GitHub Copilot actively uses your database connection and open files to deliver tailored assistance. To get the most out of it, connect to a database and work within SQL or ORM files.

For additional guidance, check out the official documentation or watch the demo video to see GitHub Copilot in action.

Get started with GitHub Copilot

It’s easy to try the enhanced UI and GitHub Copilot integration in the MSSQL extension—no setup scripts, no configuration needed. Follow these steps:

  1. Install or update the MSSQL extension for Visual Studio Code.
  2. Connect to any database, local or cloud (SQL Database in Fabric, Azure SQL, or SQL Server 2025 (Public Preview) or prior).
  3. If you have a GitHub Copilot subscription, sign in. That’s it—Copilot works automatically based on your connected database and active SQL or ORM files.
  4. To start chatting, right-click any database in the Object Explorer and select “Chat with this database.”

This opens a connected chat session with the Azure SQL Copilot agent, ready to assist with queries, schema design, optimization, and more.

Need guidance on how to get started with the MSSQL extension for VS Code? Check out the official documentation for detailed information and quickstarts on every feature, or catch our latest livestream on the VS Code YouTube channel.

Conclusion

This release marks a significant step forward in the SQL developer experience inside VS Code—bringing a modern, streamlined UI and AI-assisted capabilities together in a single tool built for developers.

As we continue evolving the extension, your feedback plays a critical role. If you try GitHub Copilot with the MSSQL extension, we’d love to hear from you:

This is just the beginning—we’re building a modern SQL development experience for real-world workflows, and your input helps drive what comes next.

Happy coding!

Read the whole story
alvinashcraft
3 hours ago
reply
Pennsylvania, USA
Share this story
Delete
Next Page of Stories